The Gauntlet:
Estimated Reading Time: Get Comfy.74 days. A Core team of 2: A Programmer (Penguin) and myself, and some very good friends. We have to go from idea to prototype to over 400 units of manufactured product plus software. And neither of us have ever touched making hardware beyond "blinky lights go brr." This is the biggest project I've ever accepted by a factor of 8x, on the tightest timeline. If we succeed, I get my first big break into the world of making games and installations ("Activations") for big clients, and the ability to make rent. If I fail: bankruptcy and the likely loss of my workshop.
The objective as presented to us by a client? A giant disco floor-looking system that has custom software, running a game like "The Floor is Lava." (Distinct from our other gigantic board game we made of the same name.) We need to make a game that can handle up to 20 players at once, and I need to be able to have access to the code that drives the floor, both so we can code a fun game in the first place, and so it's modular, permitting me to run basically any square-based board game I can design.
But let me back up a moment: I am Stevenson: a Professional Game Designer, Immersion Creator, and am the owner of SparkForge: a new-ishly-minted Activations company. (Also the Escape Room Puzzalarium, which is why you will see both names around.) I've basically been building immersive attractions for the last nine years, slowly but surely working toward making a theme park made of games. Since Covid, our escape room and immersive game facility's been closed, so in the meantime we've been running local boardgame conventions and weird gaming events.


I have years of experience making MegaGames, Escape Rooms, props, and other large games. My friend Penguin has years of experience making full-stack web frameworks, and picks up new tech quickly. We have access to my Spark Forge: a full prop workshop I use to make my crazy inventions, and I have the ability to work for 30 hours in a stretch without slowing down. You saw the pics at the start of the post, so clearly we pulled off something, but what exactly is it, and how?
Before we get into all of how this is going to unfold, allow me to give a few notes about this post:
Anything that is formatted like this has
mouseover text. Hover to get more commentary. You may not be able to see it on mobile.
This is not written as a fluff piece.
This is not written for SEO or marketing
purposes. marketing purposes.
I did not use AI to write any part of this.
There are no working analytics or ads
on this page.
This isn't a "how-to" guide, per-se.
You could use this as a guide if you wanted to, but if anything, I would encourage you to learn
my lessons and then build something completely different.
This is written as a rant to nobody in particular.
Because, dear reader. Somebody must know of my suffering.
And that somebody gets to be
you!
Lucky you.
Maybe you'll feel a little less alone next time you are in way over your head on
a project that you have no choice but to see yourself through, and perhaps you'll also be made
aware of some pitfalls I
discovered.
What, you still think I have an ulterior motive for making a post that took five months to write? How dare you insinuate that I would demand that I get anything in return for my work! I would never attempt to write organic content in a bid to get your attention, thus increasing my status and down the line fleecing you for pocket chan-
Okay, fine: I have a newsletter you can sign up to that I send emails to once every two-ish months in which I use clever writing and parasocial tactics to sell tickets to my board game conventions, weird MegaGame events, and other mad schemes and attempts at world domination. So you caught me. I hope you're happy, gumshoe. Enough of the pageantry though, let's get to the good stuff.
The Beginning
The deal is that if we manage to build this floor and install it/run it in Las Vegas for a week, we'll be able to keep it afterwards, as the client wants nothing to do with it after the event. I could rent this floor out to generate income for our interactive art stuff! The catch? Well, a few.
- We have to make something that can handle 20 players at once, and hundreds of players an hour.
- We have two people as part of a core team, one of which has a full-time real job doing web dev.
- We have 74 days to make this. We need almost double that at least.
- We don't know it yet, but I quoted too low a price. Way too low.
Due to annoying legal reasons, I am not permitted to talk about the client we had, nor specifics of the event this was for, but what I can discuss is how we made it and how making it shook out. In short: The client wanted a big game, and we said we'd make a miracle happen. So here goes!
After a month of contract back-and-forths, we finally agree on terms, and we now have 74 days to turn a 3D render into a finished project. Here we go:
We need something short and portable for mobile installations, it needs to be able to detect people stepping on it, and it needs to be modular so that if errors occur or tiles get damaged, we can swap them out. Even better, we should make an API that allows us to run most any game I can design on it! It'll be like a Framework, for Games! GameFrame. Hmm. I like that.
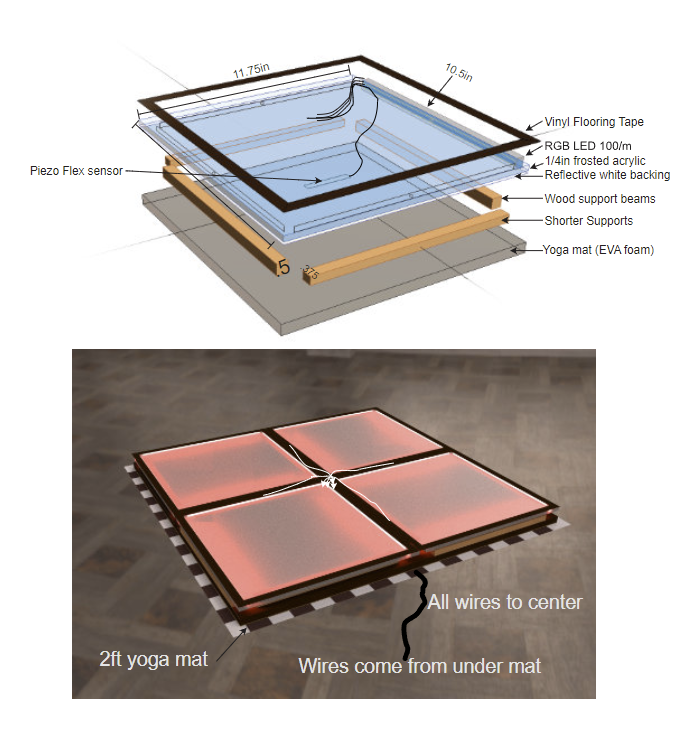
Seems sensible enough. The above design is version 1. The idea is that we use yoga mat tiles as a backing for the floor. If we use these foam mats, not only are they cheap and locally available, but they also lock together, meaning that alignment will be built in! Also, the bit of foam should help cushion the fall of any uncoordinated players.
Spoilers: Pretty much every aspect of this design is flawed. Exactly how and why is something I will discover by day 14. Before then though, we need to ask a different question:
Do I Really Need to Build this Thing?
I've learned a lot over a decade of building Escape Rooms, event games, props, etc. And that is that hobbyists will ask "How do I build this thing?" and professionals will first ask "Do I really have to build this thing?" Buying something off-the-shelf is very often cheaper and better than anything you can build, especially when you factor in the cost of your time. So what do I, a "professional" do?
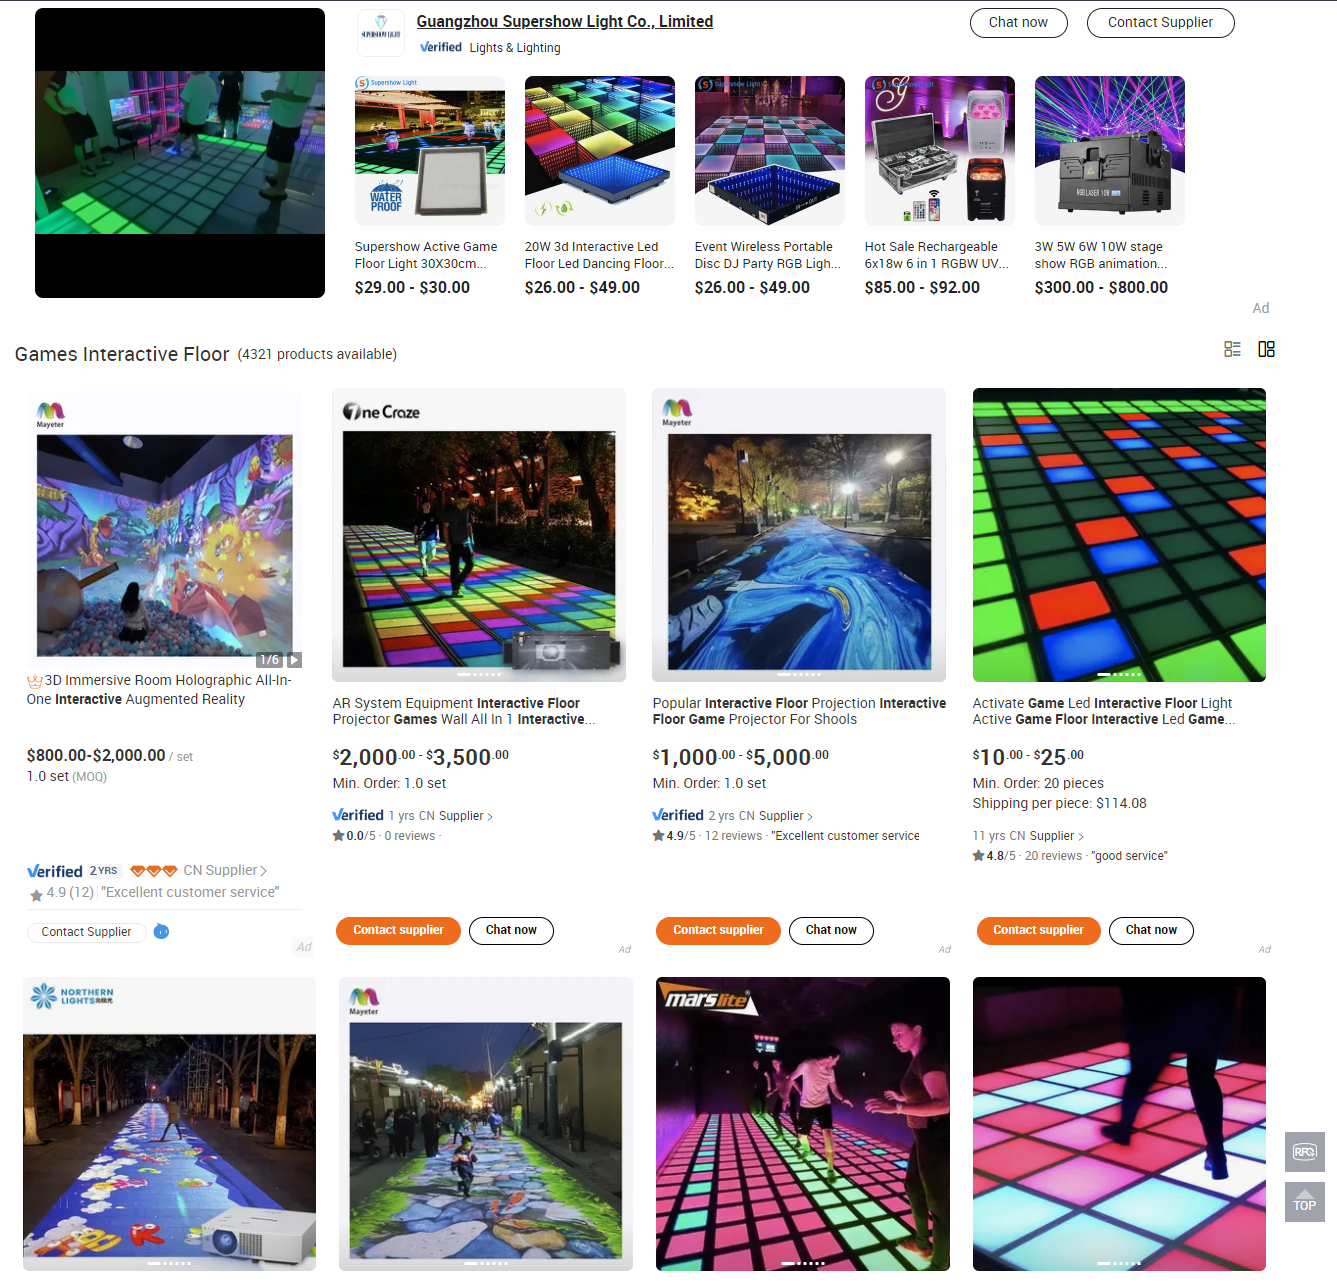
I forget this entirely and begin design of the V1.0 diagram without searching at all to see if I could just buy something like this. When I post my design to a very helpful Facebook group to try to get some feedback, smarter people than I ask why I didn't just search on AliBaba for "Interactive Game Floor." Doing so reveals a dozen suppliers that sell basically exactly what I want.
"I've learned a lot over a decade of building Escape Rooms"
I am not good at searching online.
Well, no matter. Reach out, buy some samples, and oof ouch owie! That's some expensive
shipping to get 4 tiles and the power supply
and controller here in a week. It hurts, but we have a deadline to meet dammit. Place the
order.
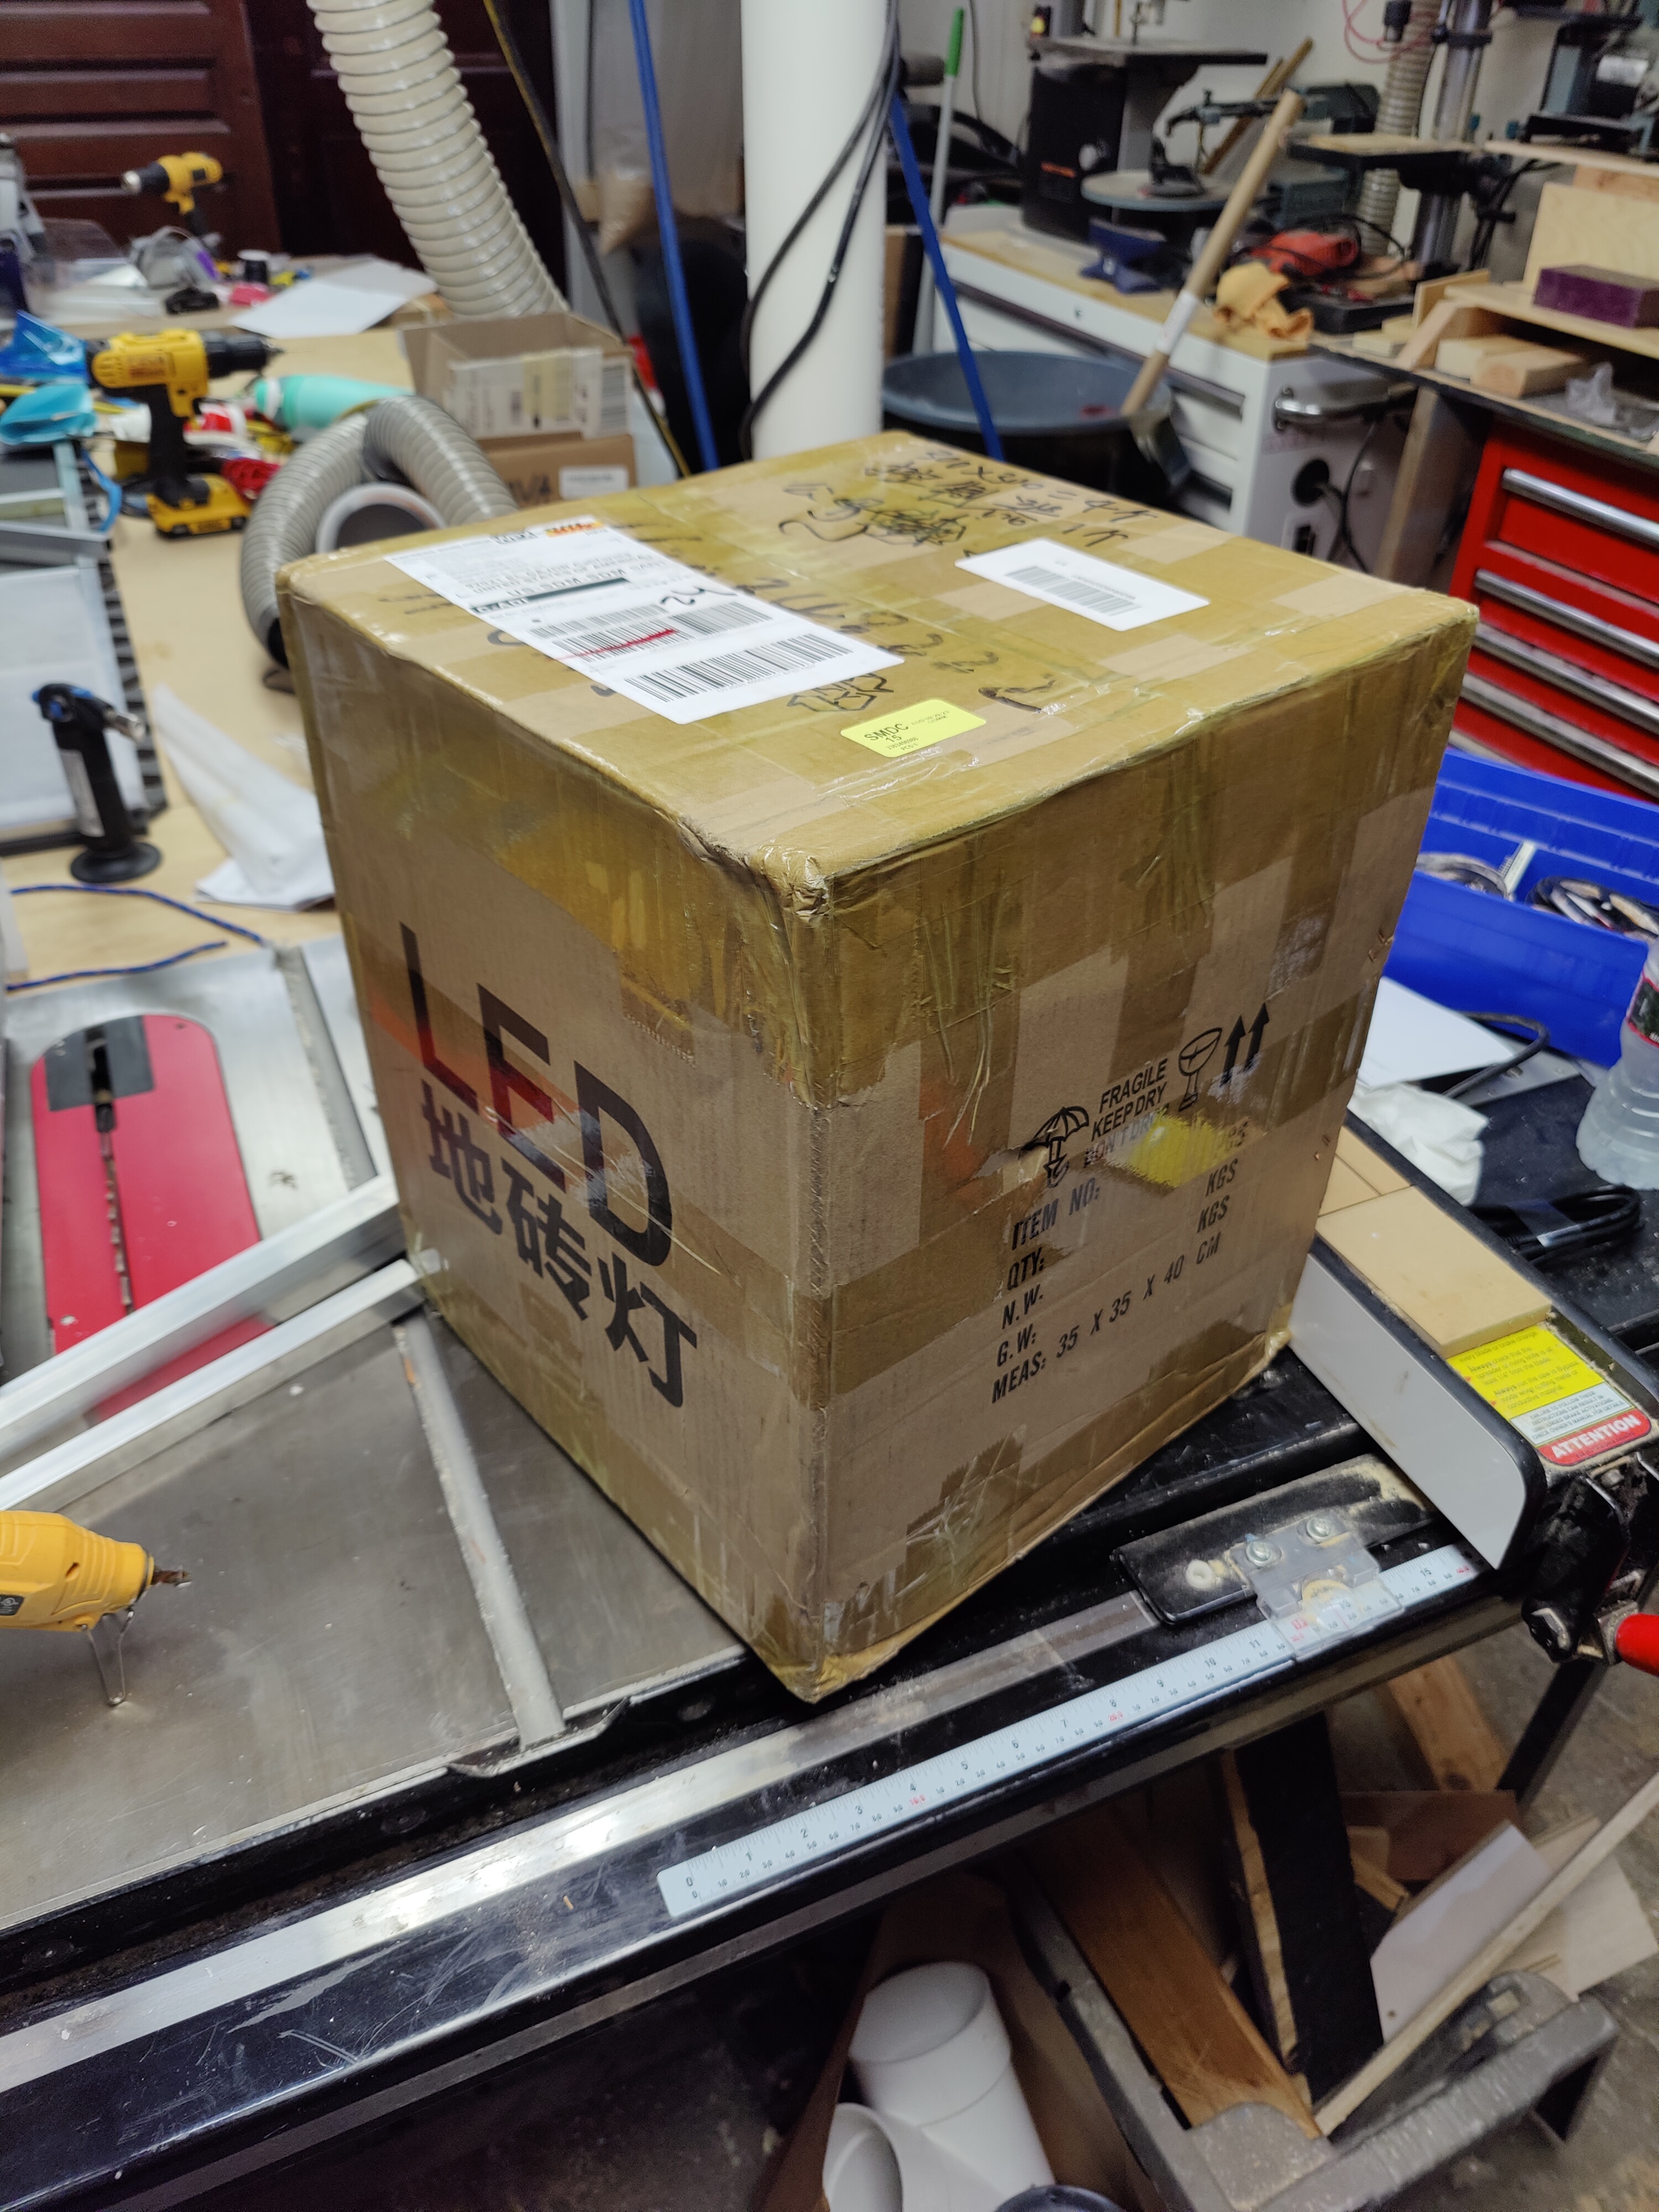
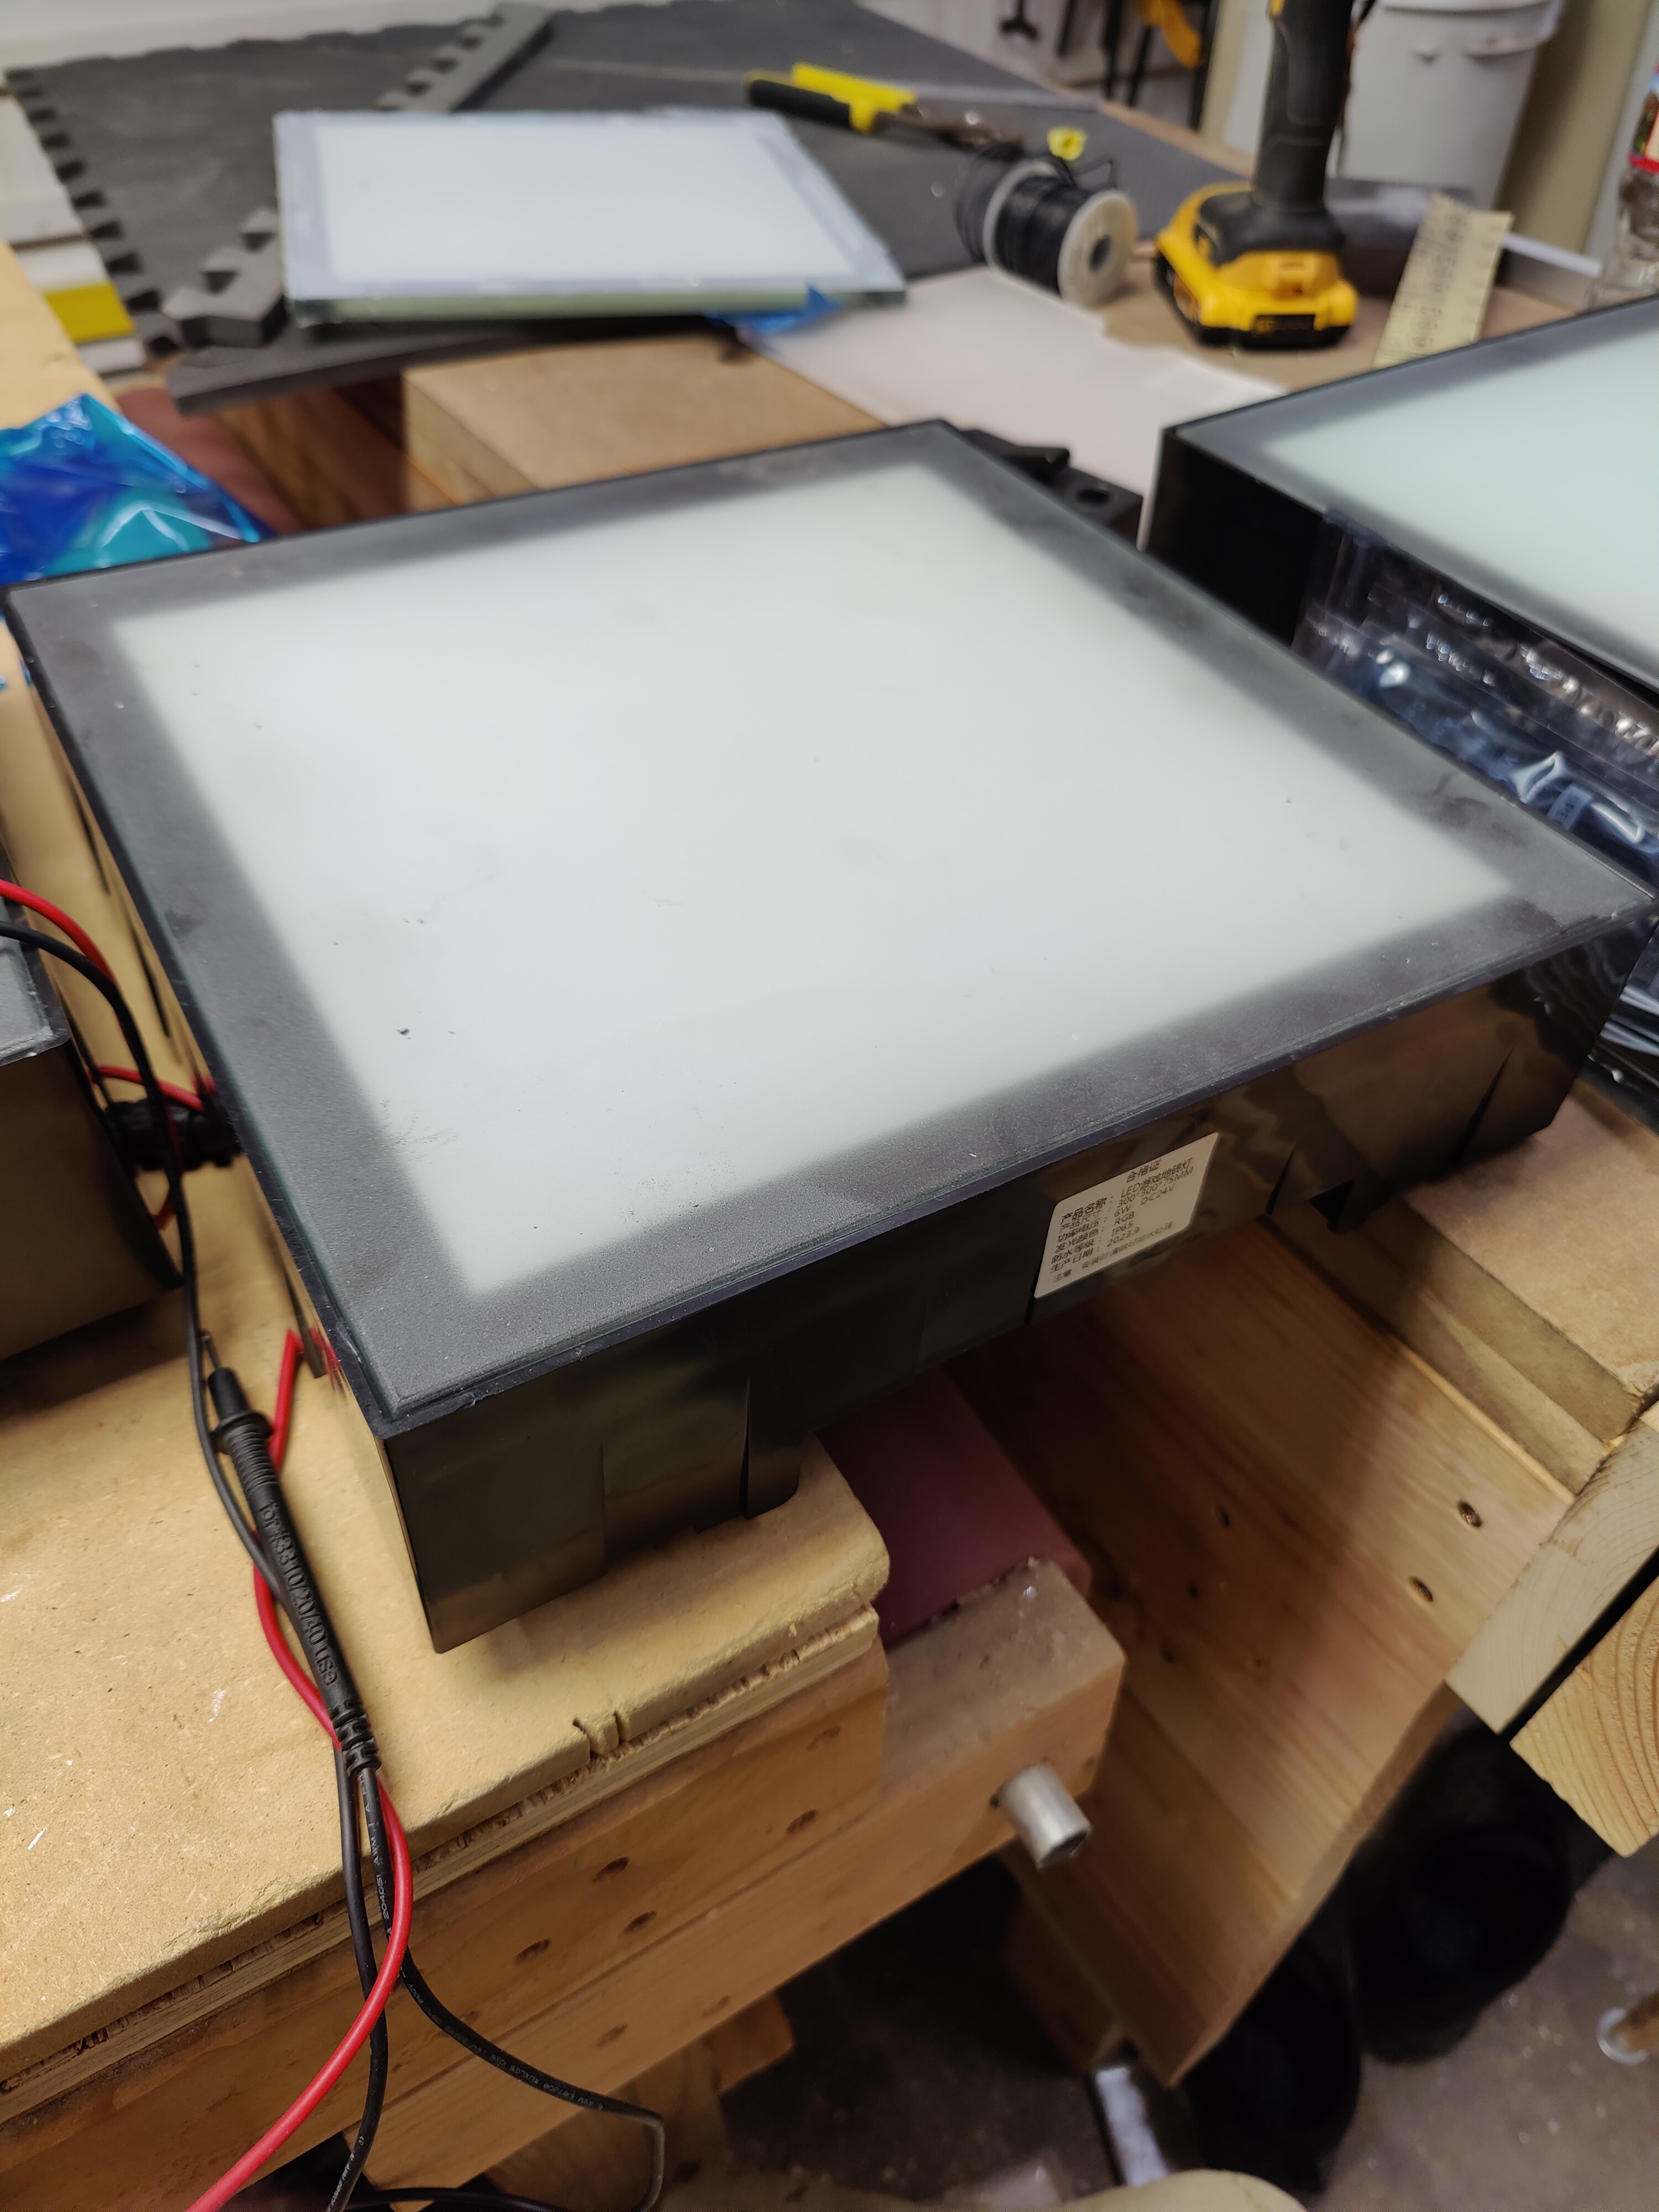
Aaaand we can't get them lit. When we ask for a wiring diagram, we get back a napkin drawing saying basically "Plug power in here."
Mmn. Annoying. But not a game-ender. Maybe we can hack into the DMX controller to actually get control of this thing and figure out what protocol they're usin-
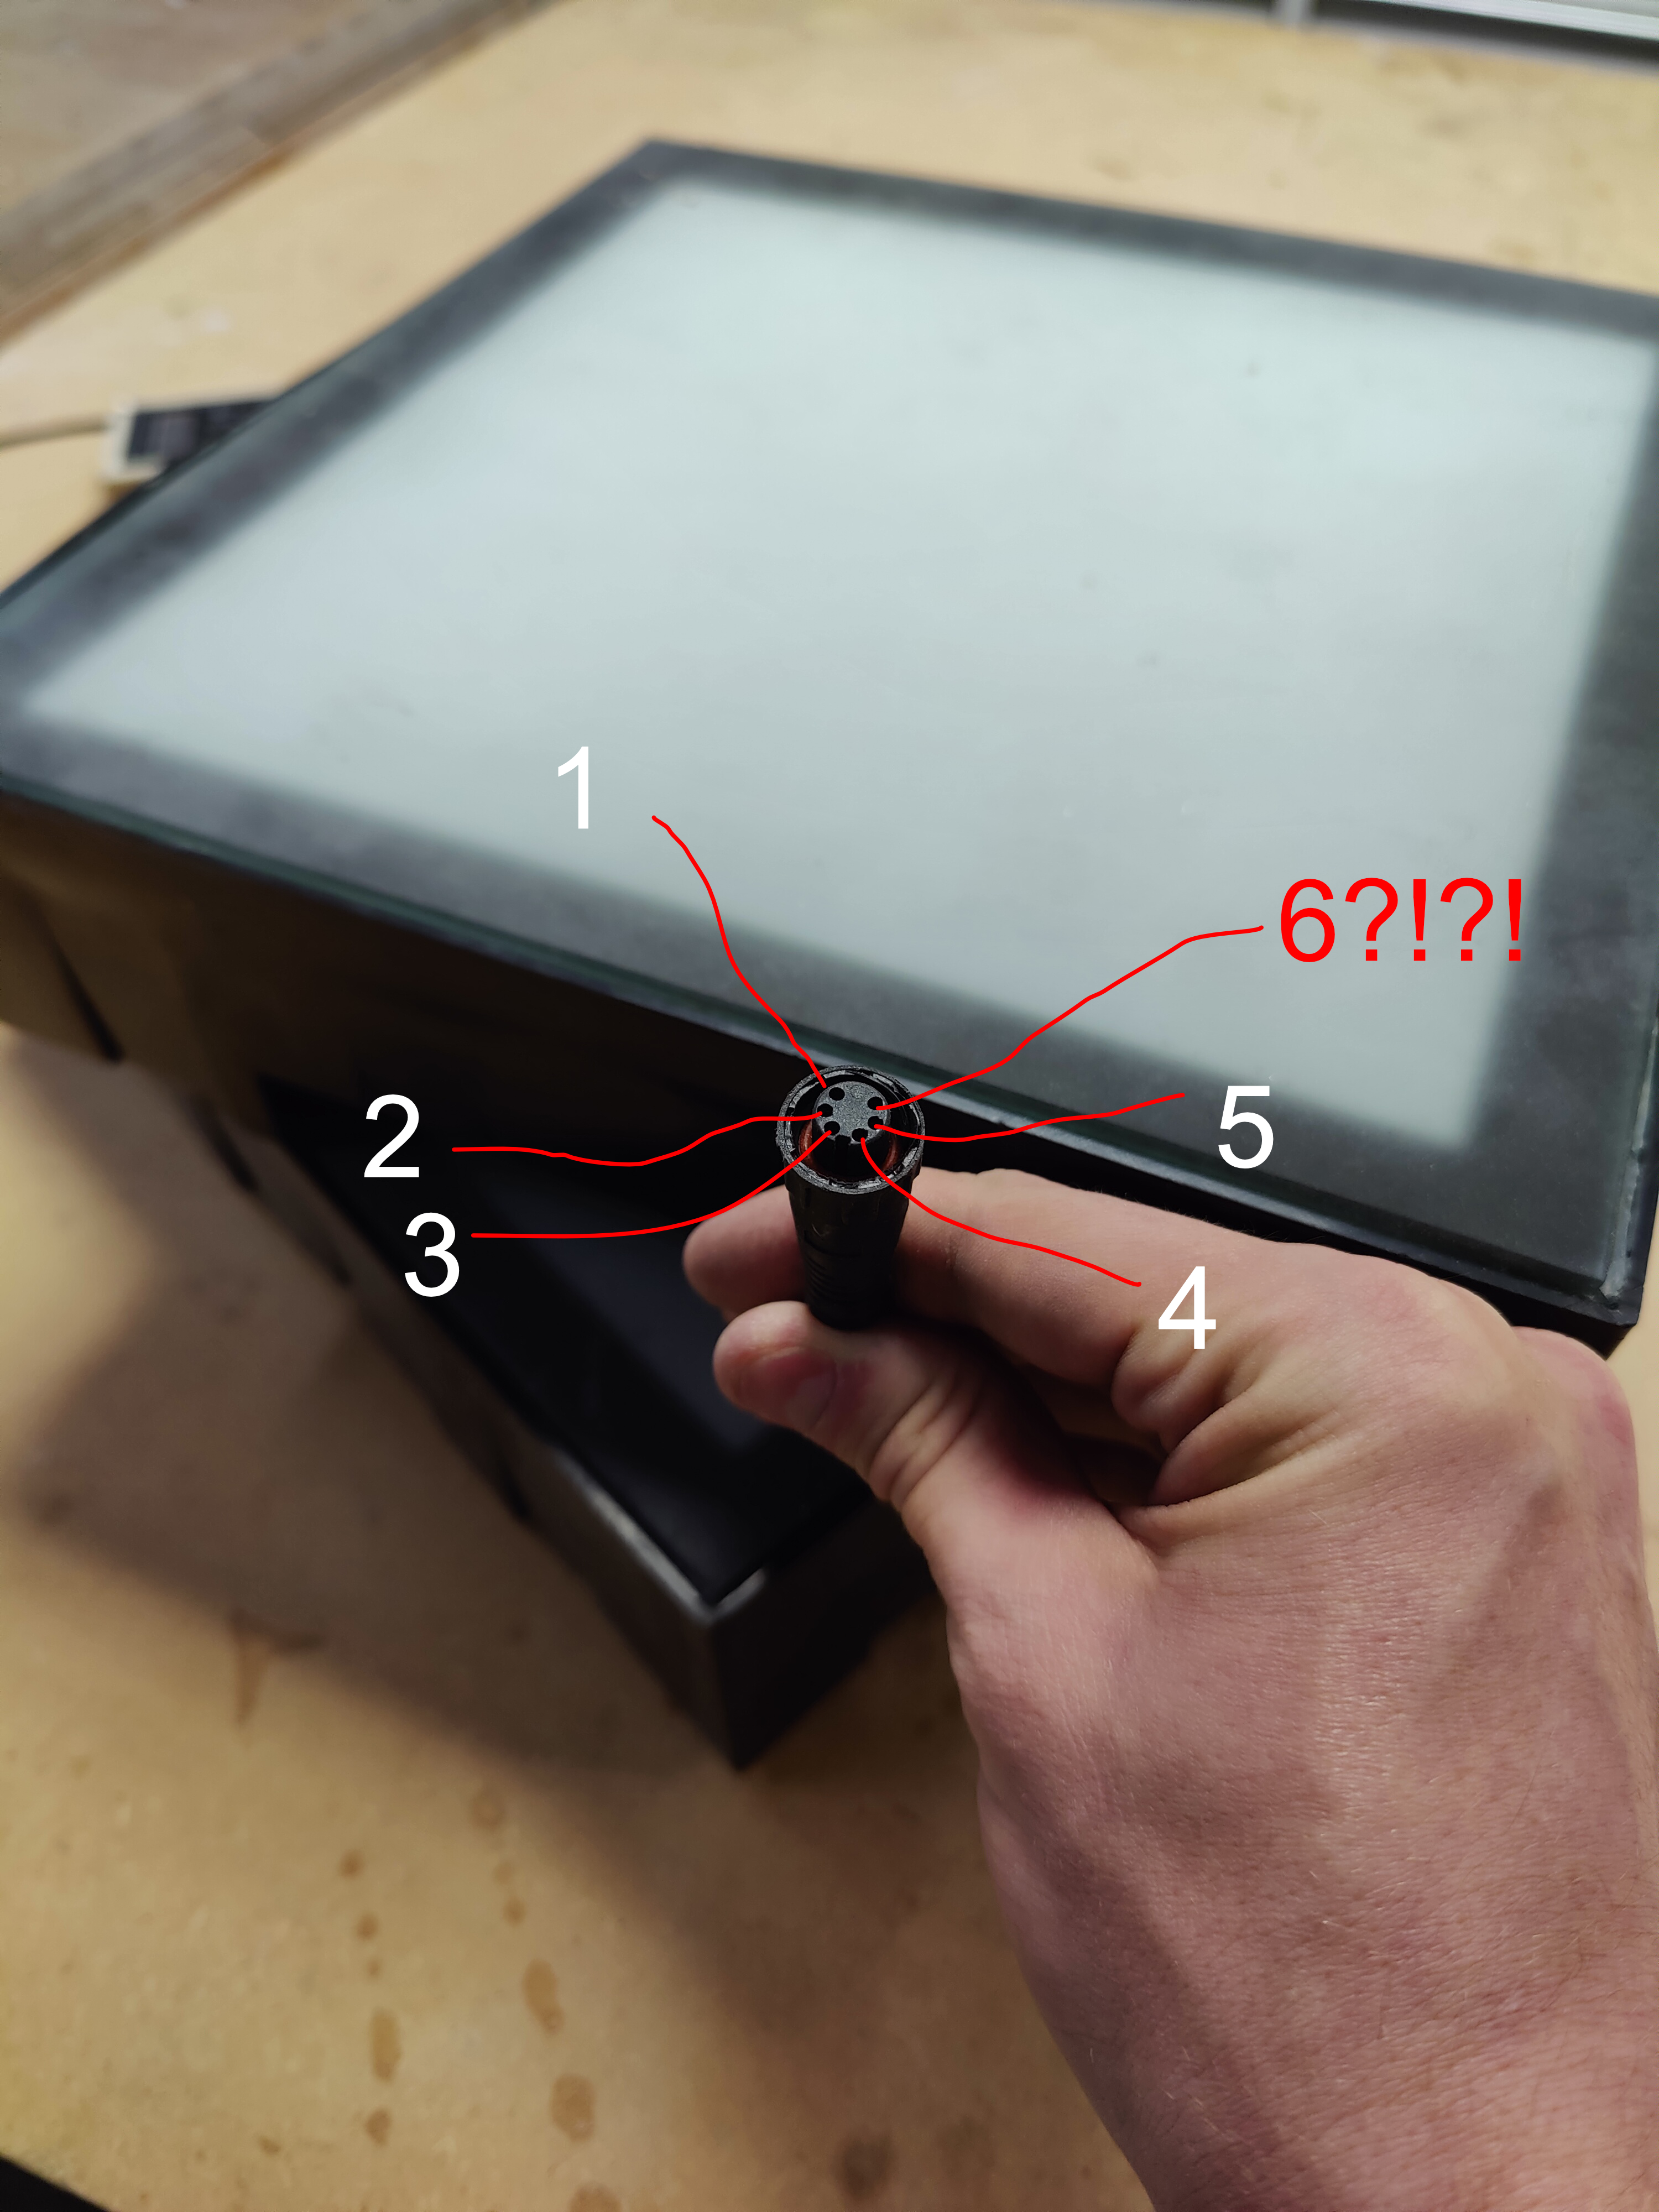
There are six wires. Why are there six wires?? DMX512, the standard that they say they're using, (and the one that is actually documented and we have even a hope or prayer of resolving), has FIVE wires. Is the sixth wire power? Is the sixth wire power and the ground wire is shared with the signal ground?
Maybe yes, maybe no. I've sunk basically 0 skill points into reverse-engineering electronics
and
PCBs, and don't know anyone else who has, so we're clueless. But the facts of the case
as
it stands is that we have a rush-shipped $900 pile of unusable unlit glass and plastic. Even if
we
were to order all of the units we'd need and get it delivered using rush shipping,
we'd be
looking at two weeks between best-case scenario delivery and the event.
2 weeks for testing, game development, and everything else is not....great. And that's
assuming
no shipping delays. Also let's not forget time to ship to the actual event. Also
also it
would cost $29,000 in shipping alone to get it here. And nobody else has a
better
deal.
We're going to have to make this ourselves.
So We Gotta Make This:
How do we do that?Alright, here goes. We have to figure out:
- How we're going to light this thing up
- How we're going to power this
- How people will walk on this thing
- How the tiles will be actually built
- How we sense if people are stepping on any particular tile
- How we're controlling hundreds and hundreds of squares
Spoilers: Most of these are answered in ways that will become sources of
r e g r e t
later
on. I'm going to follow each of these questions independently and jump back and forth in time,
instead of working through the job day by day, as I think it will make more sense: just know
that at
any
given point in the project we have multiple irons in the fire.
Question 1:
How do we light it?
Okay, Lighting. If we got a light-up floor, we gotta get lights. And if we're not blanketing the floor in LEDs, then we're going to have to get a smaller number of lights that diffuse in a bigger panel. If you want to diffuse light, you can do it one of two ways, either increase the distance from the light source to the thing that is diffusing it, (A light right up against a surface won't look as spread out as if you move the light back) or have more/better diffusing material. (A thick piece of translucent acrylic diffuses better than a piece of paper.)
Plan A is Edge lighting, which maximizes both of these ways:
Pweeeety! Man, this would work great! Let's see how it was made. Ah! Cool. No further info on the plastic. Just an affiliate link to an amazon page where I can get the exact product listed. Is the plastic magical? No... it looks like it's just regular frosted acrylic with a white background and a polished edge. Maybe that's all that we need?
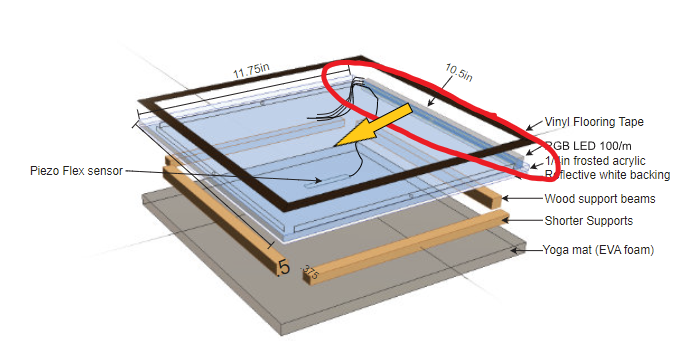
Okay, let's sand some acrylic and give it a go:
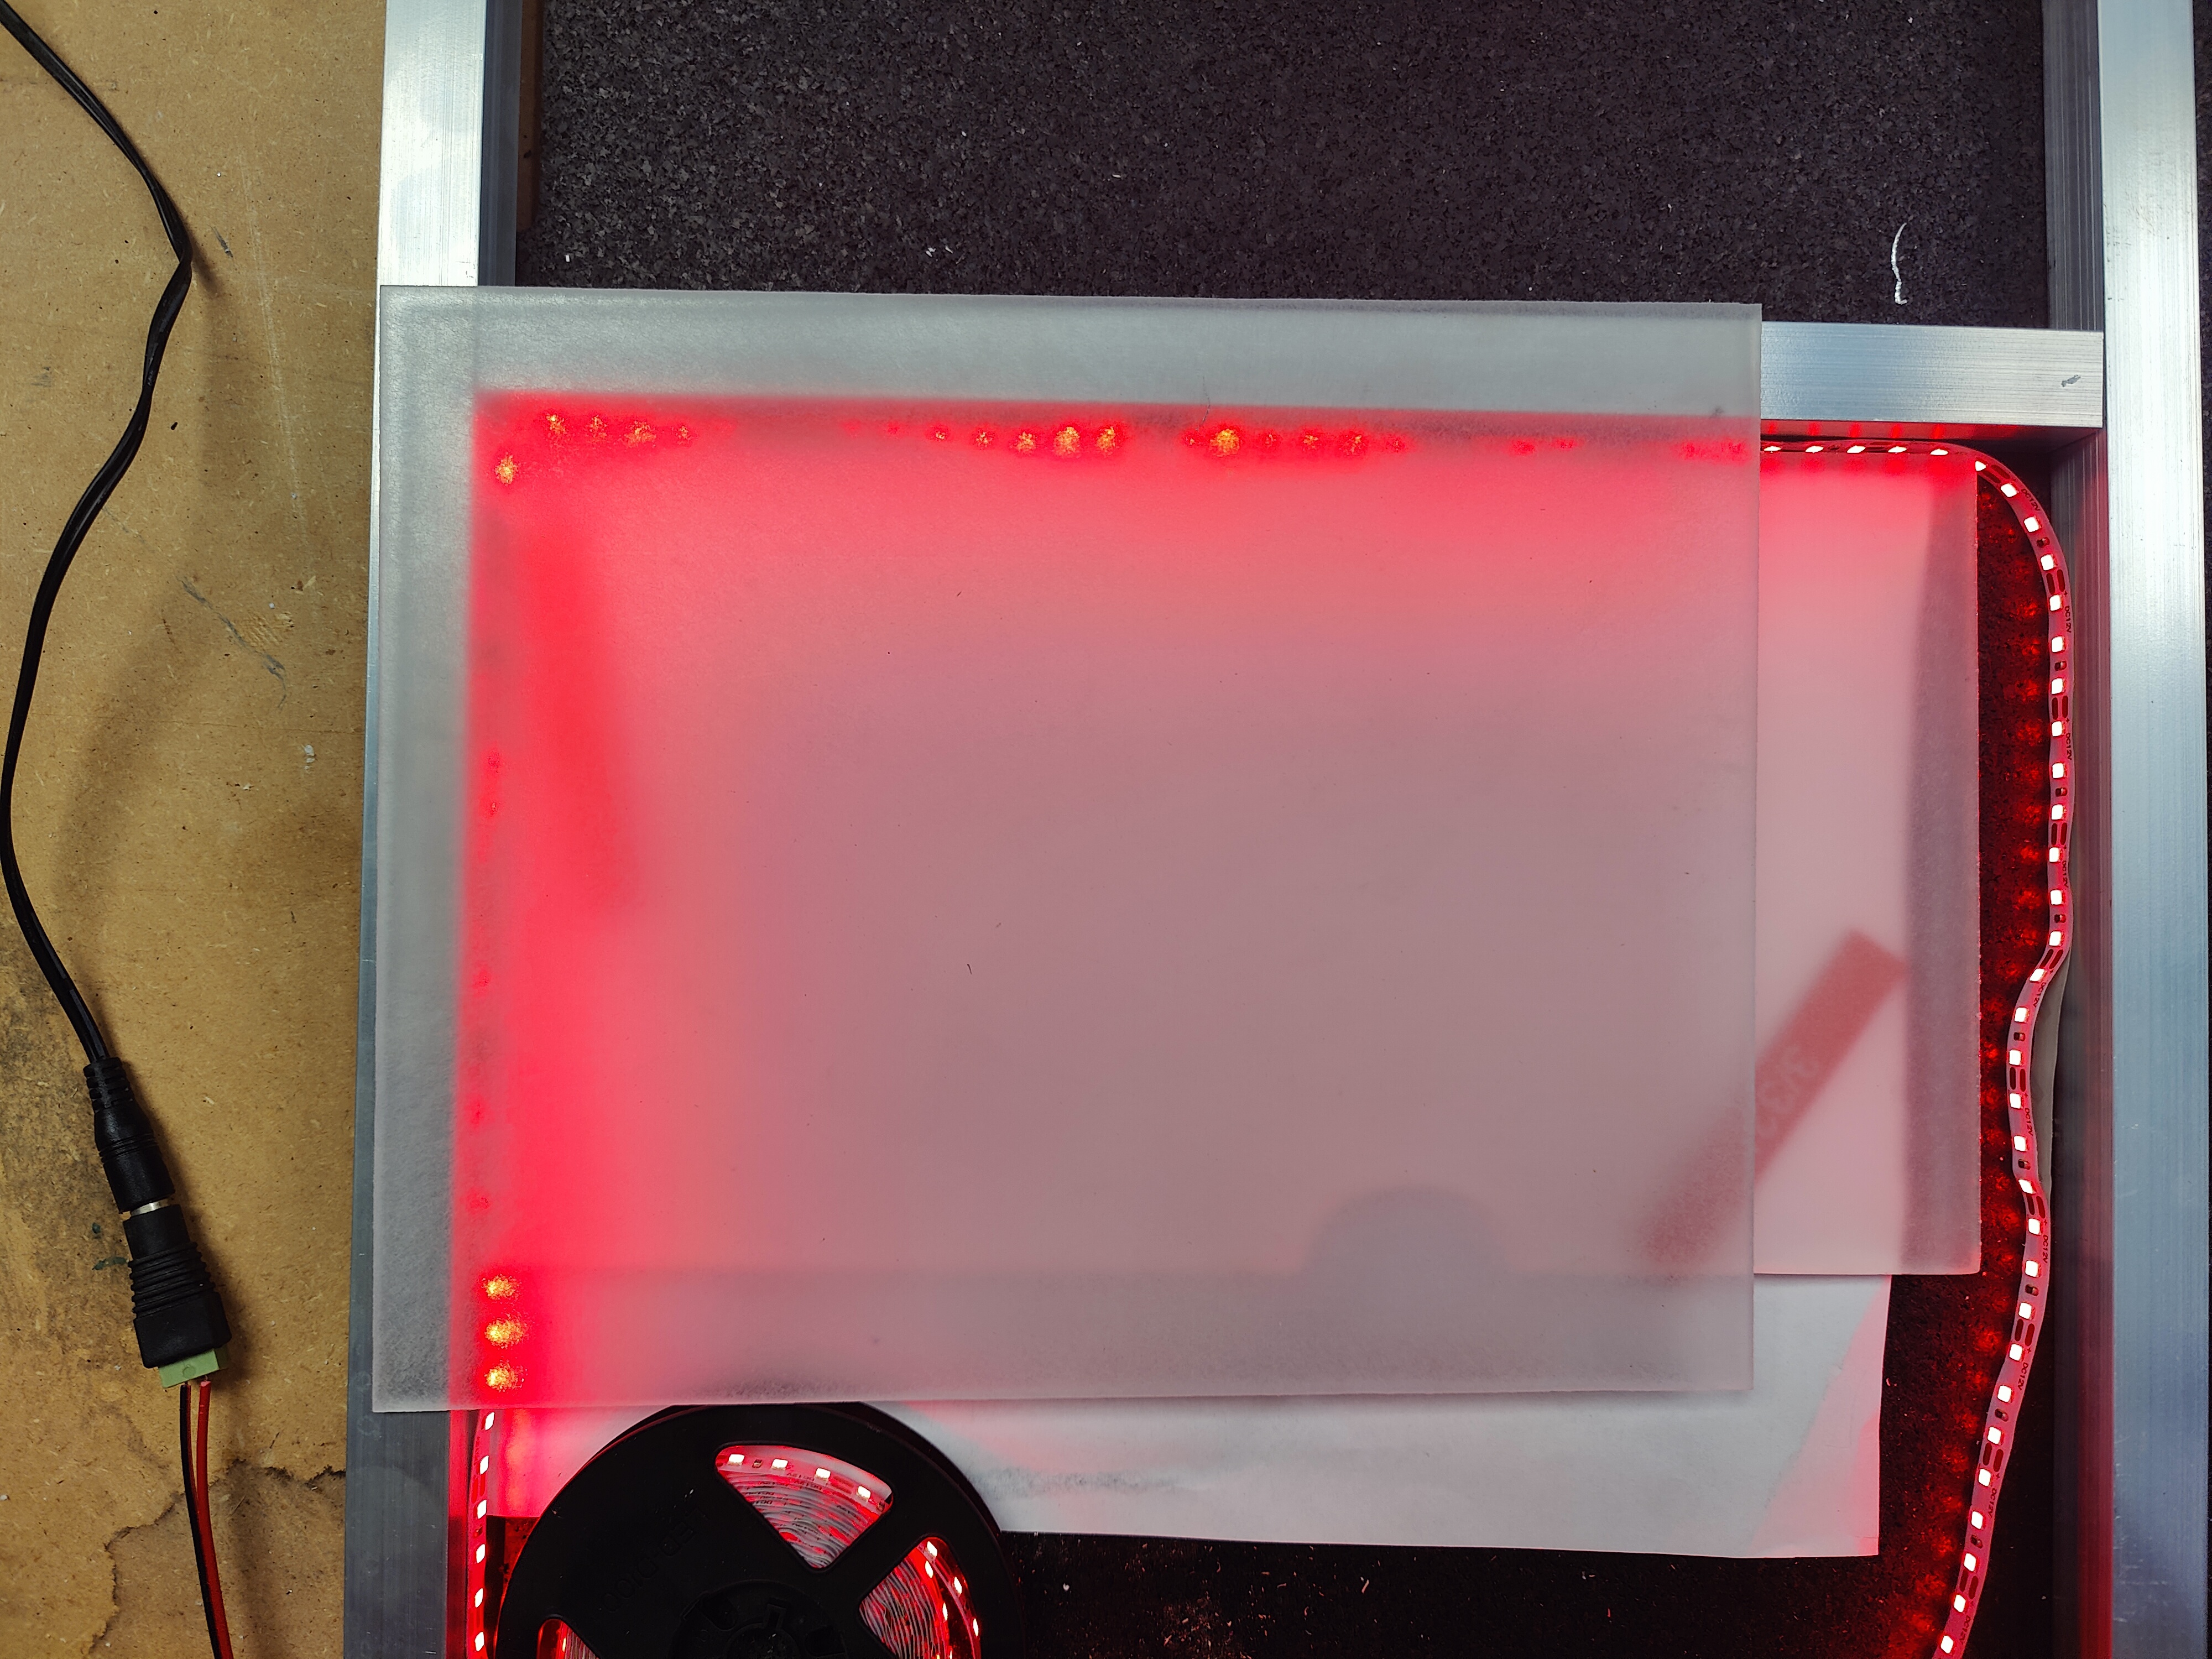
It looks worse in person. Even better, these are 12v LEDs that are sucking a LOT of power. This can't work unless we get some proper edge-lit acrylic. Luckily, Acrylite makes such a thing!
A very nice salesperson on the phone informs me that unless I want to spend ~$2000 per 4x8 sheet [wheeze] I had better find another solution. She recommends cutting grooves in regular acrylic to catch the light. Let's give it a go!
Okay, I think that's better. But this panel took me about 3 minutes to cut on the tablesaw. Multiply that by hundreds and hundreds of squares, and this quickly becomes untenable. I do have a laser cutter, but a quick test piece confirms that the juice isn't worth the squeeze on that one either. I can't spend several days cutting just one part of this floor: not when we only have a few weeks to work with.
Edge lighting isn't going to work. Which is unfortunate. LEDs shining upwards will not have the nice, smooth diffuse light I was going for, but we also can't deal with each square eating ~15 watts. We'd be looking at a power draw in the thousands! So we have to look at other designs. If we don't want the floor to be thicc, (and we don't, because a thick floor will be nearly impossible to move and store) then we're going to need to have multiple LEDs to help spread out the light.
Okay, let's google around. What do we have here?
Well, I do think that looks pretty good. Even better, they're all linked together in a daisy chain. The smarts inside of each light cluster mean that programming and sending information to each LED is going to be much easier than if we have to wire and register each light individually. Alright! Let's go ahead and order the lights that this guy used.
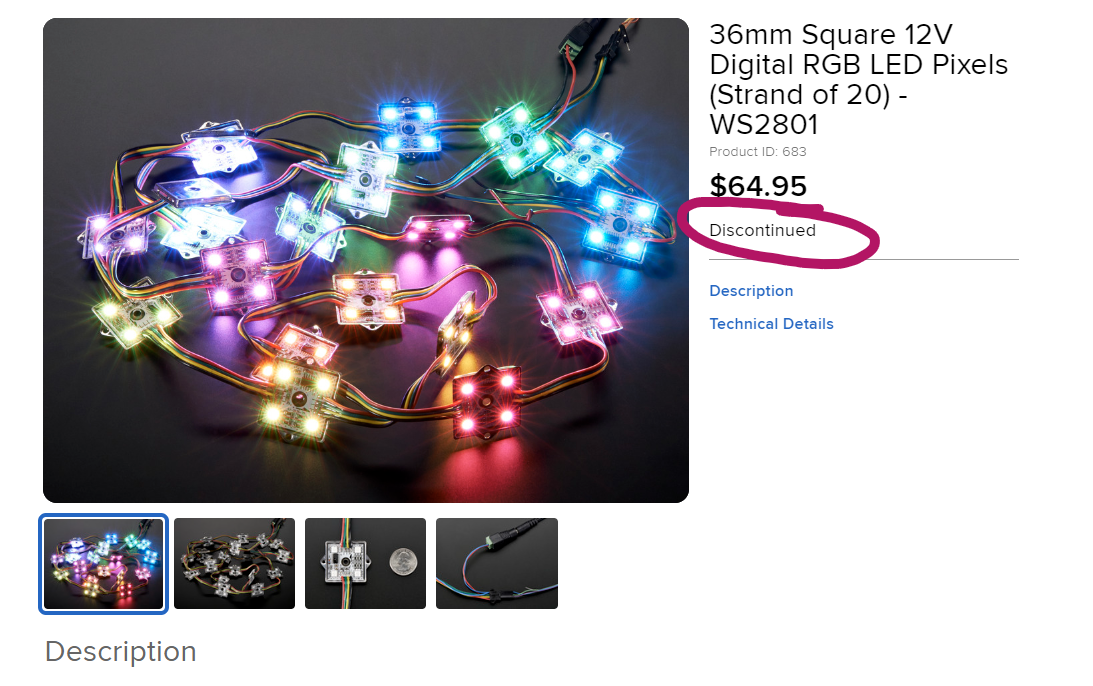
Damn. But! All hope is not lost. With the help of Alan over at Murphey's Surplus, (A local electrical junk store that has just about everything you'd need), we find the name of the manufacturer and send an email. Then a week goes by. Then another. Screw it. Even if they manage to get back to us in time, by the time we get a sample we are looking at no time left to finish this thing. Plus, the power draw could very well melt the first series of lights in the row. After two weeks, they get back to us. We spend a few hundred and order some samples, and while I don't know it yet, (Because the suppliers do not tell us anything) the SAMPLES will arrive at my front door ten days before the event starts. Fantastic. So these lights aren't going to work either.
So what can we do?
Well, AdaFruit has basically ONE sku that could work. These suckers:
I'm not super excited about one single super bright light, but I can't deny that using a
NeoPixel
would simplify the programming. These things are simple to use, have plugs instead of required
soldering points, are painfully bright, and have a wide "lens" on them that can help spread the
light.
They're also power hungry, hot, and expensive. Well, let's see what they look like:
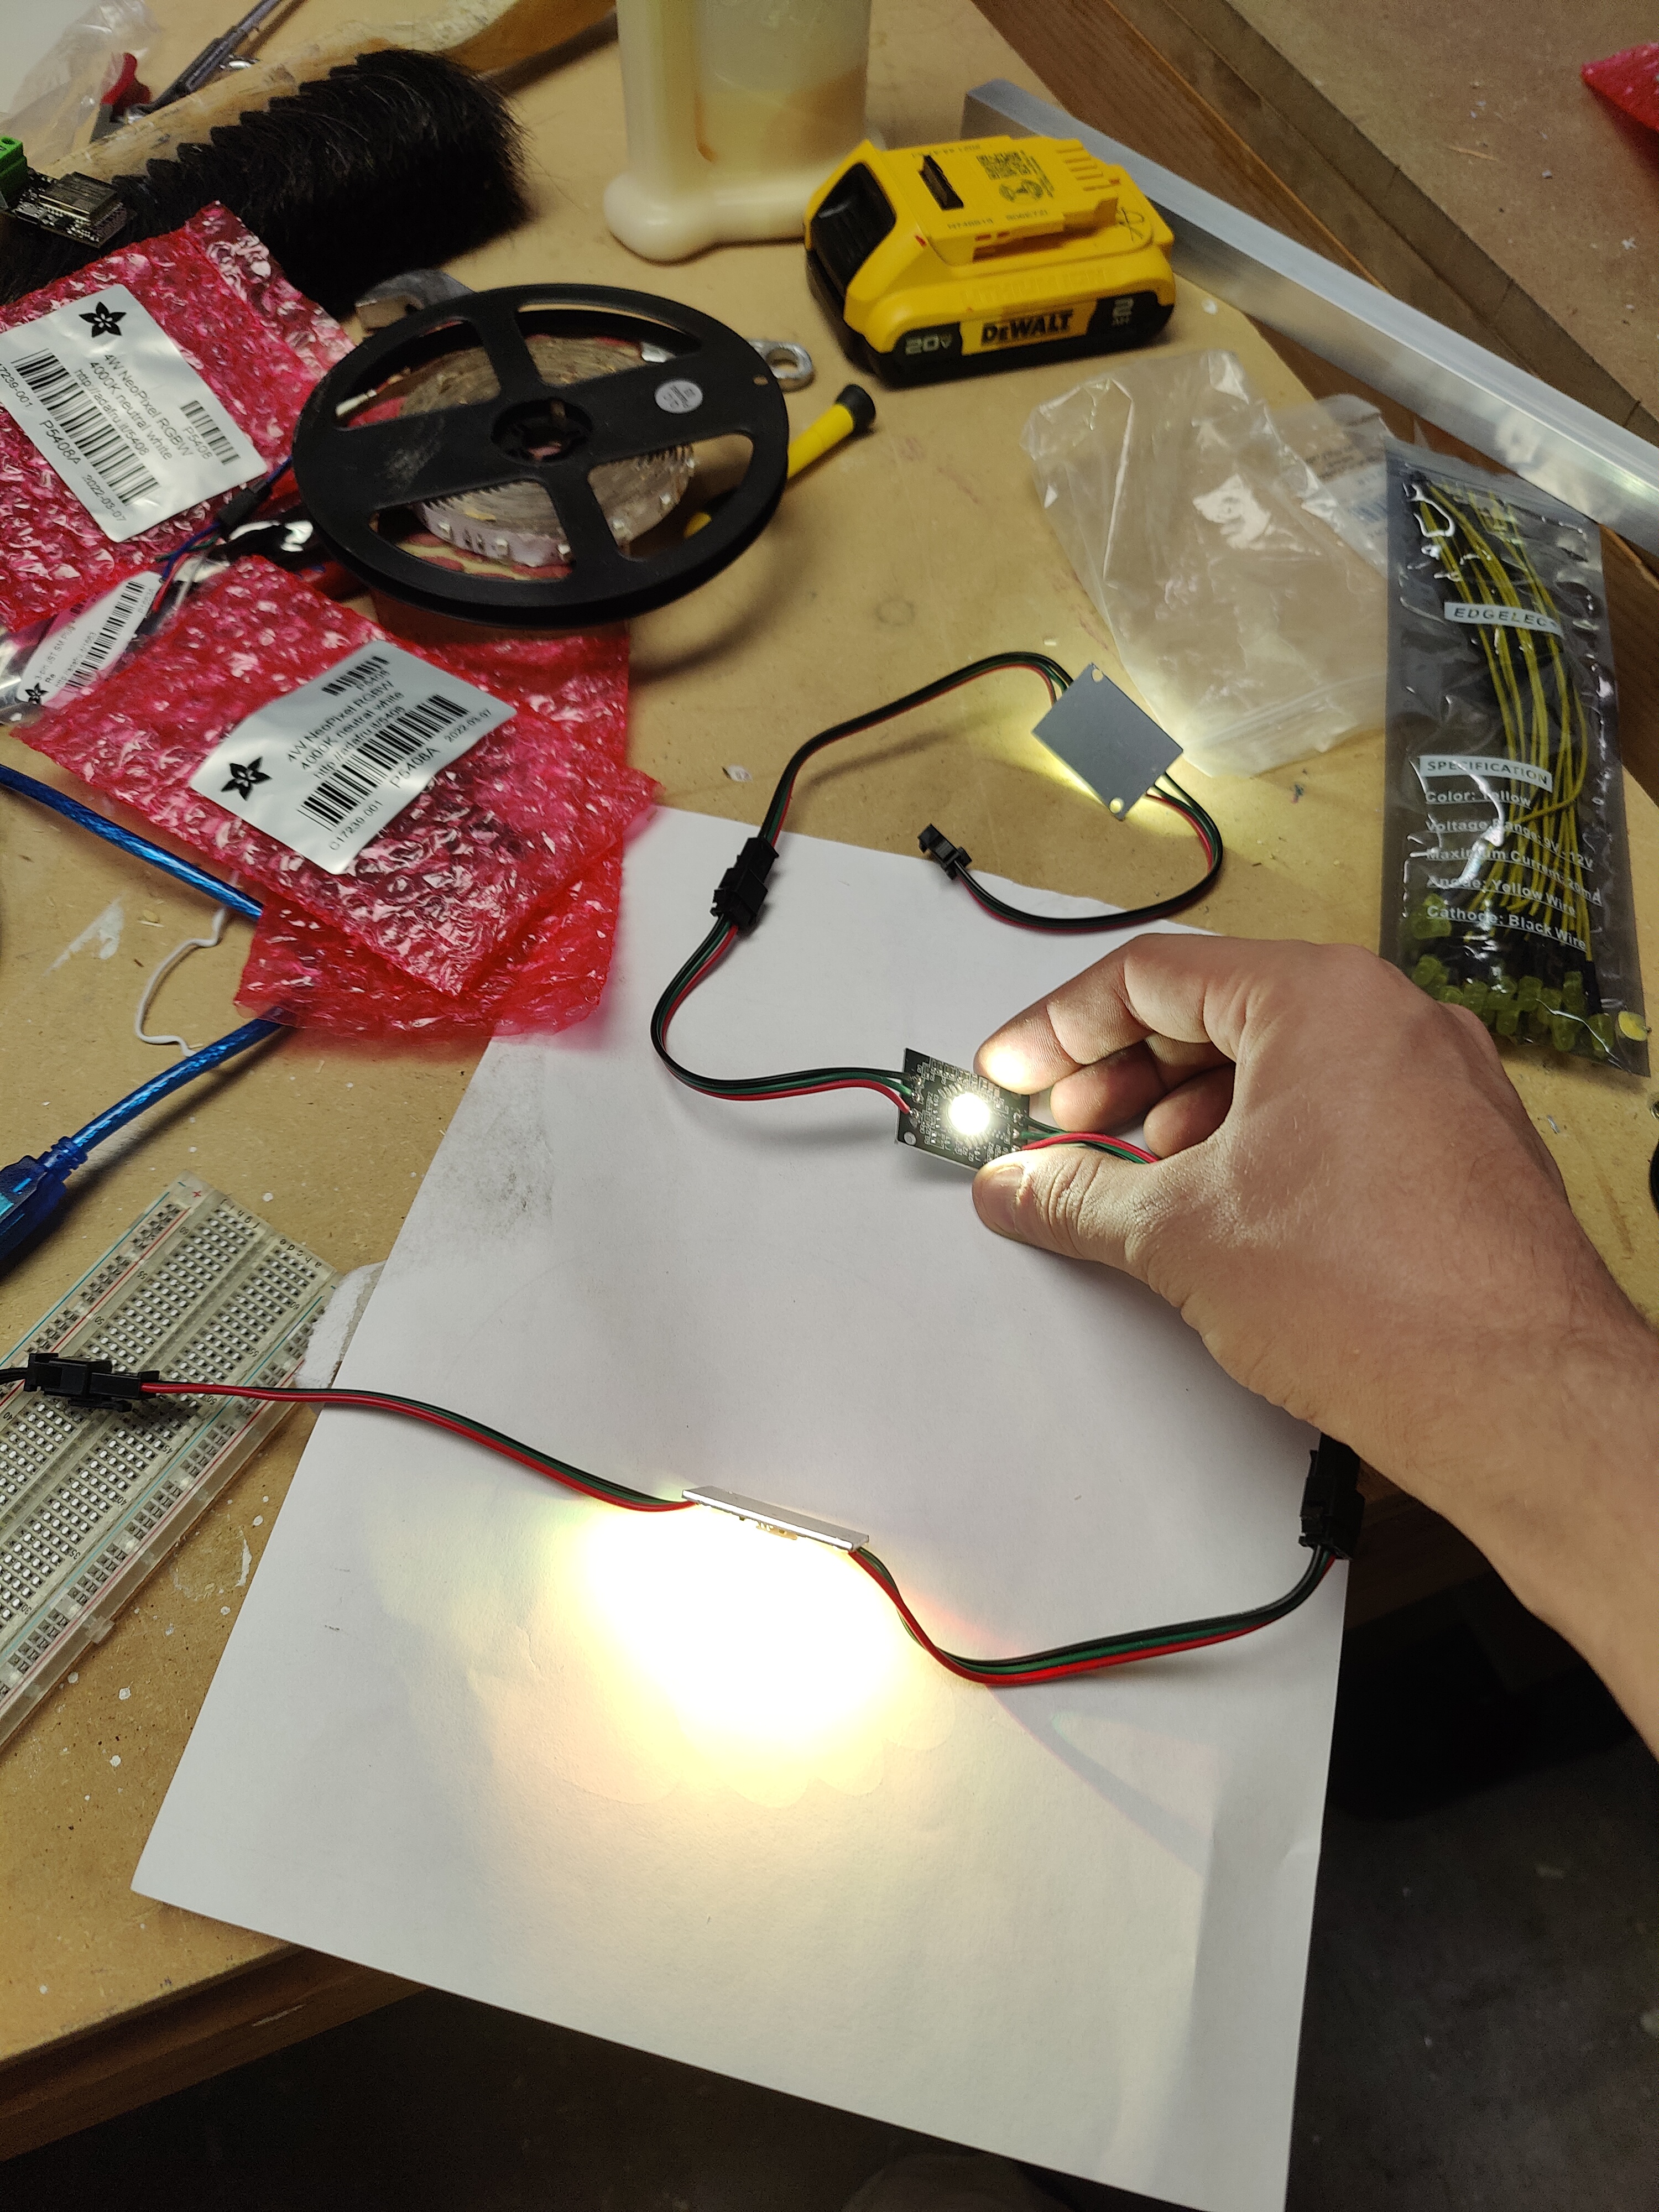
Okay, I think we can work with this. As long as there's a reflector, which we can make out of aluminum sheet, (and could double as a heat sink!) that could wind up being super solid. Most importantly, these lights are in stock and will actually arrive in a matter of days instead of weeks. That almost makes the huge price tag of buying hundreds of them not hurt. Almost.
Question 2:
How do we power this thing?
Alright, power. This floor is going to clearly need a lot of it. After choosing those neopixels, each is going to be 4 watts. Given that we are going to be having 576 squares, we're looking at 2304 watts of power! That's a lot! Is that a lot?
Wait. What is a lot? It is at this point that I realize that I really don't know a lot about electricity outside of residential wiring and software. My computer has an 800w power supply. So three of those? Three "my-computers" hooked up to power doesn't seem that bad. But wait. My power supply can totally kill somebody if they stick their tongue into it.
I need to do some research. The brains of the floor are going to be 144 Raspberry Pi Picos with a CAN bus. Those run off of 5 volt logic, helpfully the same as the neopixels we got. That means that we can run the whole thing using one voltage, making things simple.
After a bit of research, it seems like the general philosophy when it comes to powering things is to do so like a tree. Start with a thick trunk and then branch out thinner and thinner as you get closer to the end device you want to power, staying as thick as possible for as long as possible to minimize heat. I've played way too much Factorio, so this makes a lot of sense to me.
The Problem of the Plug
Whatever we do, we are eventually going to have to draw some massive amount of wattage from the wall. Watts is just volts times amps, so if we know that these lights are 4w each running at 5v, then we've got 0.8A per bulb to deal with. So we're going to need a 460.8 amp 5 volt power supply! Let's just go out and order one.
Oh, what's that? Supplies that don't cost thousands of dollars stop at about 80Amps? Oh. Hmmn.
Okay. So in the spirit of modularity, let's break the floor down. We have a floor we're trying to make that is 24 feet by 24 feet in size. If each yoga mat tile is 2 feet square, that's 12 rows of 12 tiles. Powering them all at once in a very long zig-zagging line doesn't look like a tree. So let's break down the grid into rows. Makes logical sense, right? We make each row independently powered by a smaller 5v power supply, and electrically isolate them, both to minimize single points of failure, as well as getting a safety bonus.
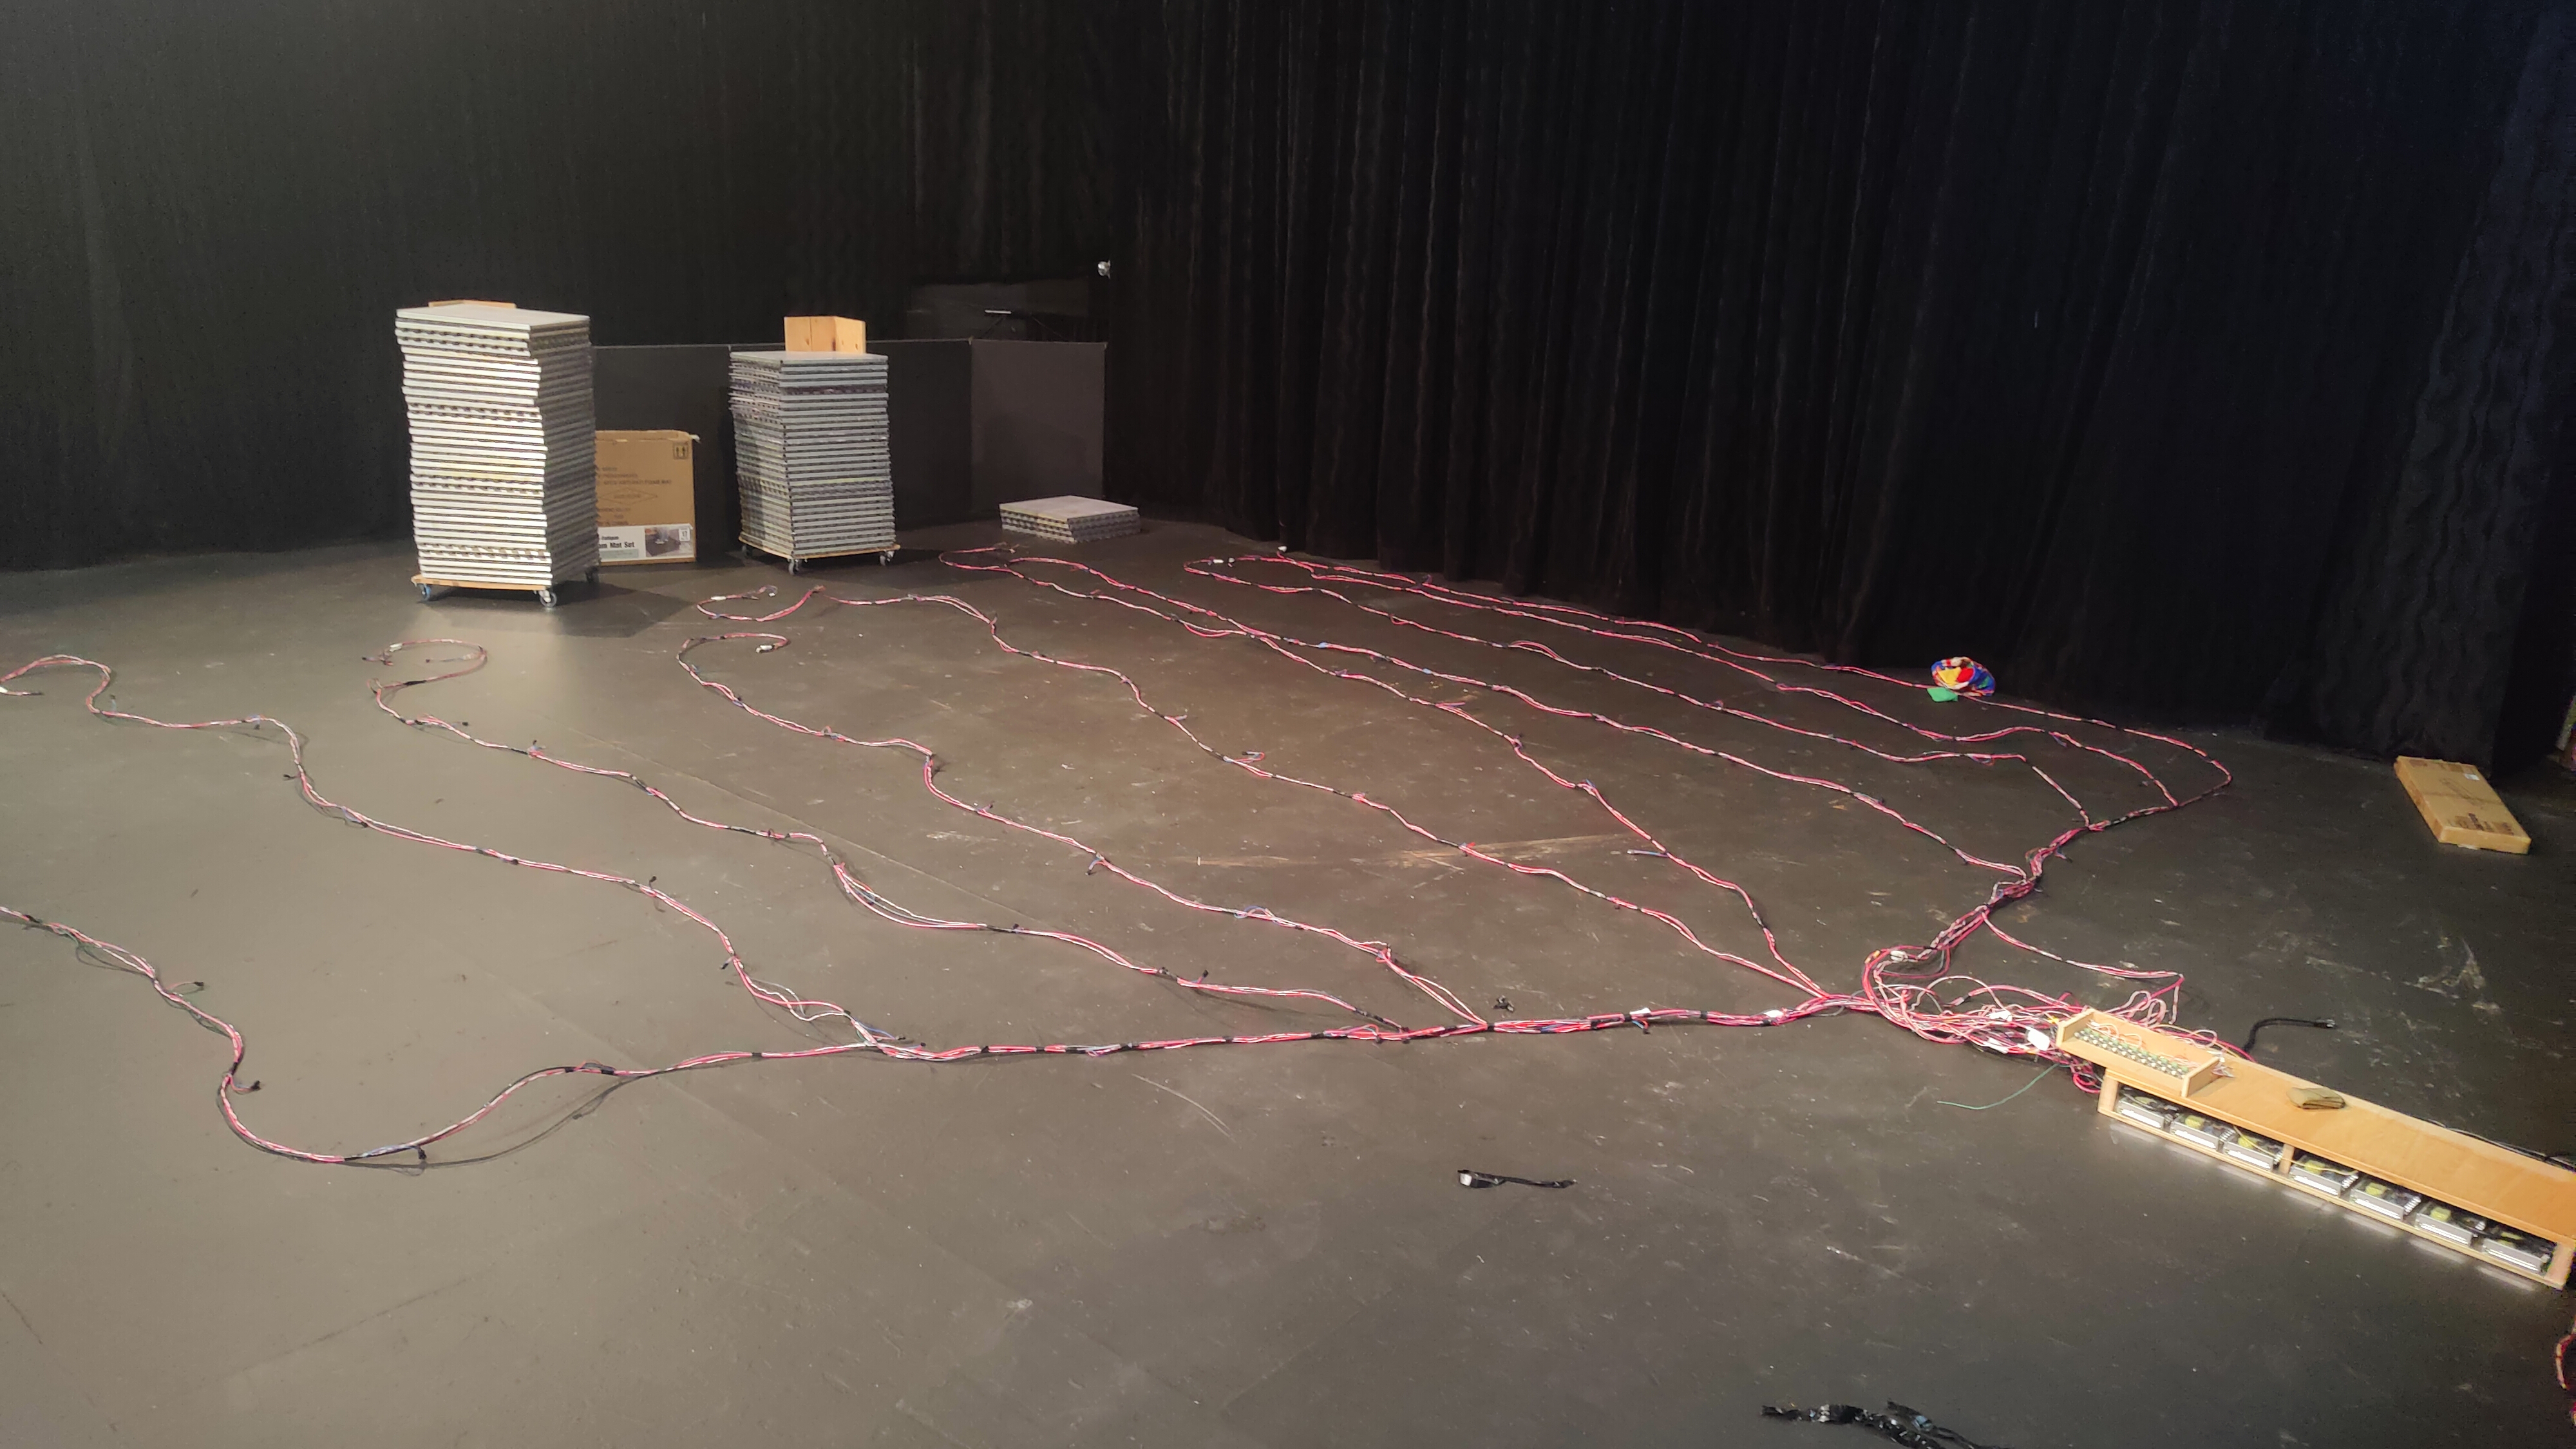
The plan then is to have big, thick cables coming out of the 5v power supplies, and those cables will go to each of the 12 tiles in a row. Get 12 lines of thick 10 gauge cable, 12 power supplies, and screw them all together into a housing to avoid anybody touching the contacts, and bam!
We screw 12 power supplies (plus 2 spares because why not?) together into a big case to keep it all safe.

Looks dangerous, but it's just 5v.
Wood clad in thick aluminum means that any shorts will be grounded instantly, and the wood will be an insulator. The actual dangerous connectors, the 110v wires, are all facing inwards and under a screwed down lid.

Wound up weighing so much it was a 2-person carry tho.
Since each power supply is electrically isolated (with a common ground), we get a decent redundancy and safety factor rolled into one. Even better, the wood it's made from is strong enough to withstand just about anything, and was treated with spray-on fire retardant just to be super-extra sure no shenanigans happened here.
Okay, now how do we connect to that power?
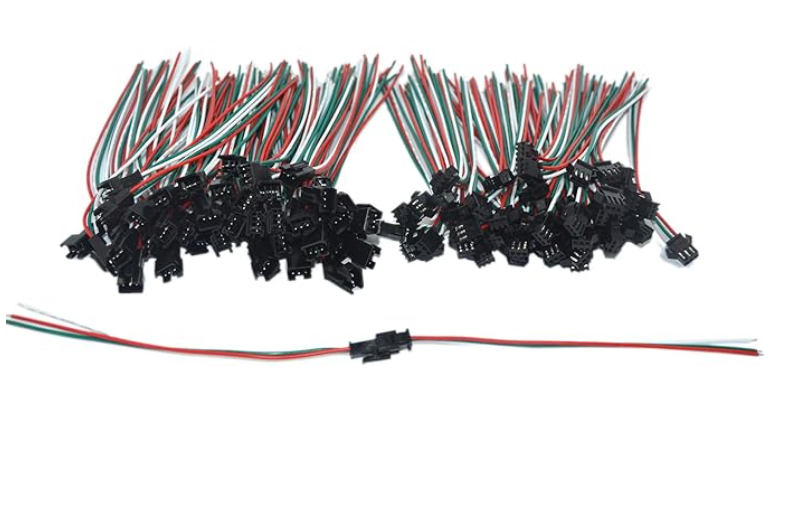
Modular connections mean that unless we want to solder big, thick 10awg wire to each and every board, we're going to need connectors. The connectors that the NeoPixels use seem as good as any. What are they called?

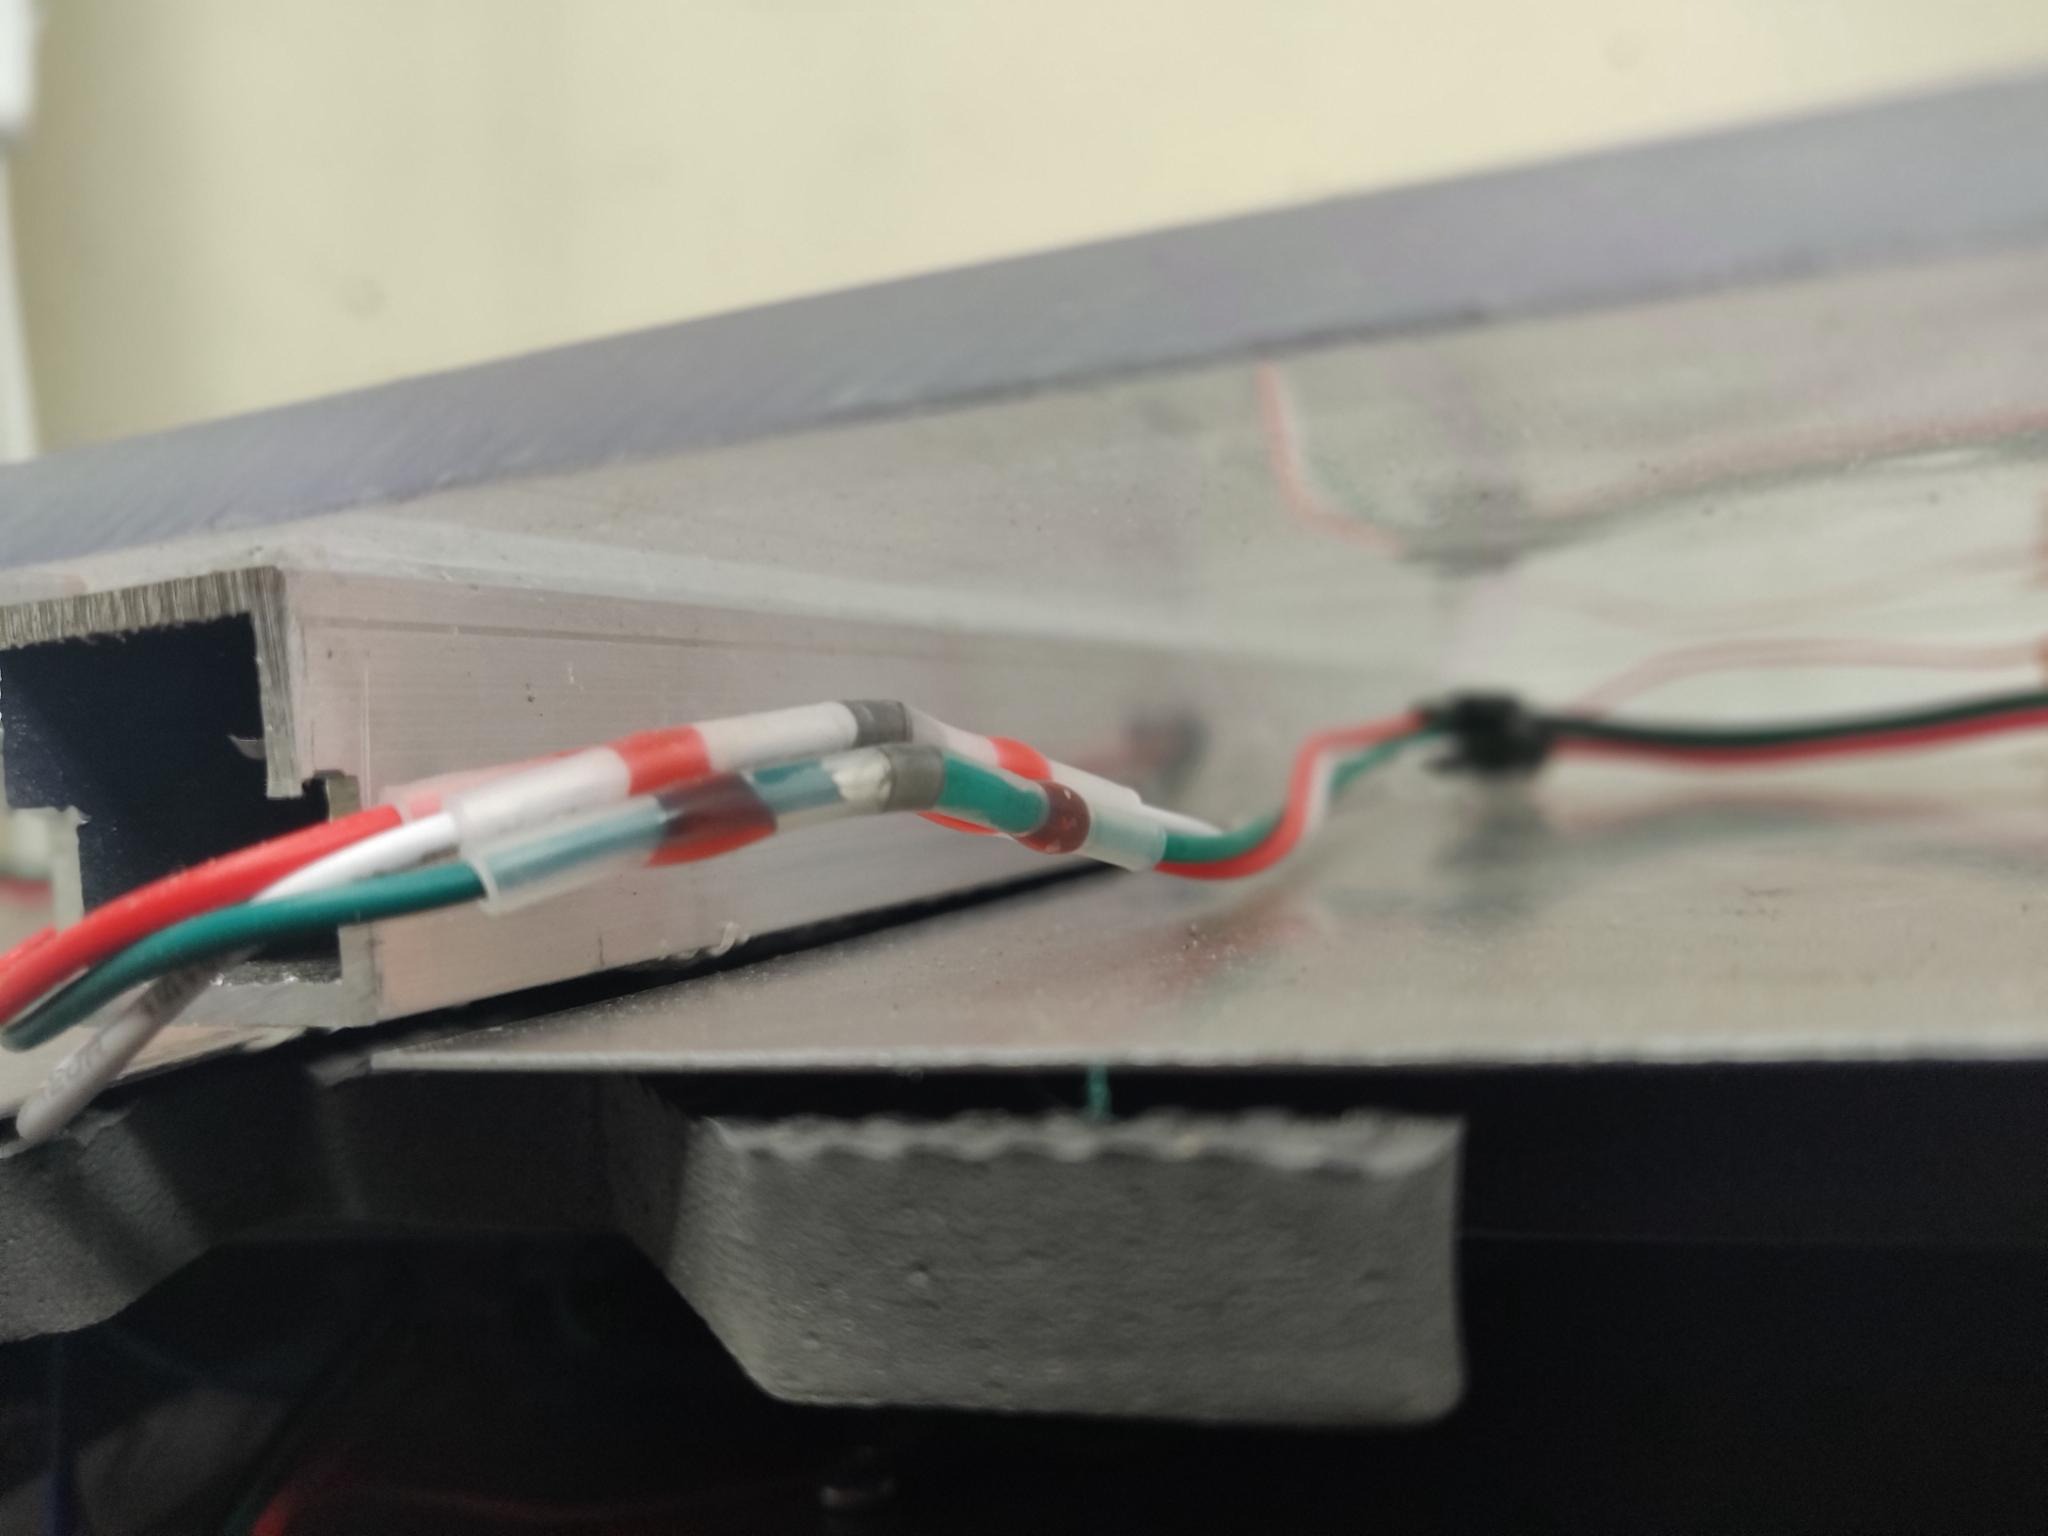
Ah. JST connectors. Well, we need a data high and data low communication wire, a power wire, and a ground. Do they make a 4 wire-variant? They do? Cool, let's order it. JST connectors seem like a good solid connector that is well-made and unlikely to be a source of digital ghosts.
At the end of the day, here's what we end up with:

Green is ground, blue is 5 volts, red and black are data positive and negative. I'm sure those colors standards are going to give somebody an aneurysm, but there ya go. They'll plug into a thick JST plug soldered to a cable that we'll braid with two thin wires for communication over CAN bus, and two thicc bois to carry dat power.
Okay. I think that's the power problem solved. And ~~spoilers~~ but outside of one CRITICAL issue regarding those fat wires, this solution actually holds up and merrily powers the whole floor with minimal fuss.
Question 3:
How will people walk on this thing?
This is a solved problem, right? There's really only one material that is both translucent
and
able
to withstand people stomping on it: tempered glass. This stuff is super hard, and if thick
enough,
can totally handle anything you can throw at it. Cars, even.
Also, after calling around to local glass shops, the best price is $31 per square. Multiply that
by
several hundred and that equals a big fat
n o p e from me. That's
most of
the
budget right there.
The original plan called for acrylic because my shop is set up for it (laser cutter FTW) but after some testing and research, I learned that acrylic is too brittle for this. Even if well supported, acrylic is going to scratch and crack. Is there some other plastic that can work?
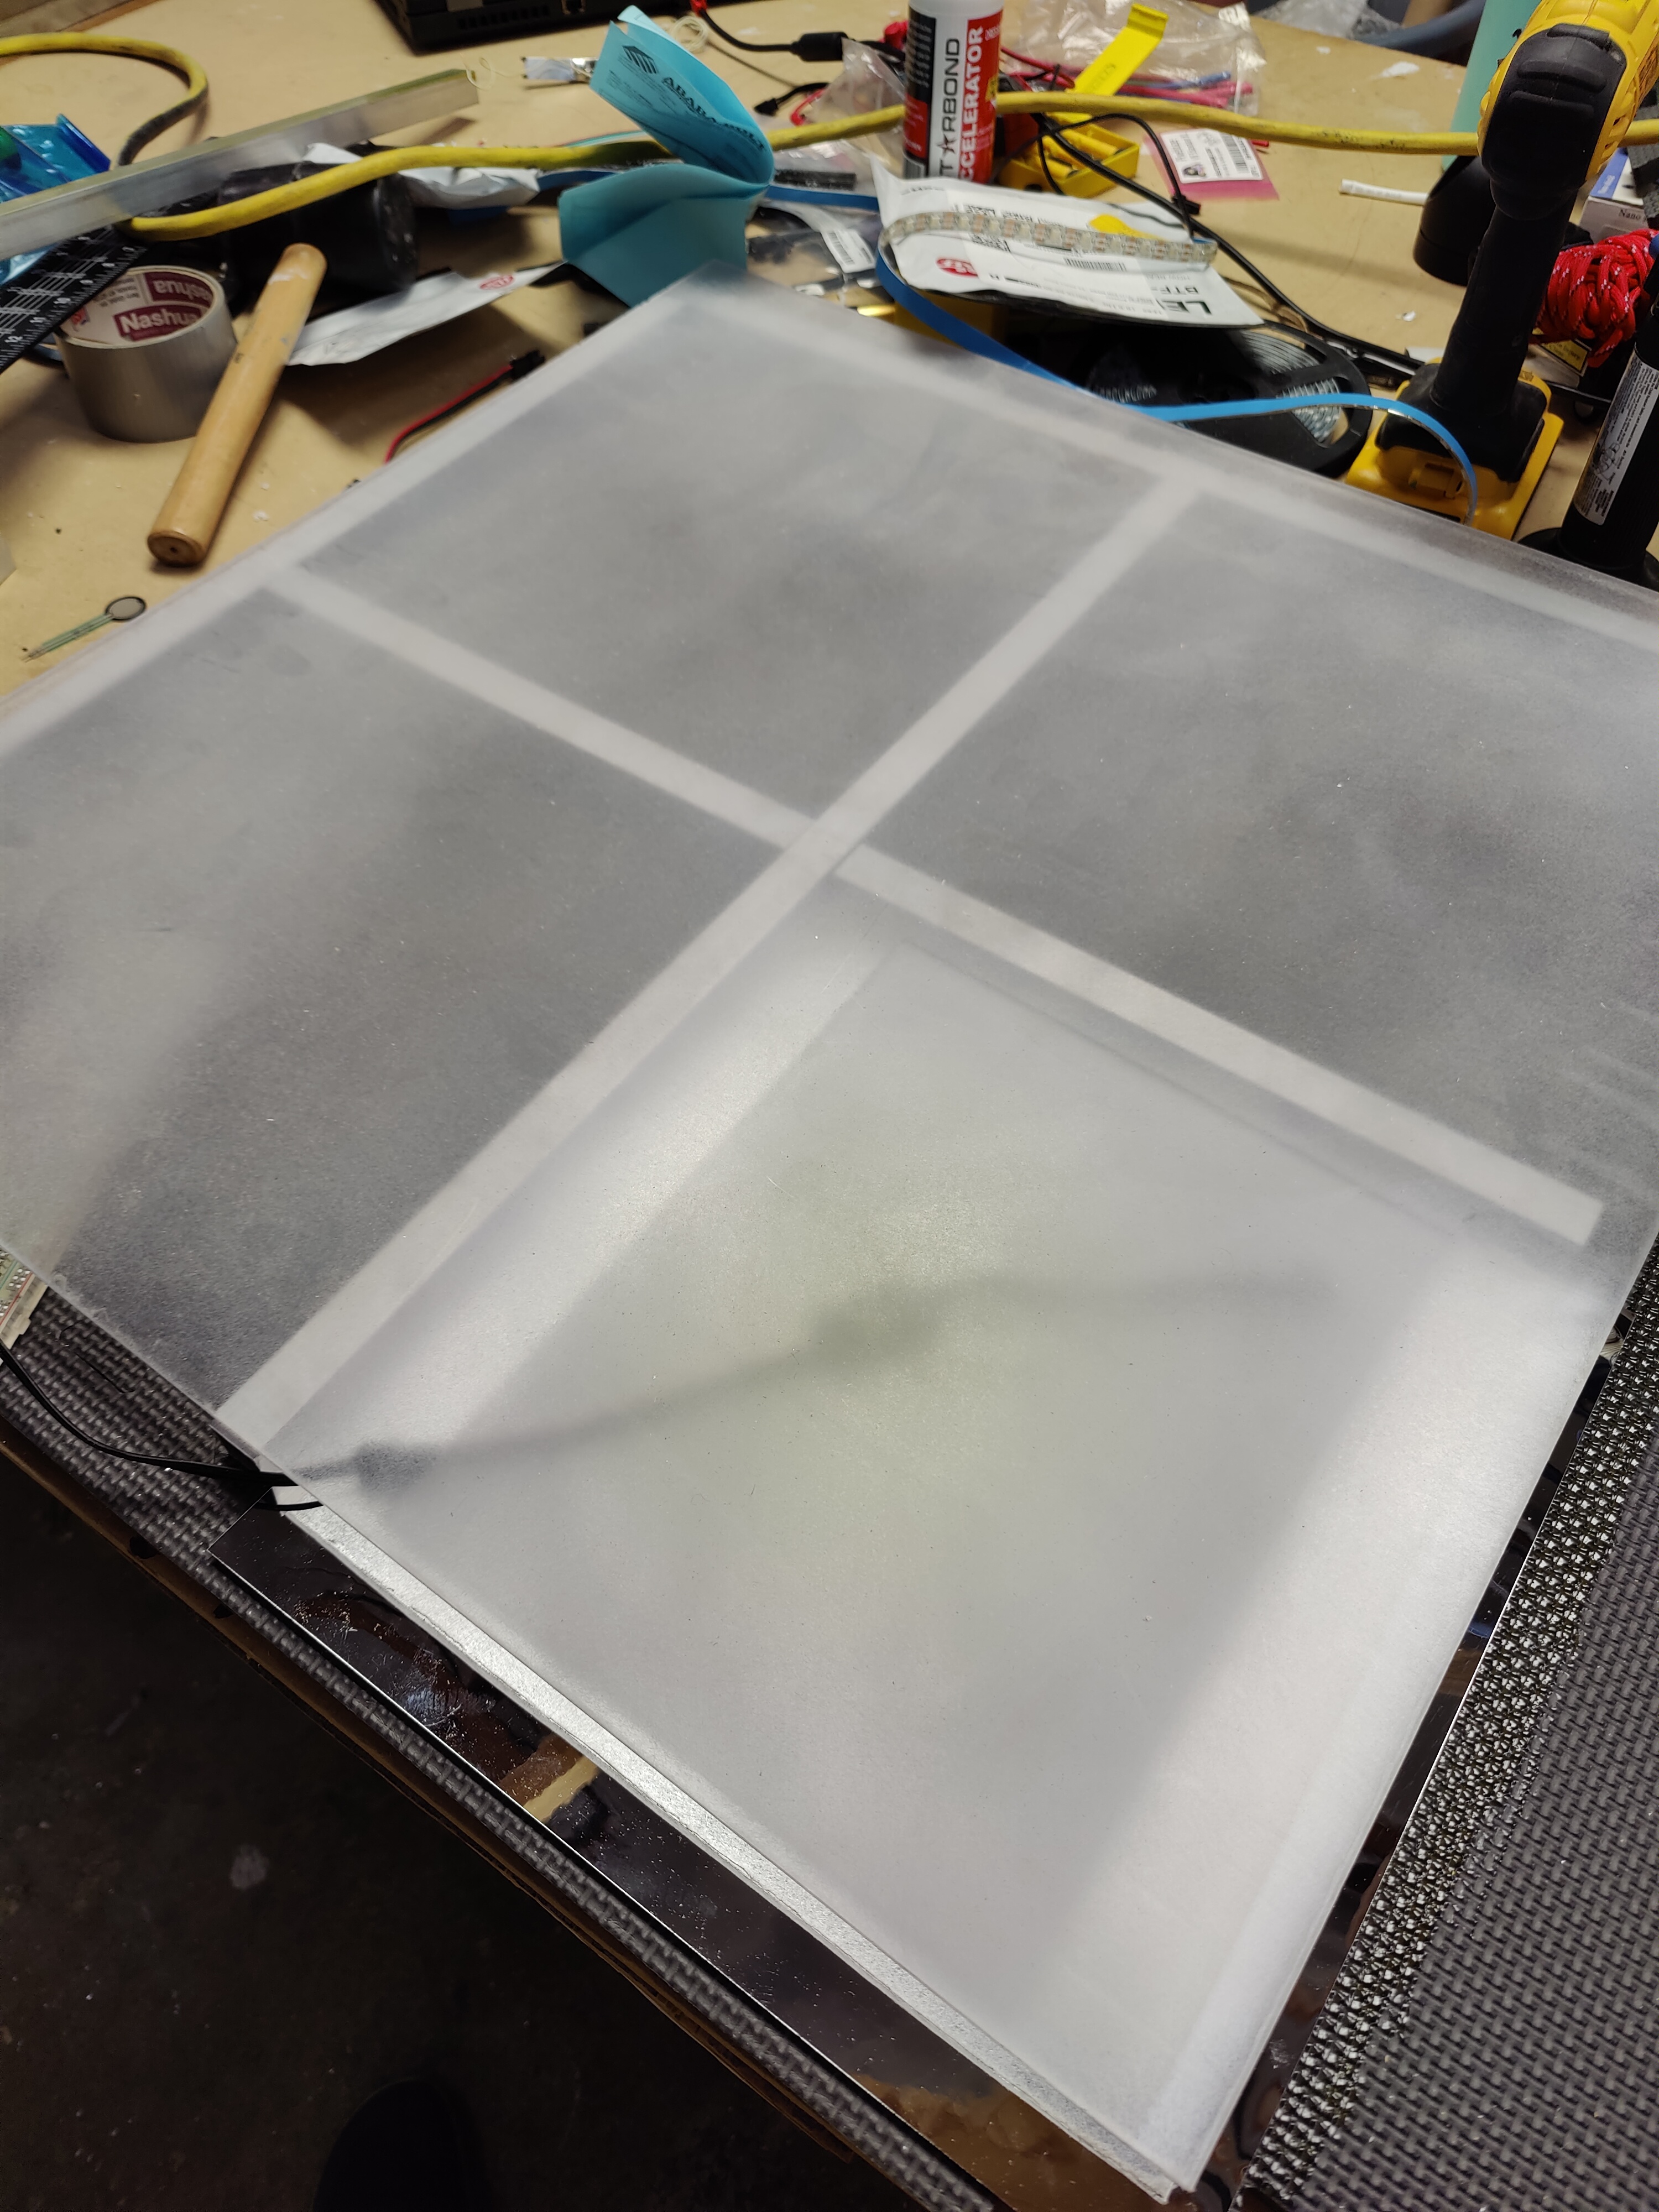
Polycarbonate! It's readily available, not cheap, but not super expensive, and flexible. Very flexible actually, and if well supported, could wind up being a good choice for the floor. It scratches easy, but it's super impact resistent. This is what they put into bullet proof glass. The downside is that it scratches easy. But that shouldn't be a problem if we get some frosted poly. See, frosted poly is really just code for "evenly pre-scratched" poly. If you scratch frosted poly, you can't tell.
So let's just order a large pallette of frosted-
Oh. That's a special order. If we are willing to pay 4x as much and wait 6 months, we can
get it. That's not possible...
We're going to have to sand it ourselves.
By hand.
Oh.
Goodie.
Well,
I've
been looking for an excuse to get a new 3M
sander, so hurray I guess.
At 5 minutes a tile and 144 tiles, that's 12 hours of sanding. Whelp. At least I have friends I can rope into some of this.
The good news is that this should work as a decently good diffuser, and at least from a safety perspective, should be okay. We can adhere it to the frame using 3M UHB silicone tape. It's crazy expensive, (1 roll per 2.5 tiles!!!) but boy howdy does it stick well.
The only other part of the puzzle is puzzling together the tiles: namely, the seams between one tile and the next. We solve that problem with vinyl tape. That will even out the sharp-ish plastic seams. That leads us to the next question though:
Question 4:
How do we build the housing?
Alright. We've got the lights. We've got a solid idea as to how to power it. Now as to making the main body of the floor, how do we feel about four thin sticks of wood supporting a fully-grown human?
In my defense, wood seemed like a good idea at the time. It's inexpensive, light, easy to
work
with, and adheres
nicely to
anything. My workshop is also optimized for woodworking, so it's my go-to
material.
But wood cut that small has a high chance of snapping under the weight of a fully-loaded convention
dork.
So, new plan:
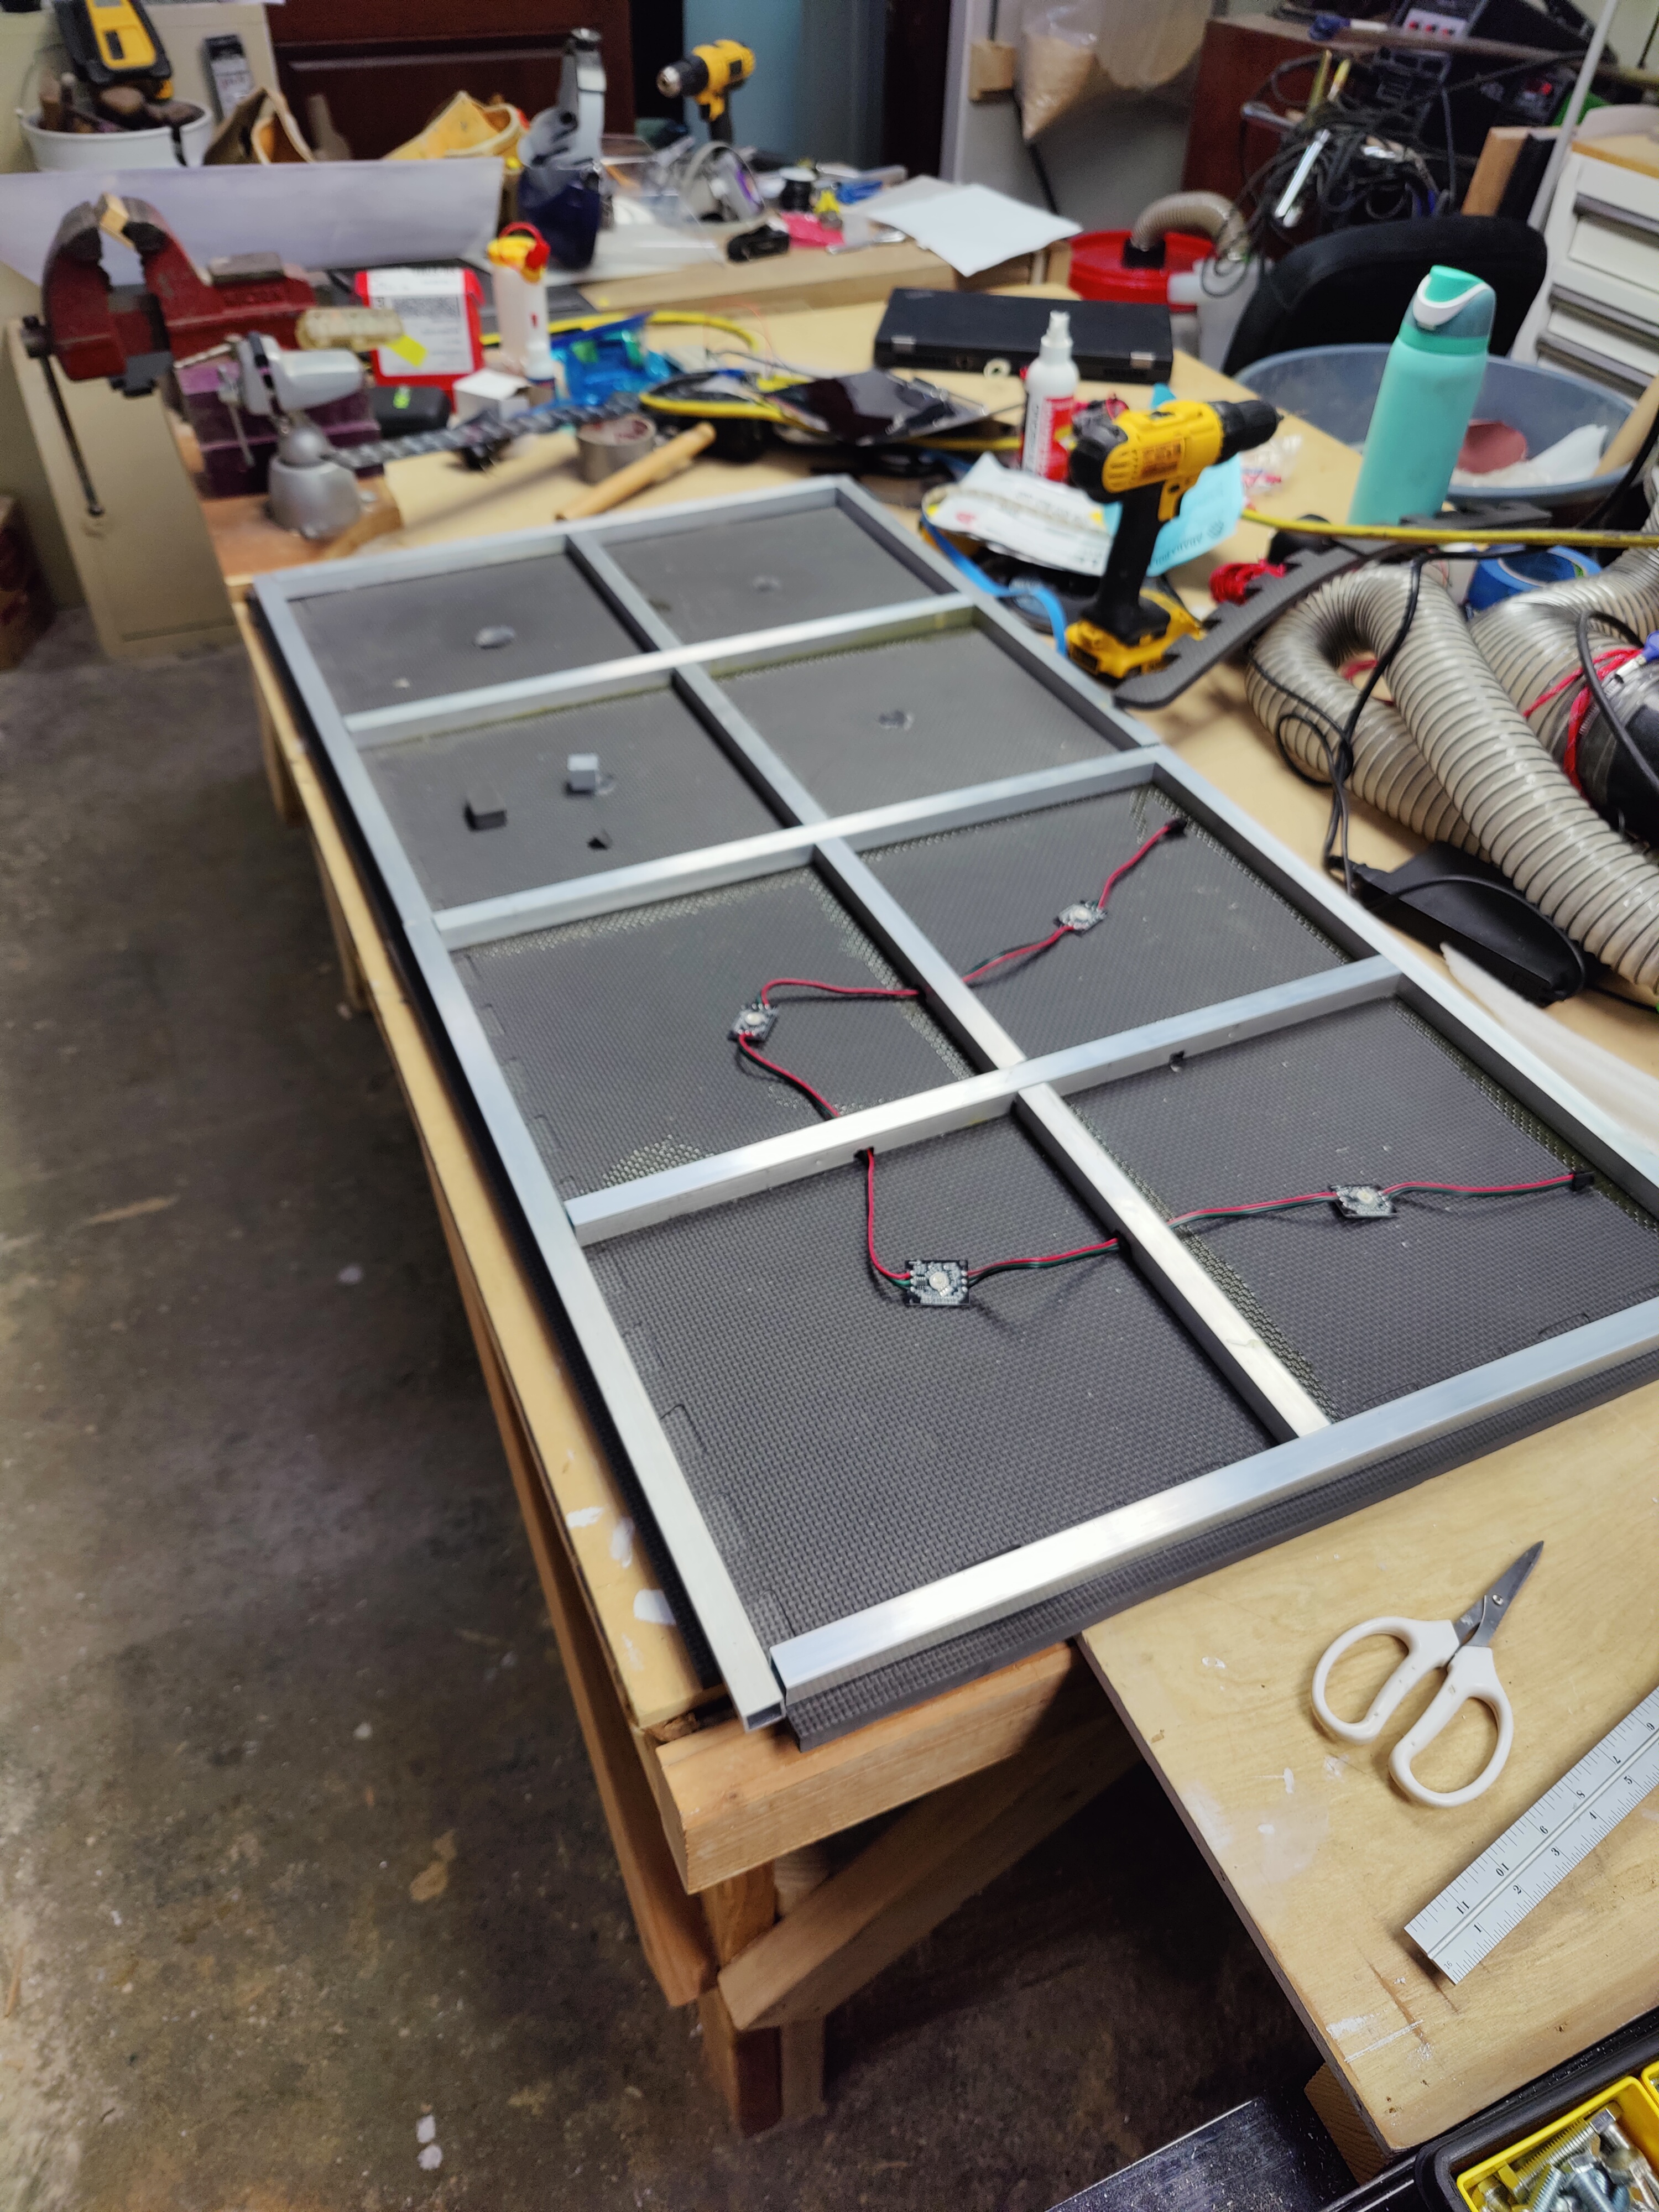
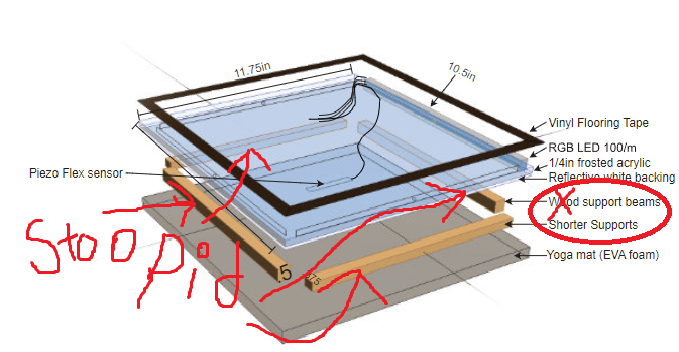
That's right, aluminum tubing. Volume for volume, lighter than wood, and cheaper to boot. We make the design such that there are four pieces of metal per frame: A left side, a top, and two pieces in the middle crossed in an X. Notice in the above design the deliberate overlap between the panels. This overlap will also carry over to the polycarbonate panels. The advantage is that it looks much cleaner and saves a lot of metal tubing. The disadvantage is that you have to align the panels right next to each other with 0.25in of tolerance. Not a problem though, because we're using puzzle piece yoga mats! Each one will be in precisely the right spot because that's the only way they fit as per the design! Easy. Definitely not foreshadowing. Alignment day of? Pssh. That won't be an issue, right?
It also won't snap when players step on it! I need to cut some notches in it to let the wires for the lights through, but that shouldn't be much of a problem! Awesome. But look a little, liiiiiiiiittle bit closer at the lights:
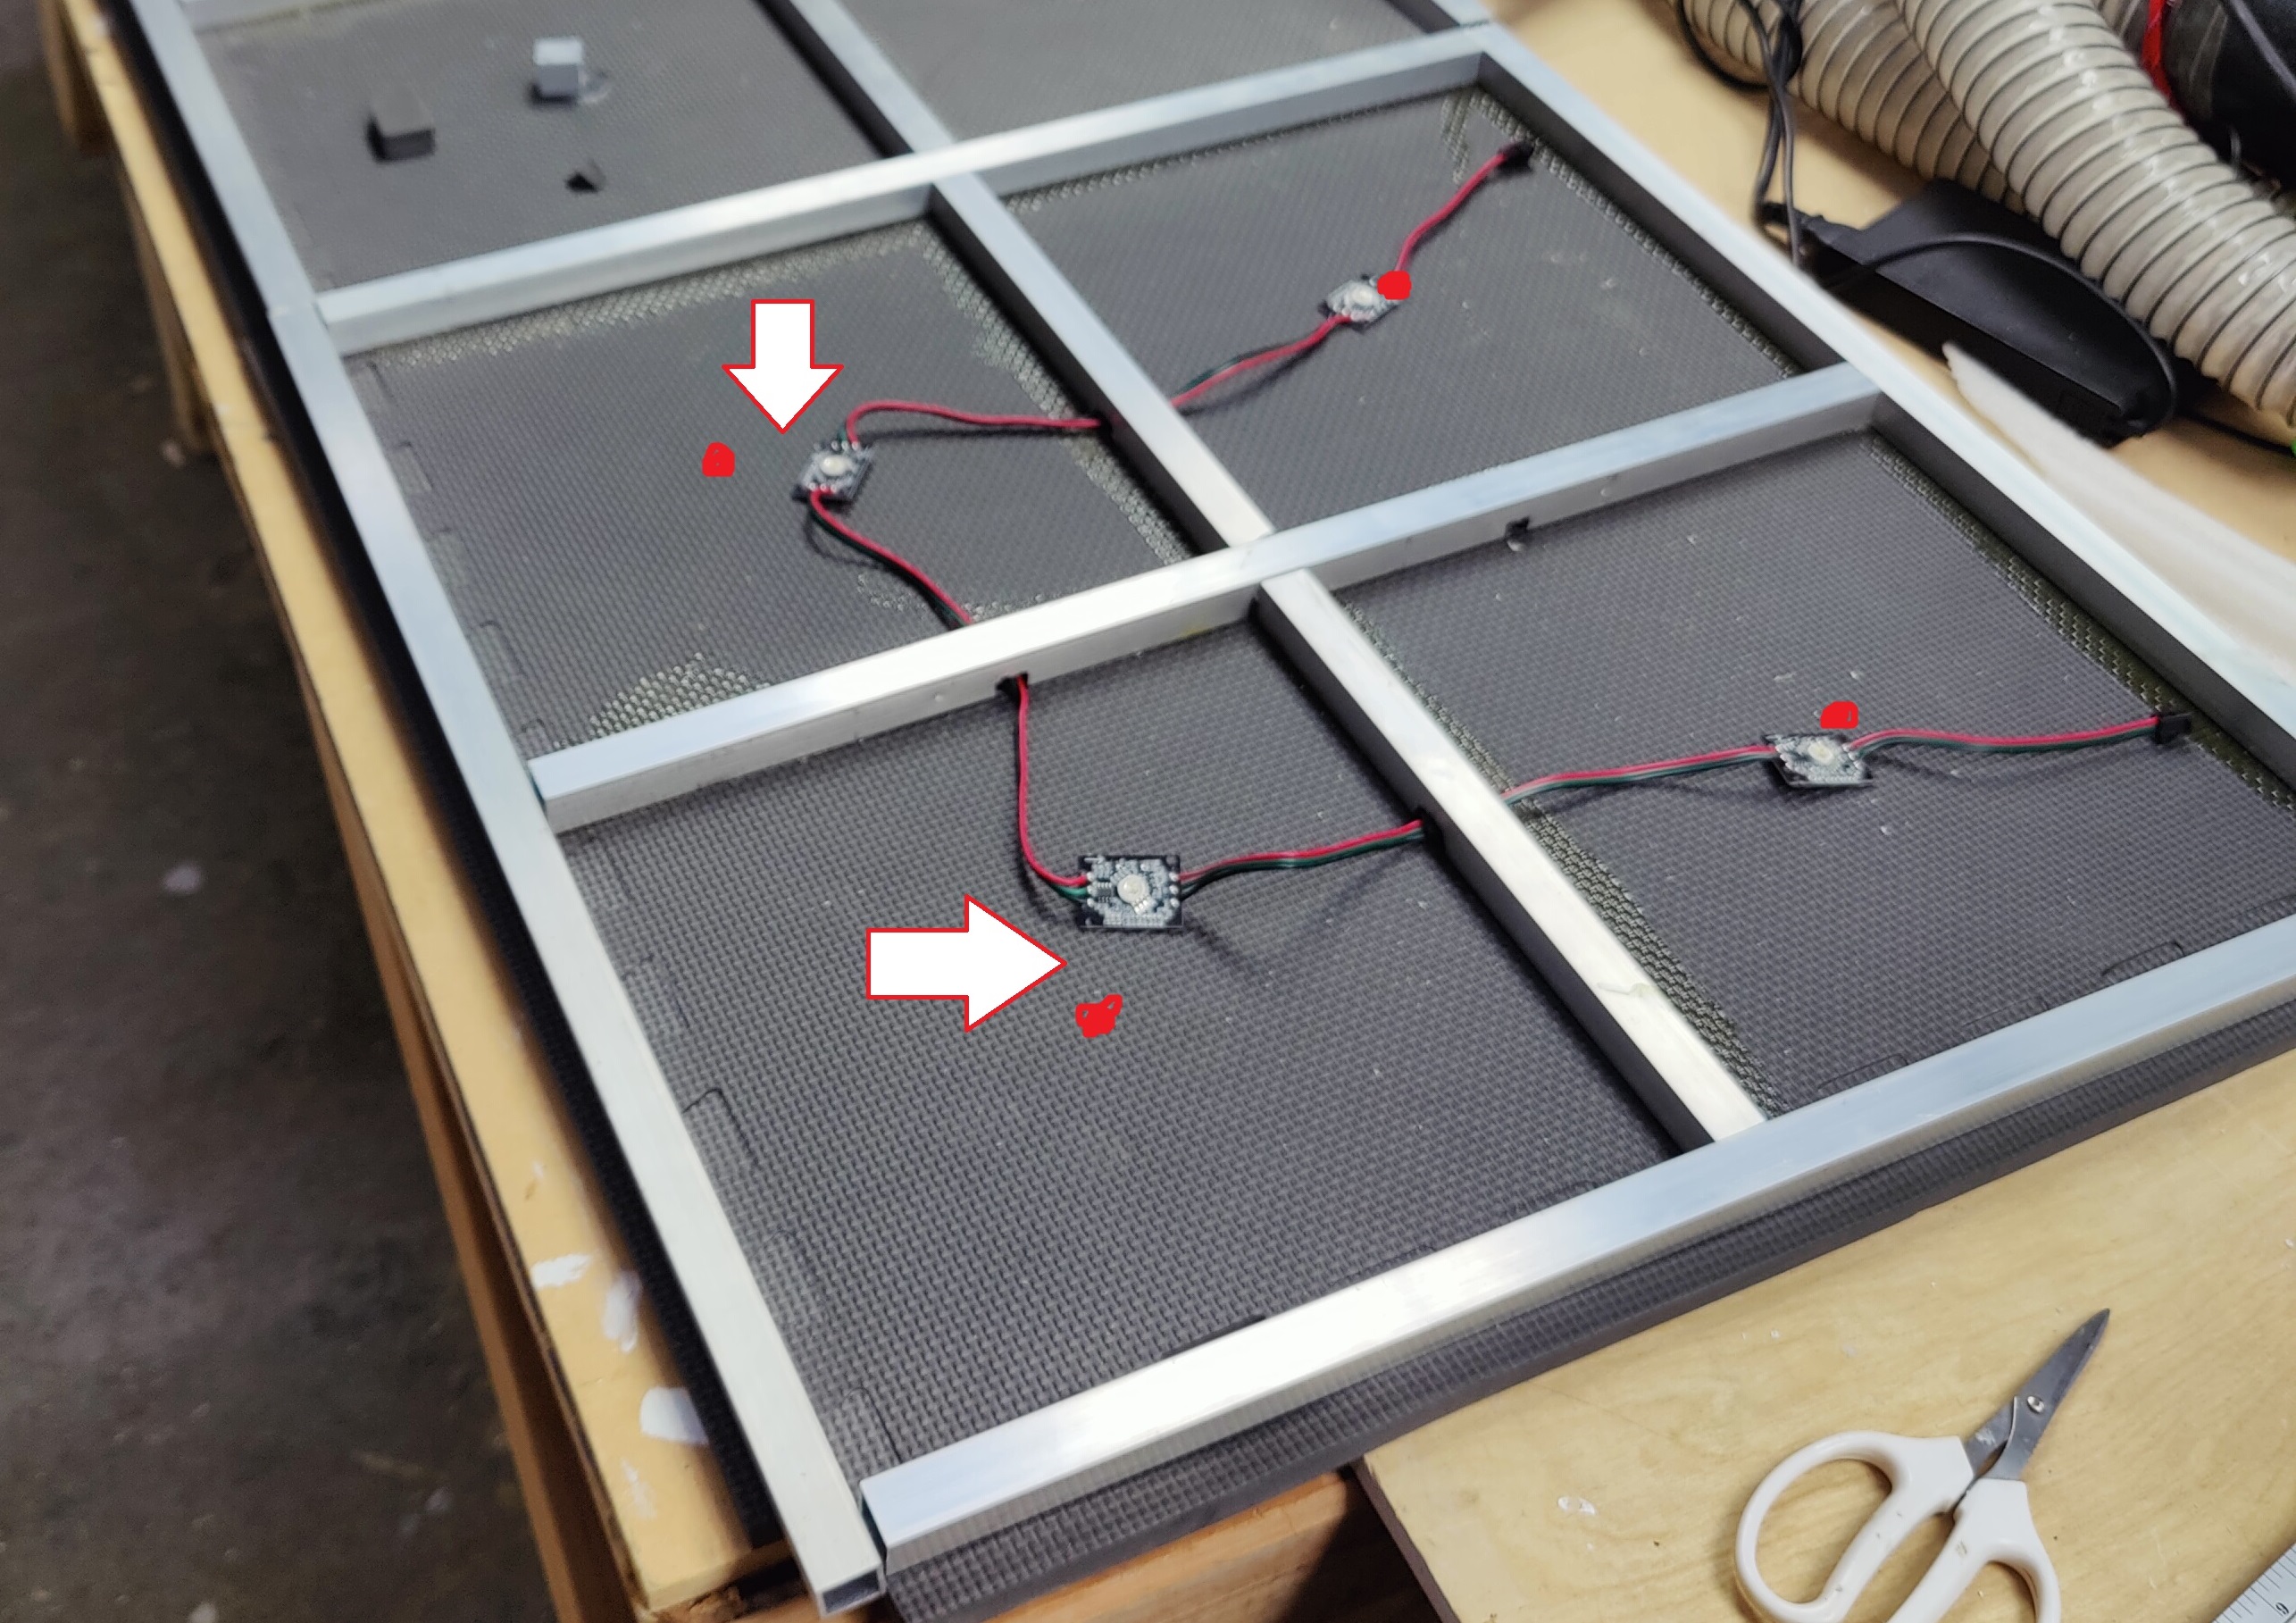
The wires are ever so slightly too short to let each pixel be in the middle of each square. I'm off by an inch on either side, and it is very noticeable.
Fuck.
We are going to have to either de-solder and re-solder six wires per light to extend the
length
of the wires, (3,456 soldering operations!!!) or find a way to get little JST extension
cords. Do they make short JST male-to-female cables?

They'll work, but only if I can join a male and female connector together. This means 3 butt-joints per extension cable. 3 extensions needed per tile, 144 tiles. We're looking at 1296 butt joins.
Making a Thousand Butts
Or: How to attach thin wires at scale.Alright, so we're going to need to put together two thin 22ga wires. How do we want to do it? The most straightforward idea is soldering, but we're going to need to do heat shrink tubing on top of that to insulate the wires. If we consider the soldering and tubing shrinkage to be different operations, then that's going to be 1,296 connections. Assuming each operation takes around a minute each, that's 21.6 solid hours of soldering. This one part. Running under ideal conditions.
Surely there are better ways to connect wires, yeah? Internet says we should consider Wago connectors:
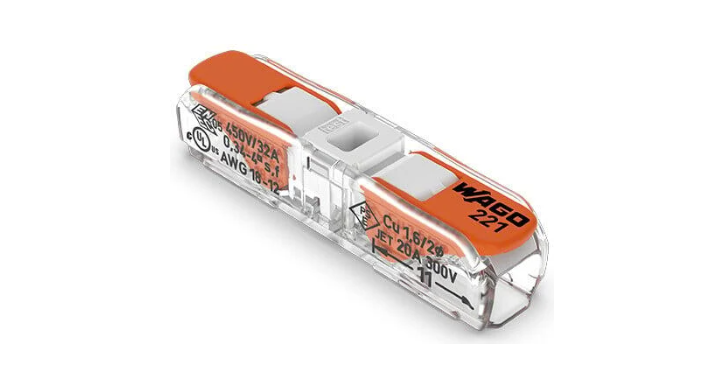
Bada-bing, bada boom: wires be joined.
Pros: they apparently make solid connections and are fast to apply and operate. Cons: Really freaking expensive per unit, I can't find bulk pricing beyond the little baggies at the big box store, and they don't come small enough for the tiny 22 gauge wire I'm using. Plus, if you put three of them together, they become too big to fit in the super narrow tolerance space we have to work with. Fantabulous.
Okay. So what's the answer? We need to strip, solder, and insulate thousands of wire connections. How can we do that quickly and reliably?
Heck if I know the correct answer, but I do know the answer we chose:

These guys are little pieces of heat-shrink tubing, with a ring of low temperature solder in the middle. You use a heat gun to melt the bead of solder, and the heat shrink shrinks up and insulates the wires, holds them in place, and the solder makes a very solid connection between the wires.
Because alignment, soldering, and insulating all happens at the same time instead of in three separate operations, we actually get fairly solid connections pretty quick. If you make a jig, that makes it go even faster. That should handle the entirety of getting the lights connected.
Okay! That's a floor design I think we can work with. Let's add some
3M reflective
paper
adhesive aluminum foil polished aluminum
thin
aluminum
squares to each of the four tiles. They'll reflect
like a mirror, and the large metal sheet will provide some stability and thermal relief
for the
lights. Add four cut pieces of clear acrylic triangular rod to support the flexing poly
lid, and
we have a fairly stable assembly!
Question 5:
How do we detect a footstep?
Oh boy are we in the thick of it now. But we're also close: How do we actually detect if someone has stepped on a specific square? This is a critical aspect of the game framework.
Let's Try: Capacitive Switches
Capacitive switches have a great advantage: they are non-mechanical. Stomp as hard as you want, but you can't break them via force. More reliable, simpler, heck: maybe even cheaper! All made possible thru the wonders of capacitive sensing.
But how does this work?
If you were to measure the voltage going through basically any wire, then if the wire is unpowered, you might expect that you would see zero voltage. But you would be wrong! Electromagic radiation bouncing all around us can induce voltage in the wire, causing weird stuff to happen. This is called floating voltage, and it's why you can't just hook up a button to an arduino and call it a day. If you're wondering why this happens, it's because it's ghosts infecting my electronics to spite me personally. Sure, you can try to convince me, the software guy, that hardware isn't haunted, but I have gone from a man of science before this project, to acknowledging that all modern programming languages are naught but the fettered souls of the damned, bidden to process x64 CPU instructions.
Capacitive sensing takes advantage of these ghosts to detect when large electrical disturbances come into range of this hypothetical wire. If you have a piece of software listening to this wire, you can have the software tell when the wire is next to a big, fleshy capacitor. (AKA a human)
Sounds good right? That's because it is good. The issue is that since we are working in a tiny amount of sensing space, we don't have a lot of distance to separate signal from noise. That, and I have 0 experience doing this. All the online guides I could find didn't really break it down super well for people that are...erm.... on my level. I'd love to figure out more about how to do this from a practical level, but at this point I can't dedicate two of my eight weeks learning about a technology that has a high chance of not working out for production. So! While capacitive switches were (and still are!) what I think the correct answer is for this kind of floor, I'm going to have to rely on switches I can understand and implement in my super tight time frame. That means making my own mechanical switches.
Okay: Let's Make Mechanical Switches.
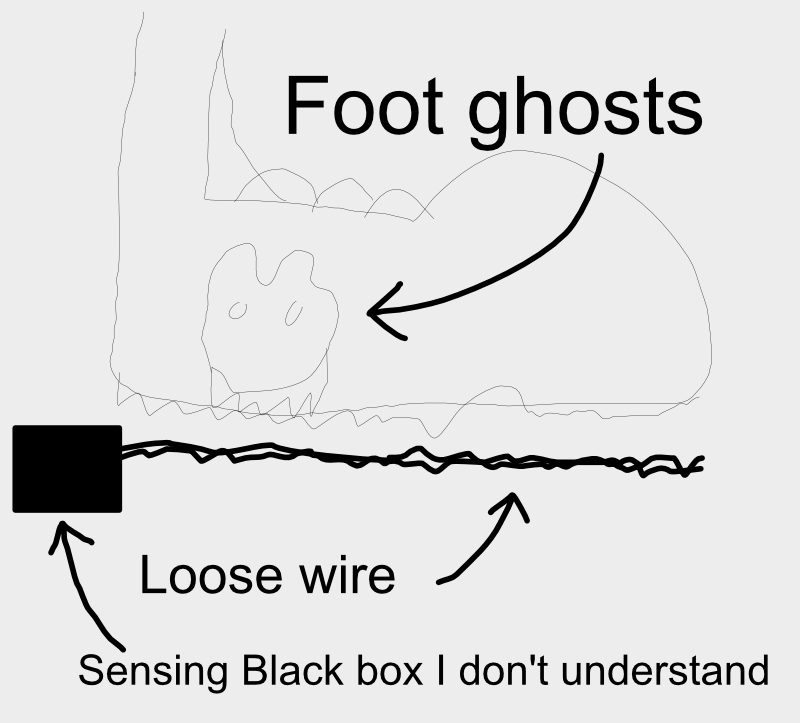
At the end of the day, all a switch is is a fancy way to get two pieces of metal to touch or not touch each other. Good switches are switches that reliably allow power to flow or not flow through them. So I need to make two pieces of metal touch, eh? That sounds do-able.
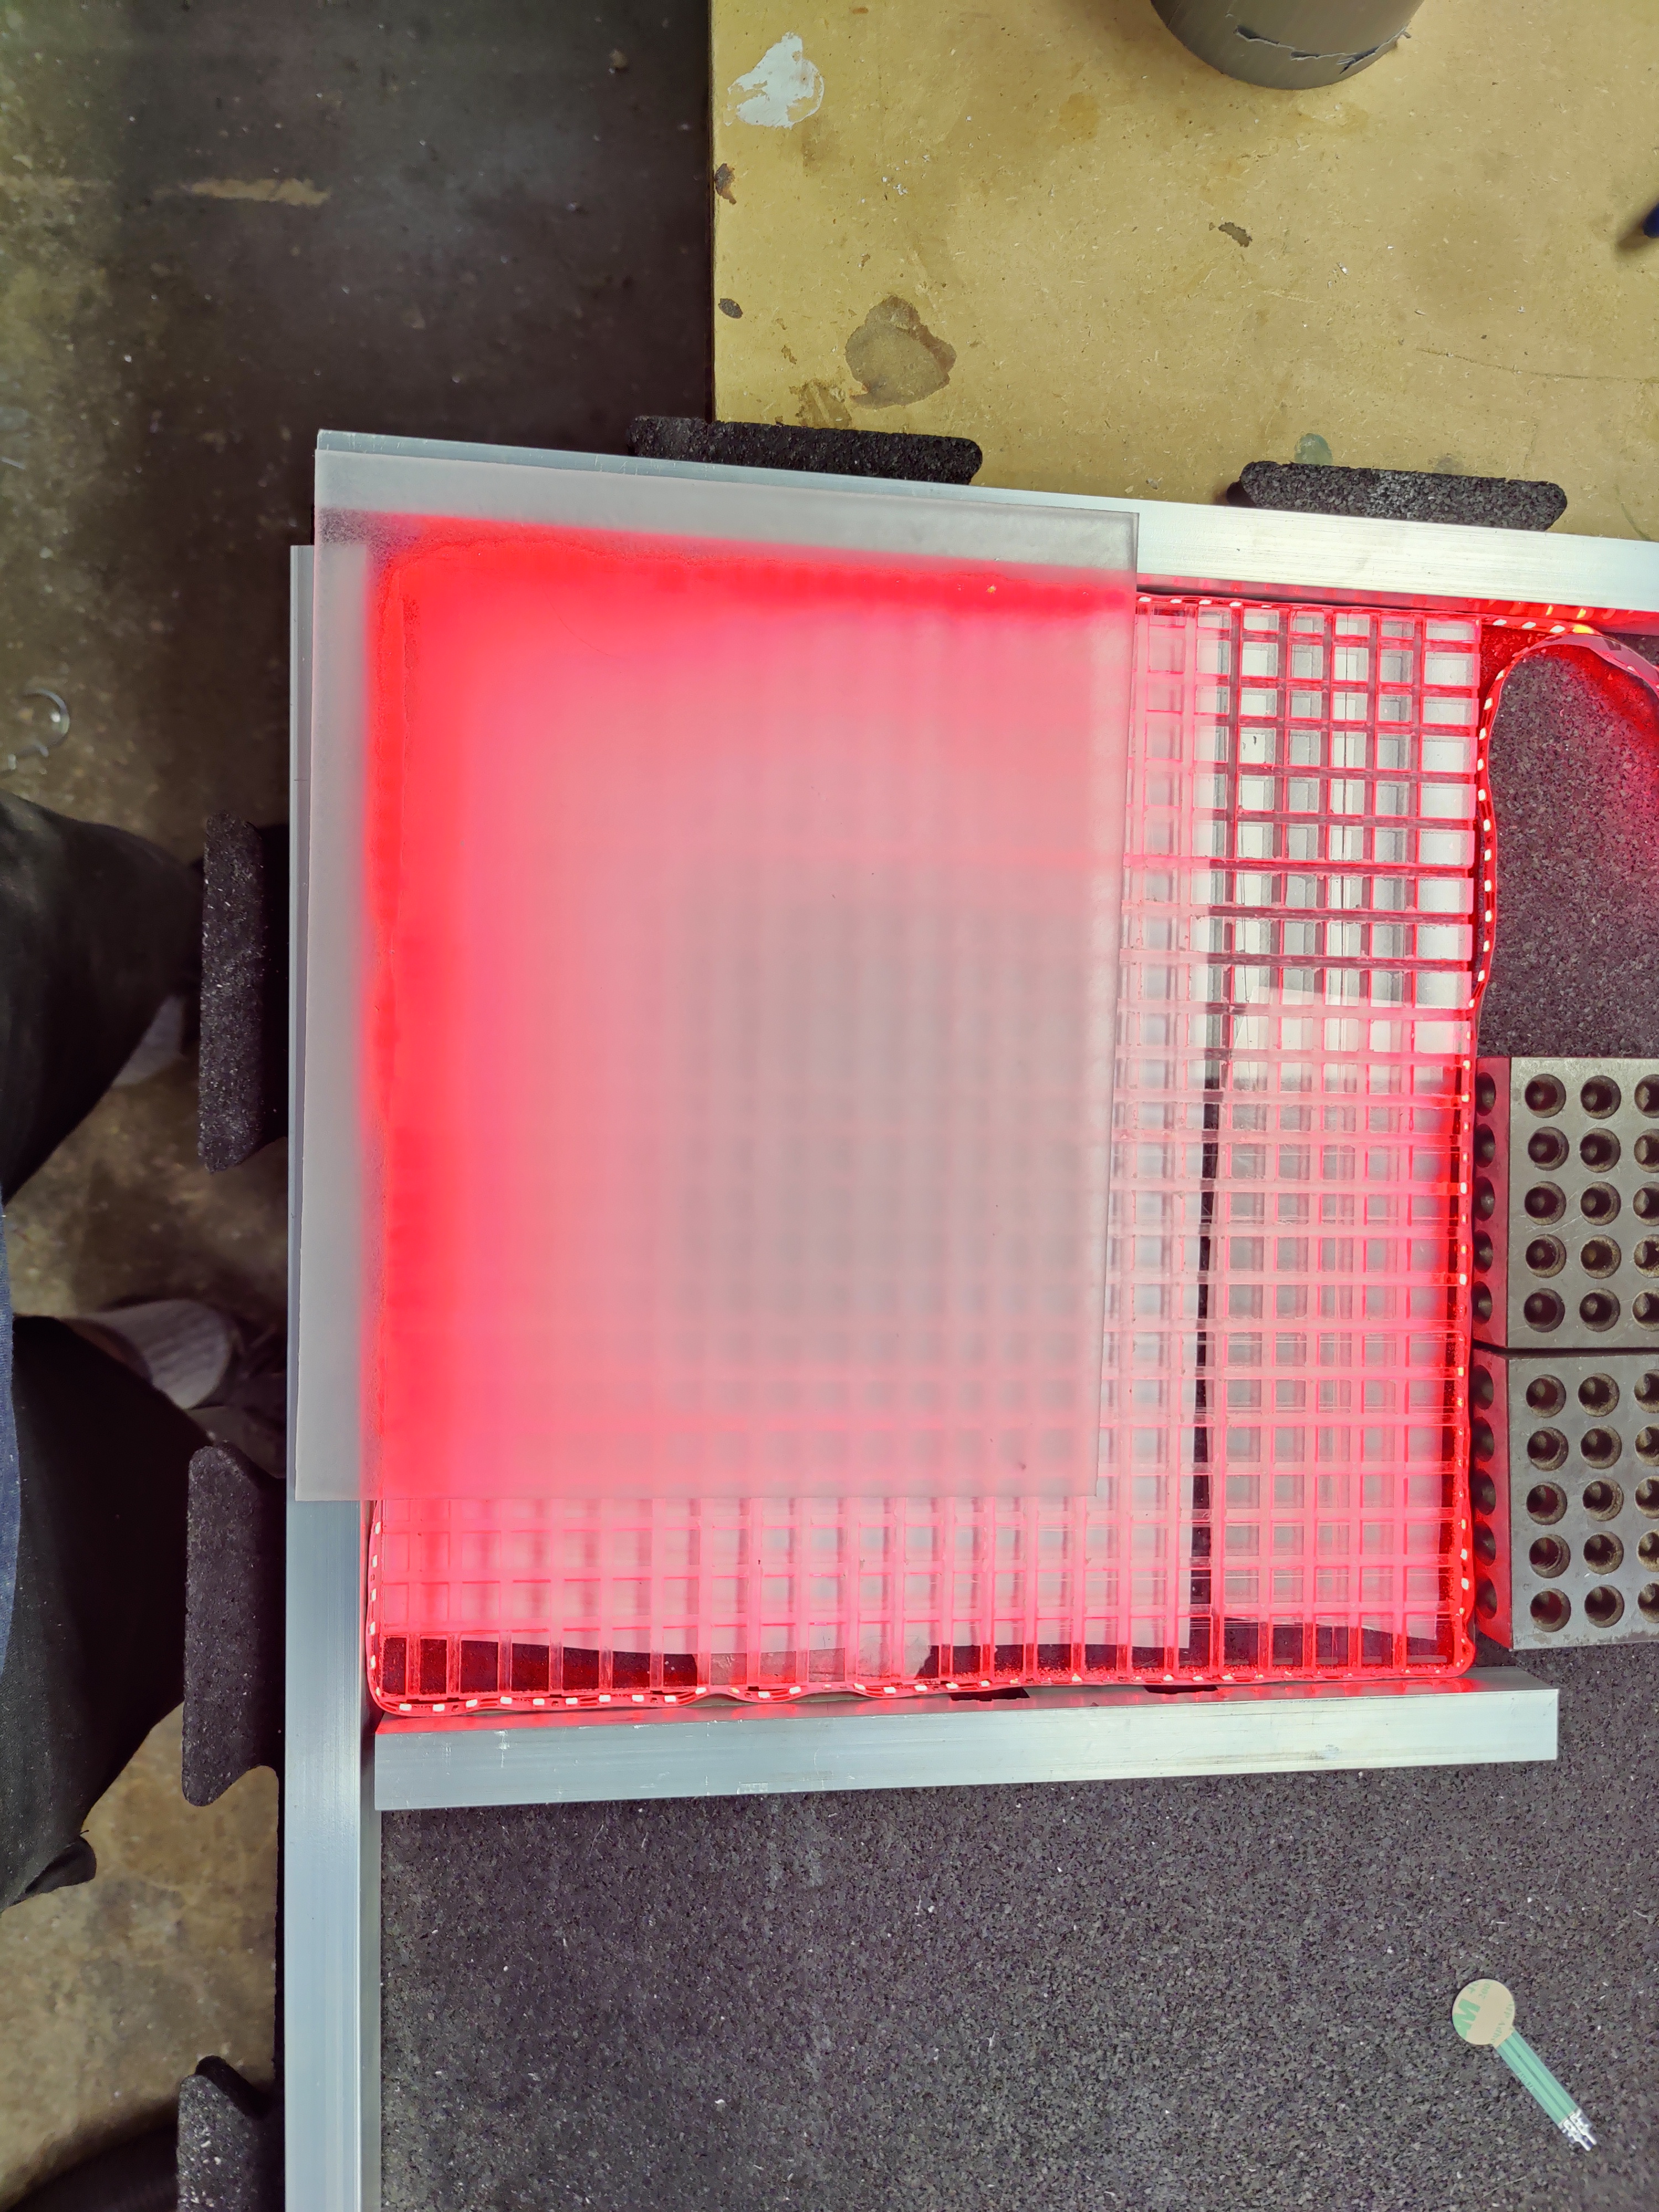
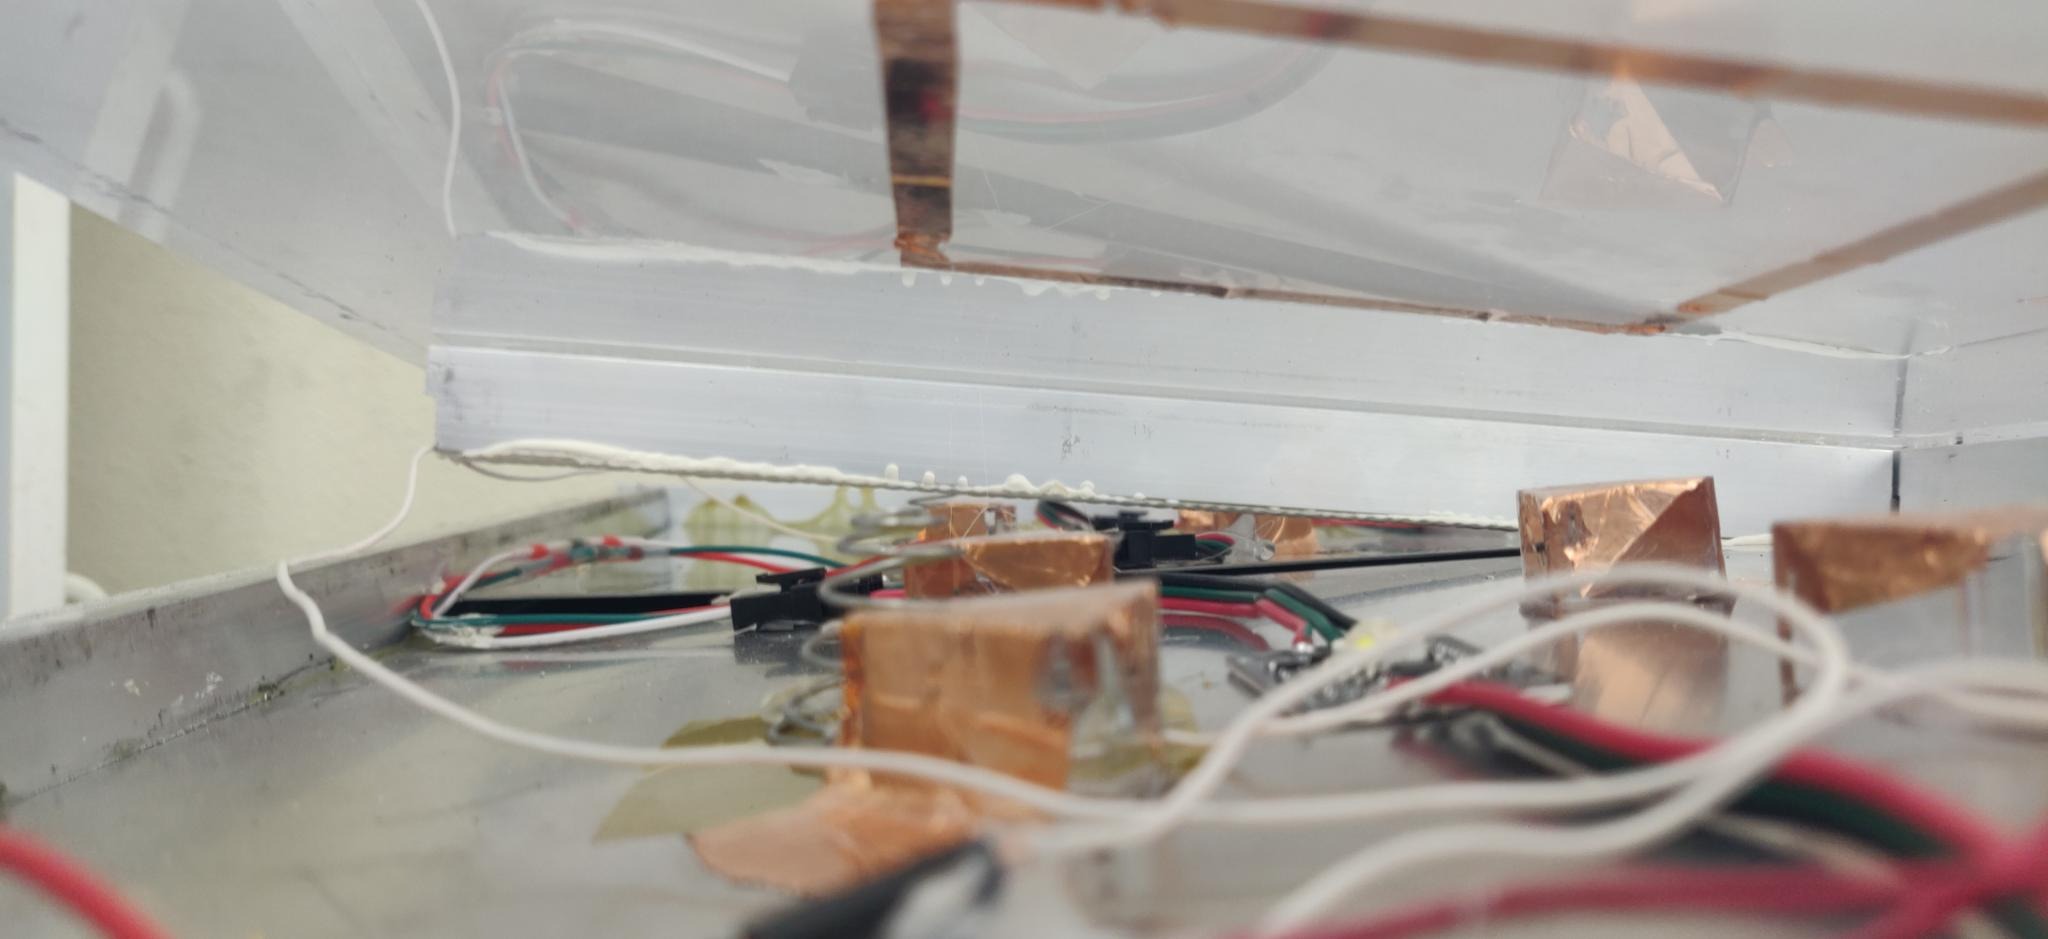
I'd love to use a pre-made switch for this, but we've got to worry about a very heavy human stomping on a tile, and most switches can't handle that. So let's find a way to turn the flexing polycarbonate lid into a conductive electrode. Enter copper tape!
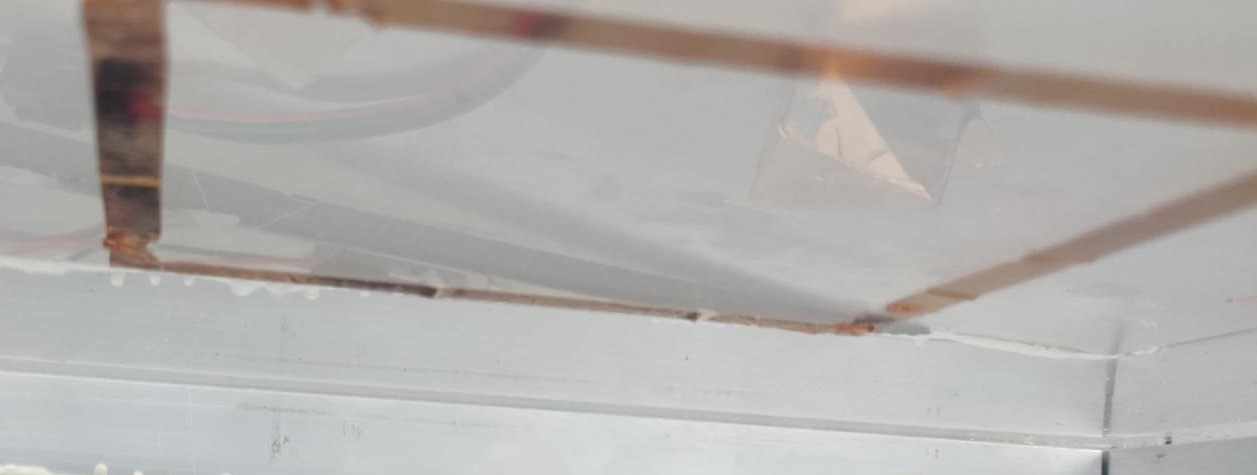
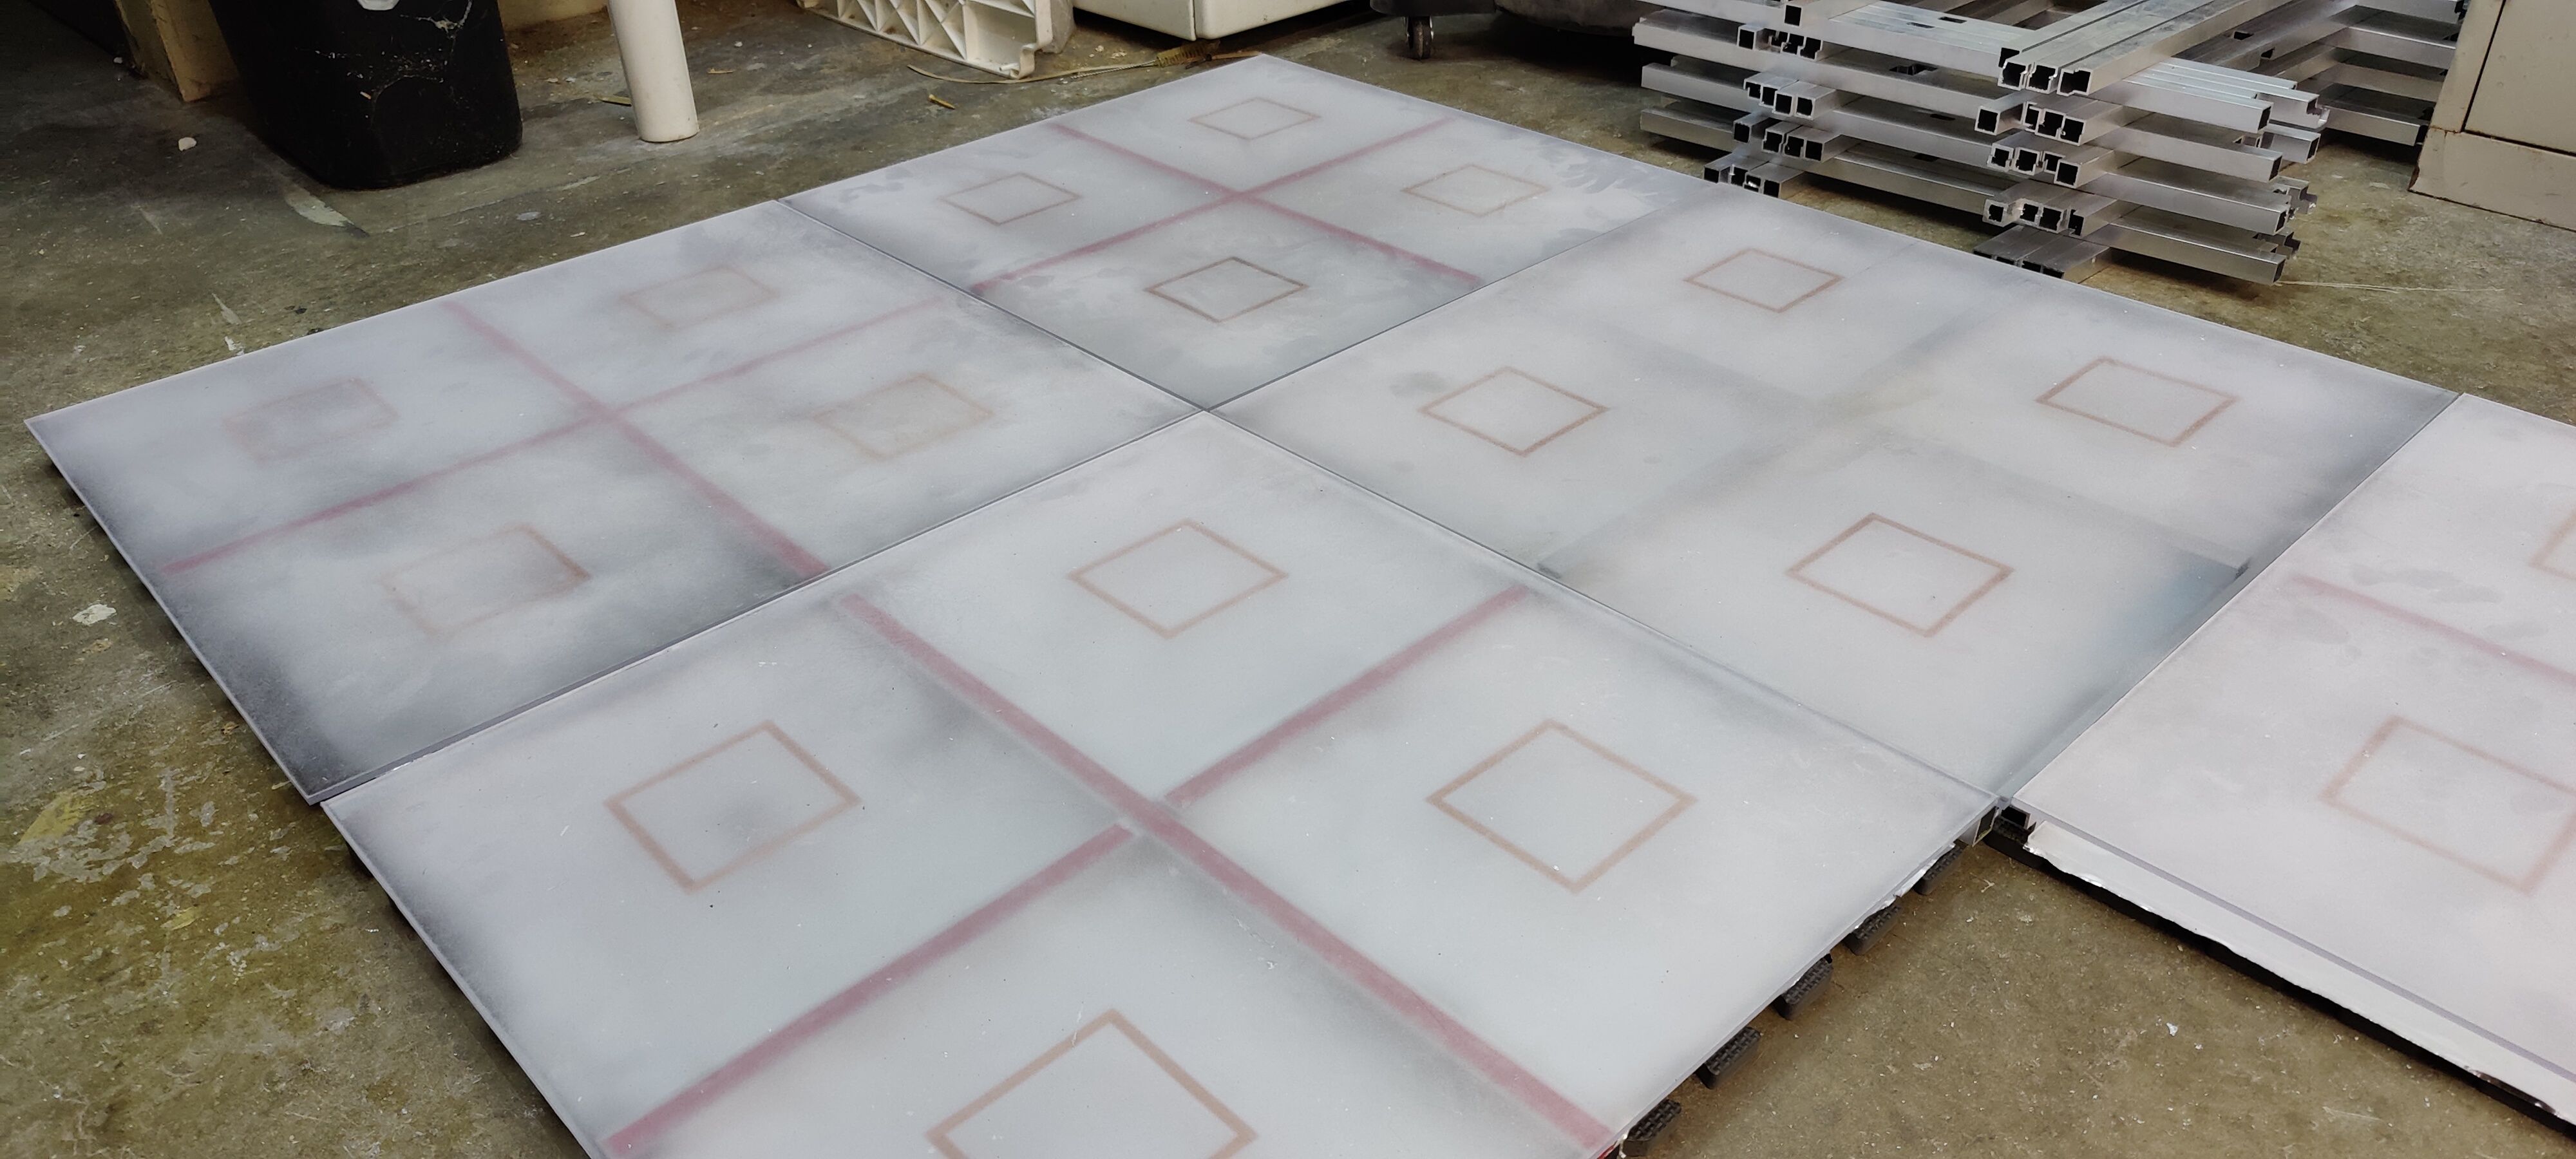
I admit that the tiles would look better if we didn't have the copper tape squares. But! It doesn't look awful in the final product so long as it doesn't cover up the light in the middle.
Add in an electrically isolated spring to supply power to the copper tape, and that completes the sensor.
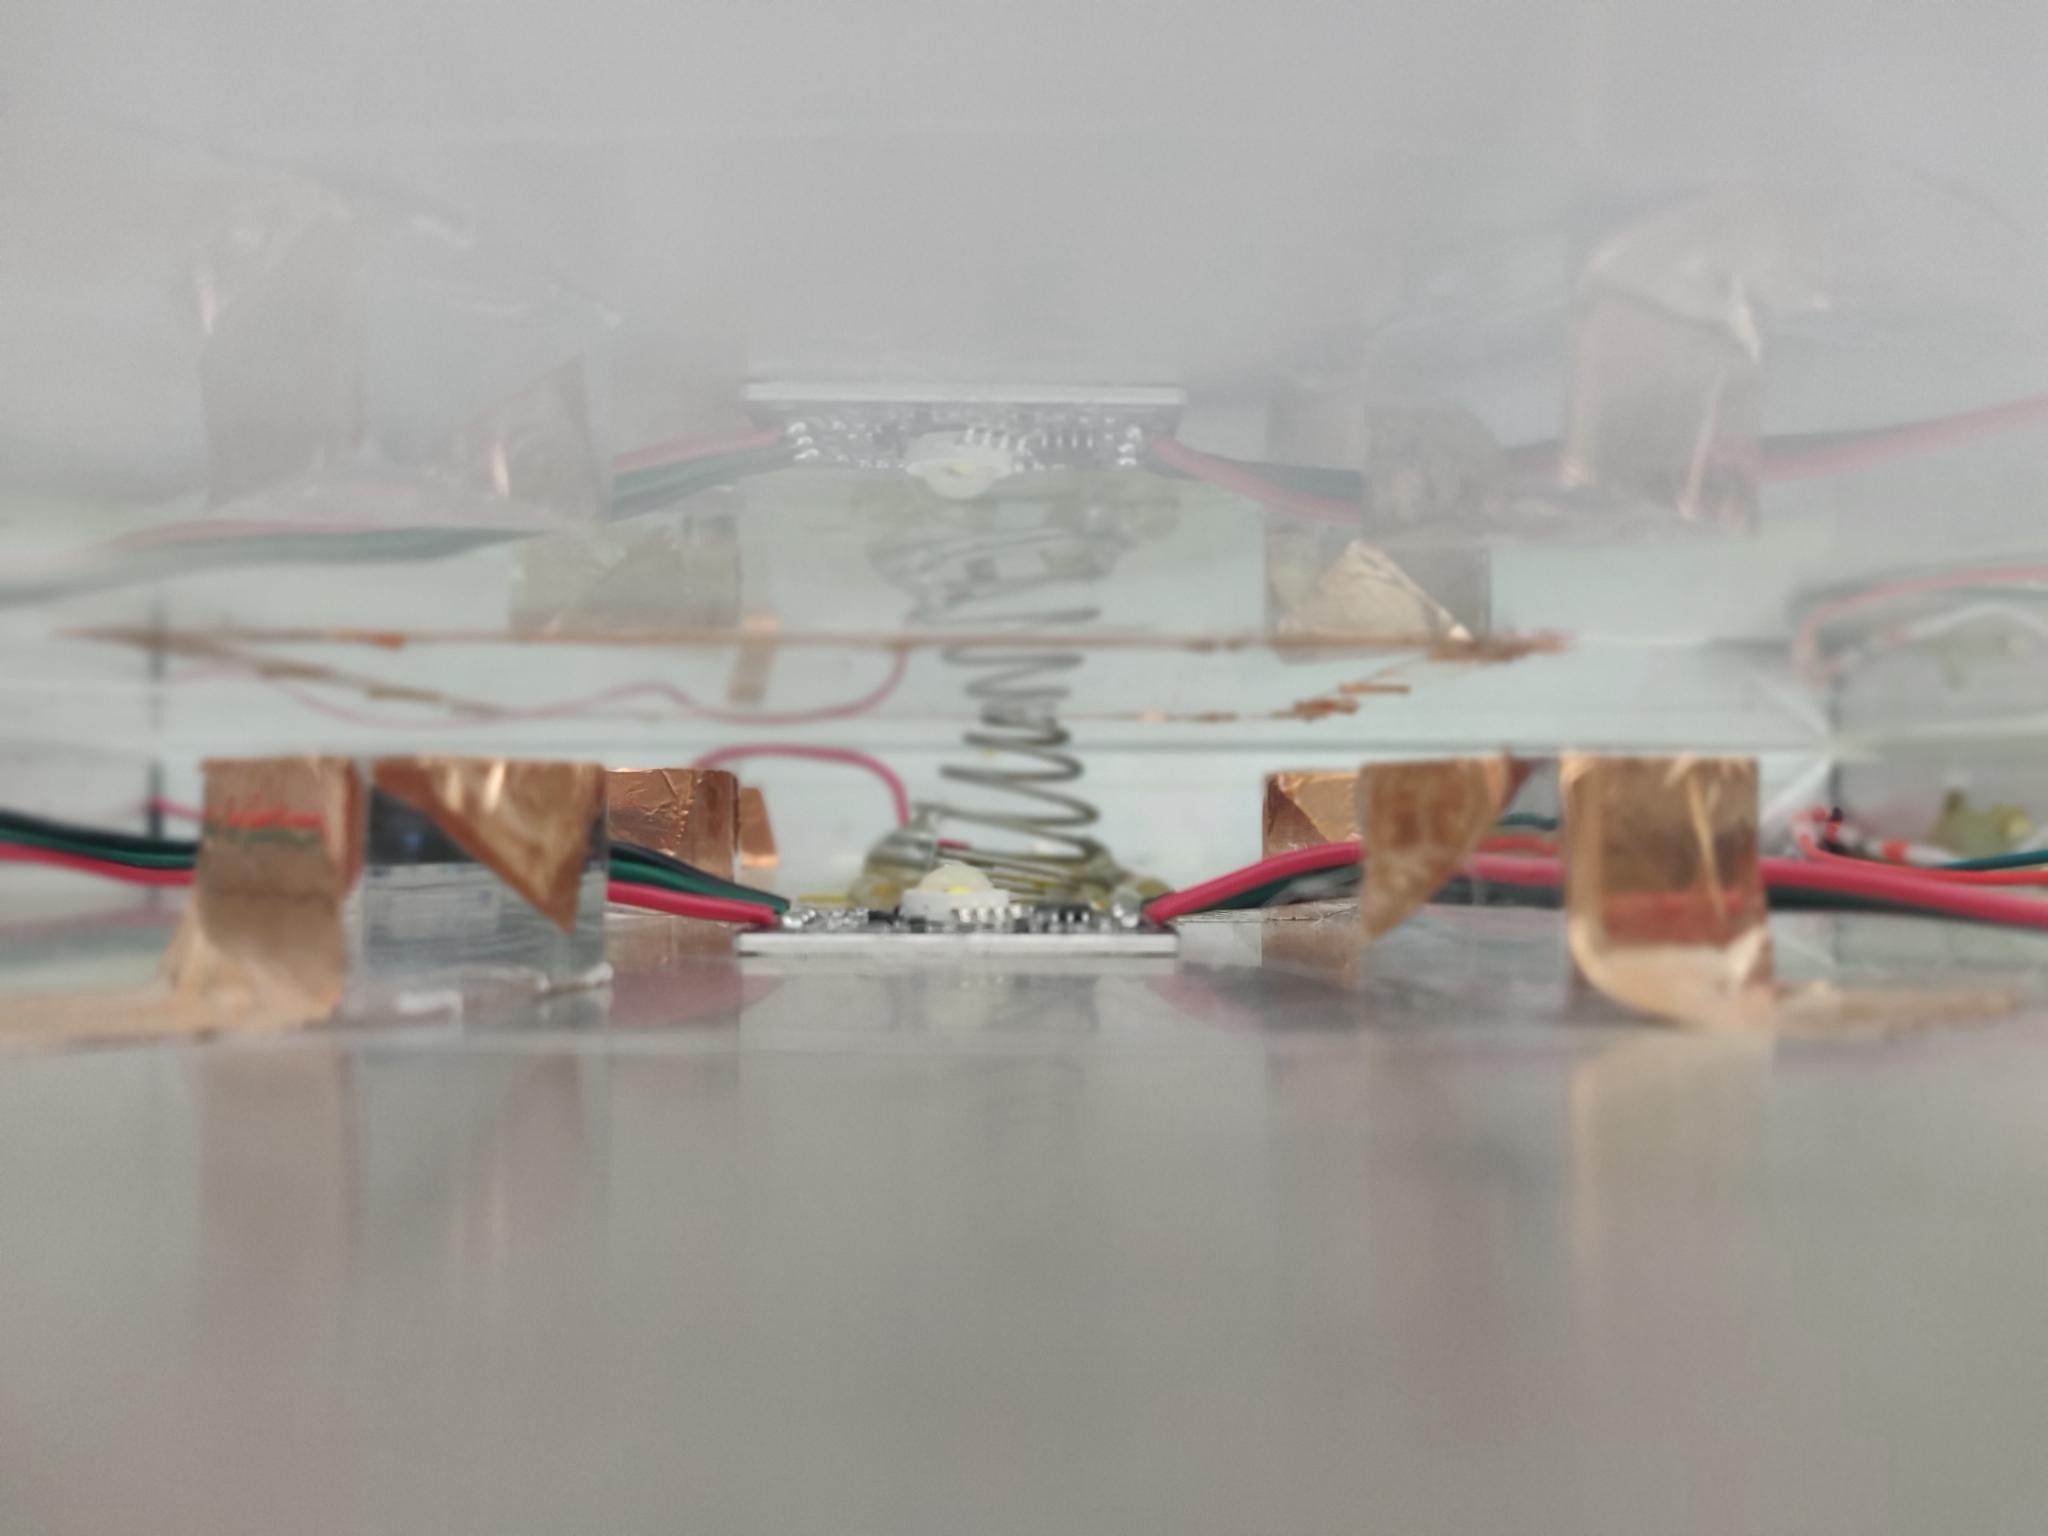
The spring will be powered with 3.3 volts of power from the Pico sensor board, which will transfer to the square of copper tape. When somebody steps on the lid, the plastic flexes and the energized copper tape touches the four little acrylic pillars that are connected to ground (the ground sensor) by way of yet more copper tape. The voltage flows into ground, and the Pico detects the voltage drop and reads that as a step.
So that's the mechanics sorted, now the question is how this information is processed and sent to a computer.
Question 6:
How do we control the floor?
We've got the prototype built. We're using metal. Switches are sorted. The lid will be polycarbonate. Yoga mats for the base layer. Now the question is: how do we raise up from this lowly world of metal and wire and plastic, and ascend to the heady heights of control, of an API? That is where my friend Penguin comes in, so I'll let him take it from here:
The AsobuFiles
As a software engineer that has dedicated much of his career to web, desktop, and game development, hardware programming was out of my wheelhouse. Past a few flirtations with an Arduino VILROS Kit, and a Raspberry Pi 4-powered project that never went anywhere, I had hardly ever decided to tread in the realm of smart electronics. But, we don't get better by staying in our comfort zone, we get better by venturing into the unknown. Sometimes you walk away with a career, sometimes you decide never to touch the stuff again.
My personal policy being to jump into new ventures, Stevenson approached me with this opportunity, and I had to take it.
Little did I know this was going to stretch the limits of my knowledge and sanity.
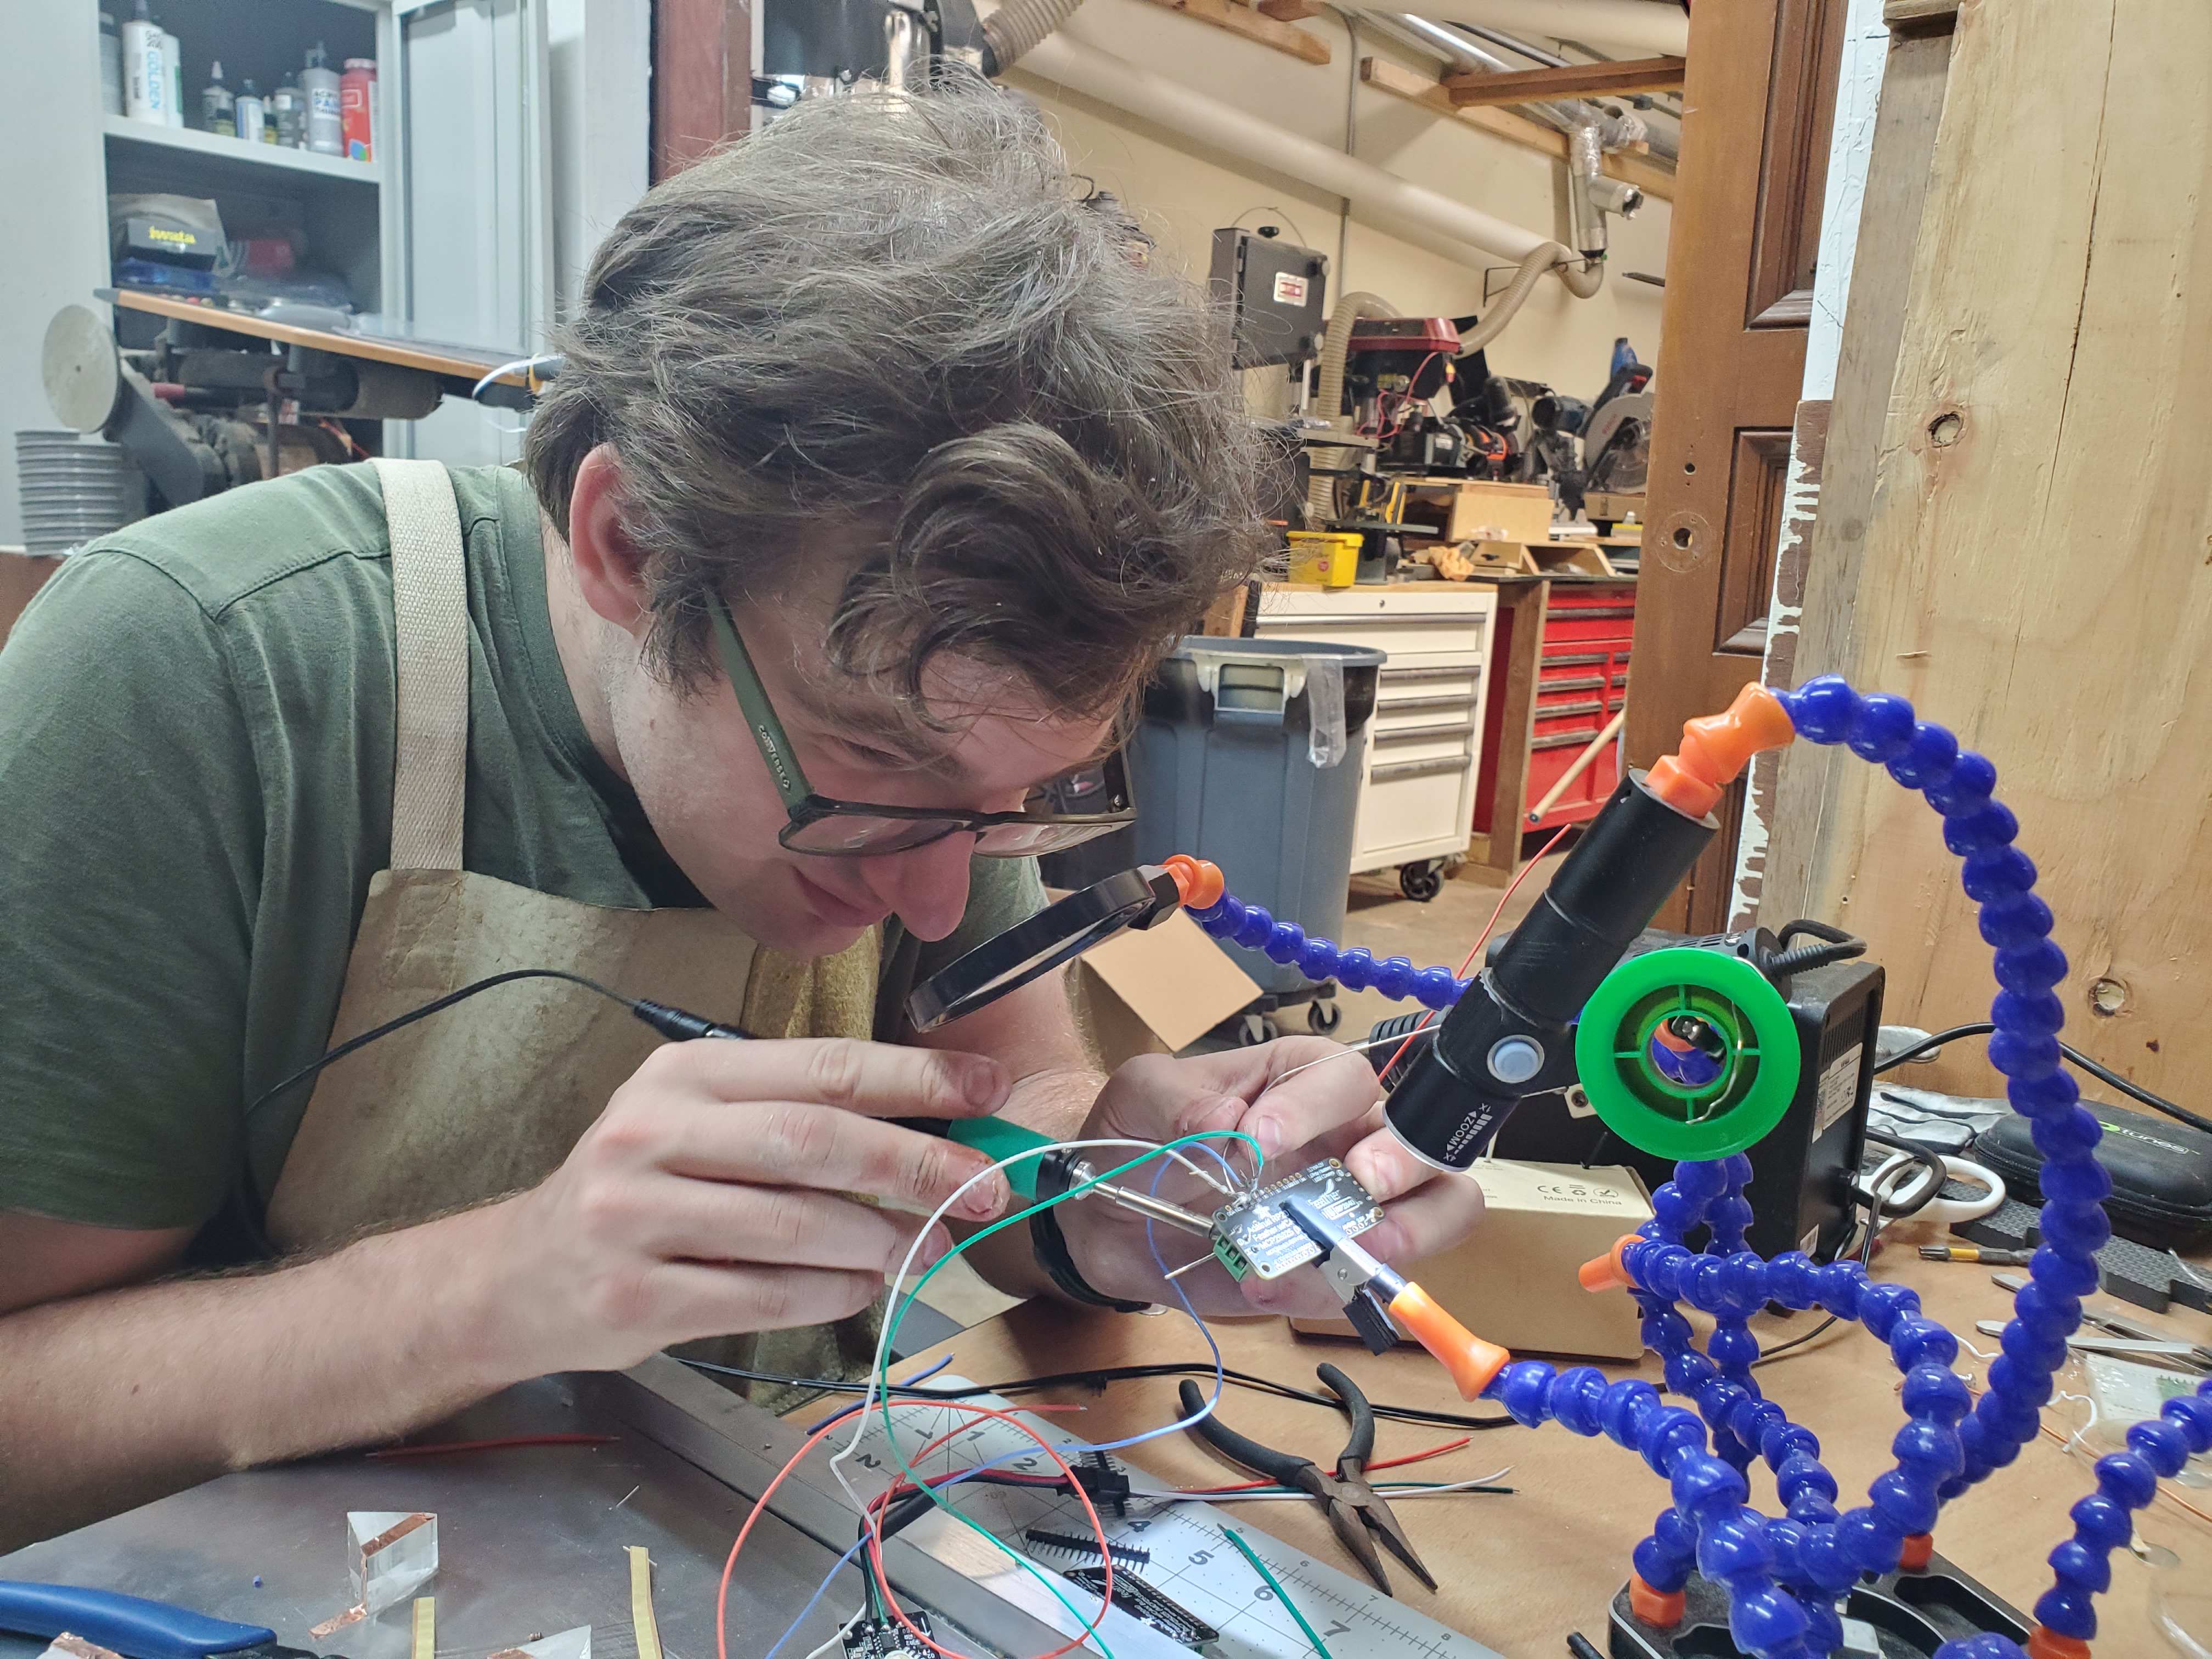
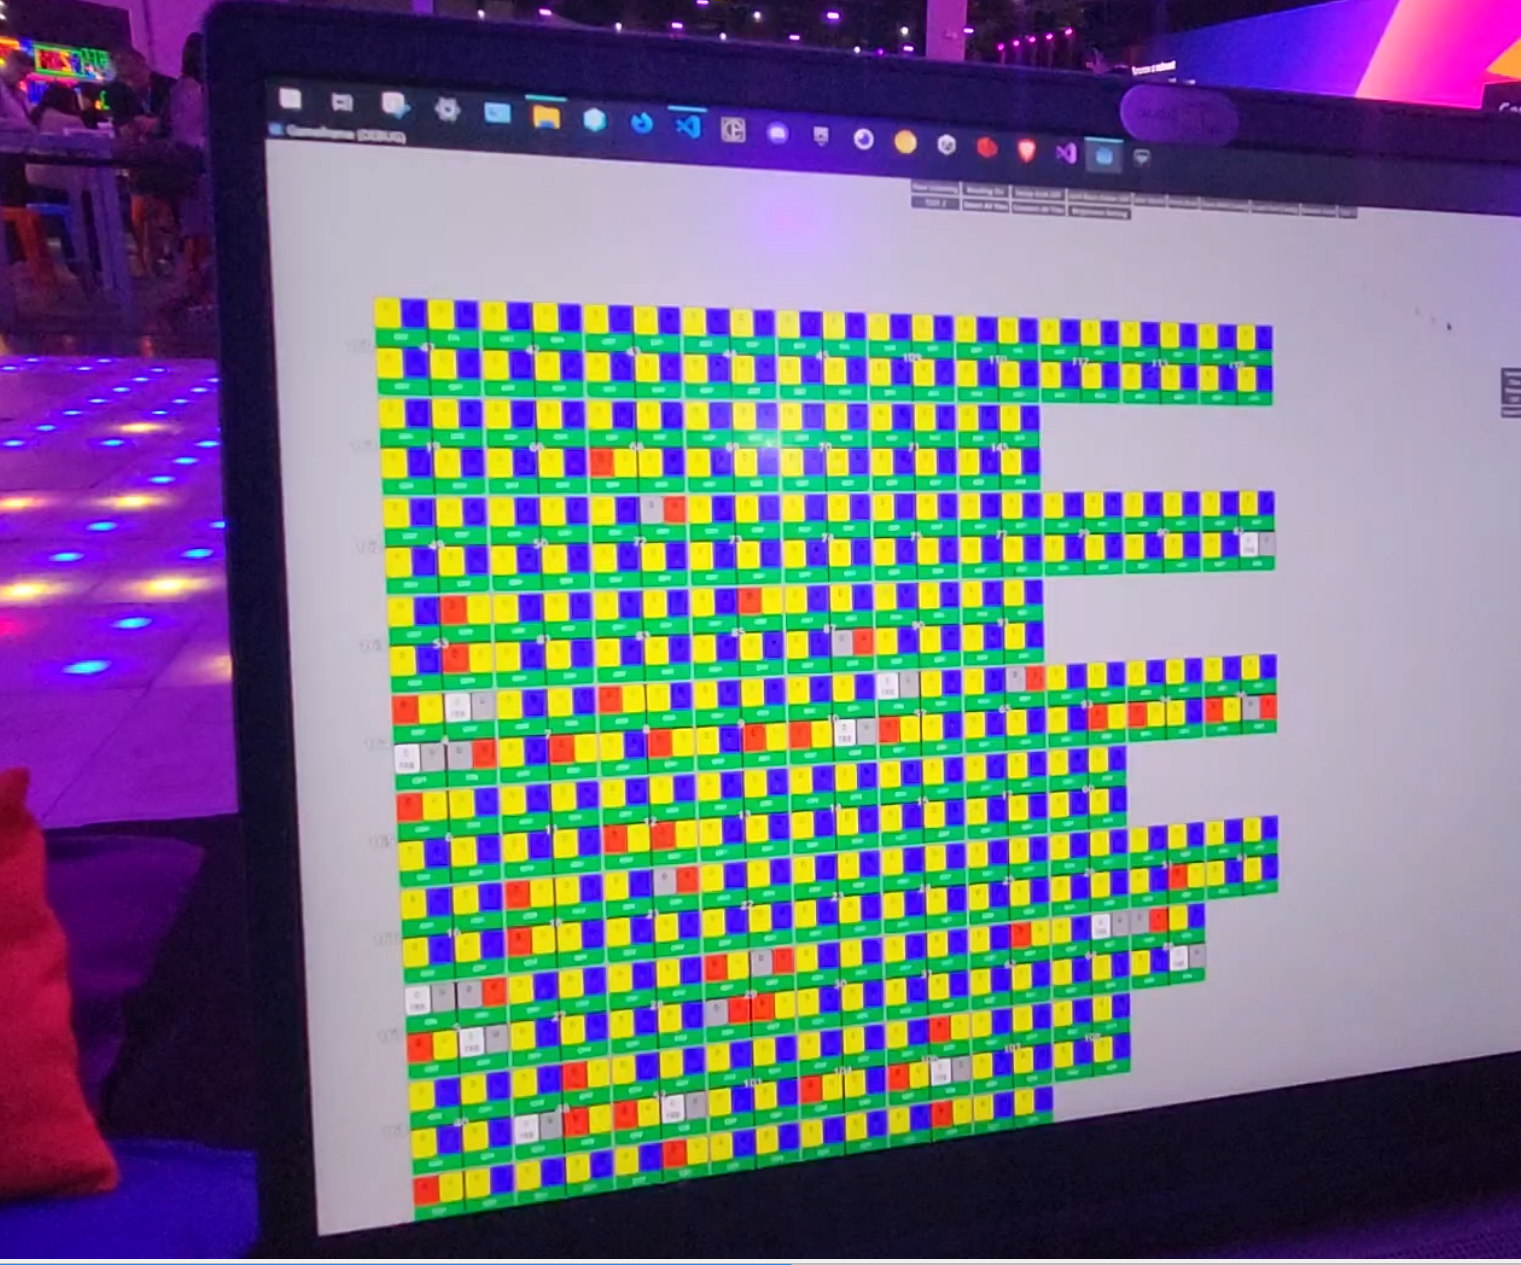
At a base level, each unit in the floor consisted of 4 lights and 4 switches to keep track of the state. This necessitated 8 GPIO pins to read state and set the lights. Later these would be reduced to 5 as the light strip only needed one pin to set a data signal. Given that my experience with hardware is limited, I was always going to go for an Arduino or Raspberry Pi-like platform to drive atomized behaviors in the floor. The deciding factor was, and would continue to be, communication between the floor tiles and sending data into the computer that would drive the state of the entire apparatus.
At first I thought I could just chain every tile with a USB cable in a row, with a hub of 10 devices communicating to a manager device at the head of the row. They would be relaying information to the hub, and the hub in turn would relay information of how to light up.

Stevenson shot down that proposal very quickly: The cable run would be so bulky it wouldn't fit in the side channels of every tile.
I researched the possibility of providing chains of Power over Ethernet where I could provide voltage for the controlling device and the lights, daisy chained between each other. As soon as I proposed this to fellow engineers, I was promptly told that this was both insane and dangerous.

I was at an impasse. I needed a physical protocol that could:
- Send and receive short binary messages
- Receive said messages quickly, and most importantly:
- Support daisy-chaining devices instead of a hub-and-spoke paradigm.
Asking my only colleague who studied robotics for advice, he clued me into CAN devices. The Controller Area Network was a standard created by the Society of Automotive Engineers to send and receive fast short messages over simple High and Low wires in a fault tolerant manner. Implemented by Phillips and in production cars starting in 1991, the standard was well understood and used in a broad array of industries. Most tellingly, CAN devices could be wired up in a Bus, meaning that the cable run would be at maximum 3 ordinary cables.
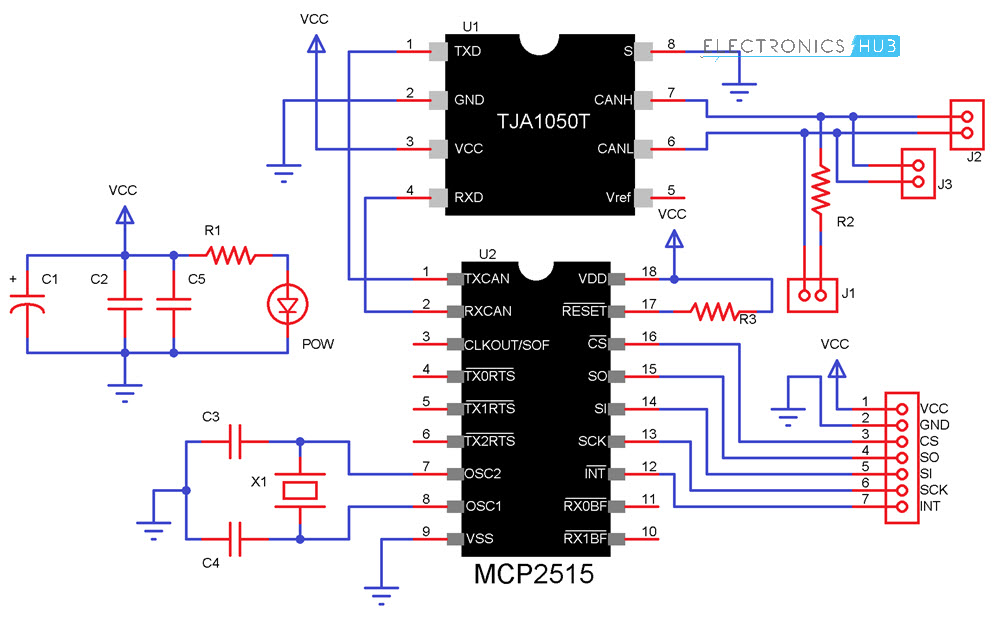
With a familiar coding environment, and the desired protocol already available, the choice of hardware was clear.
I'm kidding. At first we went with a Raspberry Pi Pico W and the CAN Bus Cowbell from Adafruit, thinking we could benefit from the wireless capabilities by sending information to a swarm of wireless Picos 100 devices strong.
But when the Cowbell simply refused to connect with the RPi Pico W, we desisted from this course of action when we realized we were probably going to operate in an environment that was absolutely saturated with wireless devices. In ideal conditions, one would already have to contend with latencies inherent in any wireless communications, but in the real world and on the convention floor getting any kind of consistent wireless performance would be impossible.
And so with the RP2040 CAN Bus Feather we went, using the Circuit Python 8.7 environment.
The software was architected as such:

Every floor tile would have one CAN Bus Feather, that would record what state of its switches for 1 GPIO pin each and keep a reference to the Light strip connected to a 5th and final GPIO pin. These tiles would be connected to a data bus that would comprise one row of tiles. At the head (or tail) of these rows would be the "Manager" CAN Bus Feather, whose purpose was to read the stream of messages coming into the bus, and send out color information for each of the tiles. The manager would then be connected to a central computer that would hold an executable that would read messages sent by the managers through, excuse me... I... I feel terrible acknowledging this.
Even right now, as I write it, months after it happened, I am overtaken by grief, disgust, and sorrow.
The manager boards sent messages to the computer via serial to the computer, which would then read pressure messages and initiate color responses.
My woeful uncleanliness aside, as far as I know the only way to talk to RPI Picos with a regular computer is to establish a serial connection over USB at 9600 bauds.
I sent colors out, I took switches in.
It's simple right? It's a single-threaded python process that sends messages. That's simple, right? Right? You can do this no problem right? Right?
Ha.

I proceeded to learn a few painful lessons, one at a time under a ticking clock:
Lesson 0: Memory leaks will destroy you.
As seasoned hardware engineers should know, running out of memory is something that can and does happen in your world. I'm used to throwing more RAM at the problem. I was in a Java Spring shop for 4.6 years, with a platform that needed 32 GB of RAM minimum to run. I had some bad habits to break, and fast.
Moreover, using strings for anything was and is a coin flip. The CircuitPython environment considers strings to be immutable. And as such any transformation requires allocating space for a different string of characters. On regular computers, it's not a problem if you're not insane. In an SOC less than the size of a stamp, however, very much a problem.
Use strings sparingly, don't learn this the hard way.Lesson 1: Reduce message frequency and length at all costs.
You would think that given the address space of the CAN Bus, we would be sending and receiving messages like nobody's business even if we were sending messages constantly as fast as clock . No, no such luck. The MCP2515 transceiver decodes these messages one at a time, even when the ID does not match. At first the tiles sent messages constantly, even when there was no change in the state of the switches. This would “clog” the line, as every transceiver was constantly trying to figure out what to do with the messages, even when the messages weren't addressed to it.
I resolved to only send messages when something changed (i.e. a floor switch was engaged when previously it wasn't), and instead of initially sending information per individually set color, I sent bulk messages to update the colors of a tile. This greatly reduced the addressable color space, but given that we were never going to need to address the hex spectrum, I had to force Stevenson to stick with 18 colors instead.
Efficiency means everything when communicating. Only send when you have to.Lesson 2: Always find a way to fail gracefully.
Most of the troubleshooting happened when I had no way of diagnosing problems in individual boards. They would crash while on the floor, away from a usb cable to monitor their debug output. There was no true difference between development and production builds, forcing me to handle errors with making the boards restart themselves.
Figuring this out was a nightmare with only days away from the installation.
Always build in some manner of debug environment. Somehow.Lesson 3: Have a deployment strategy as soon as possible.
I had to manually connect my computer to 120+ RPi Pico devices and flash them with the script. I was at about device number 30 when I came up with an automated script that did the work for me in the CLI. The biggest timesaver in the world.
If you know you're going to be doing a task a lot, it's never too early to automate.Lesson 4: Don’t identify your deployments arbitrarily.
One of my biggest mistakes was to assign every tile an ID at complete random in order to identify them and make them interchangeable. This was not a good idea. It should have been a sequential series. Quite a bit of time was wasted in this.
If any part of your spec involves the rand() function and it's not cryptographic, something has gone wrong.Lesson 5: Despite doing everything right, you might have problems and you won't know why.
Perhaps the harshest lesson of them all. Oh we learned it.
-Penguin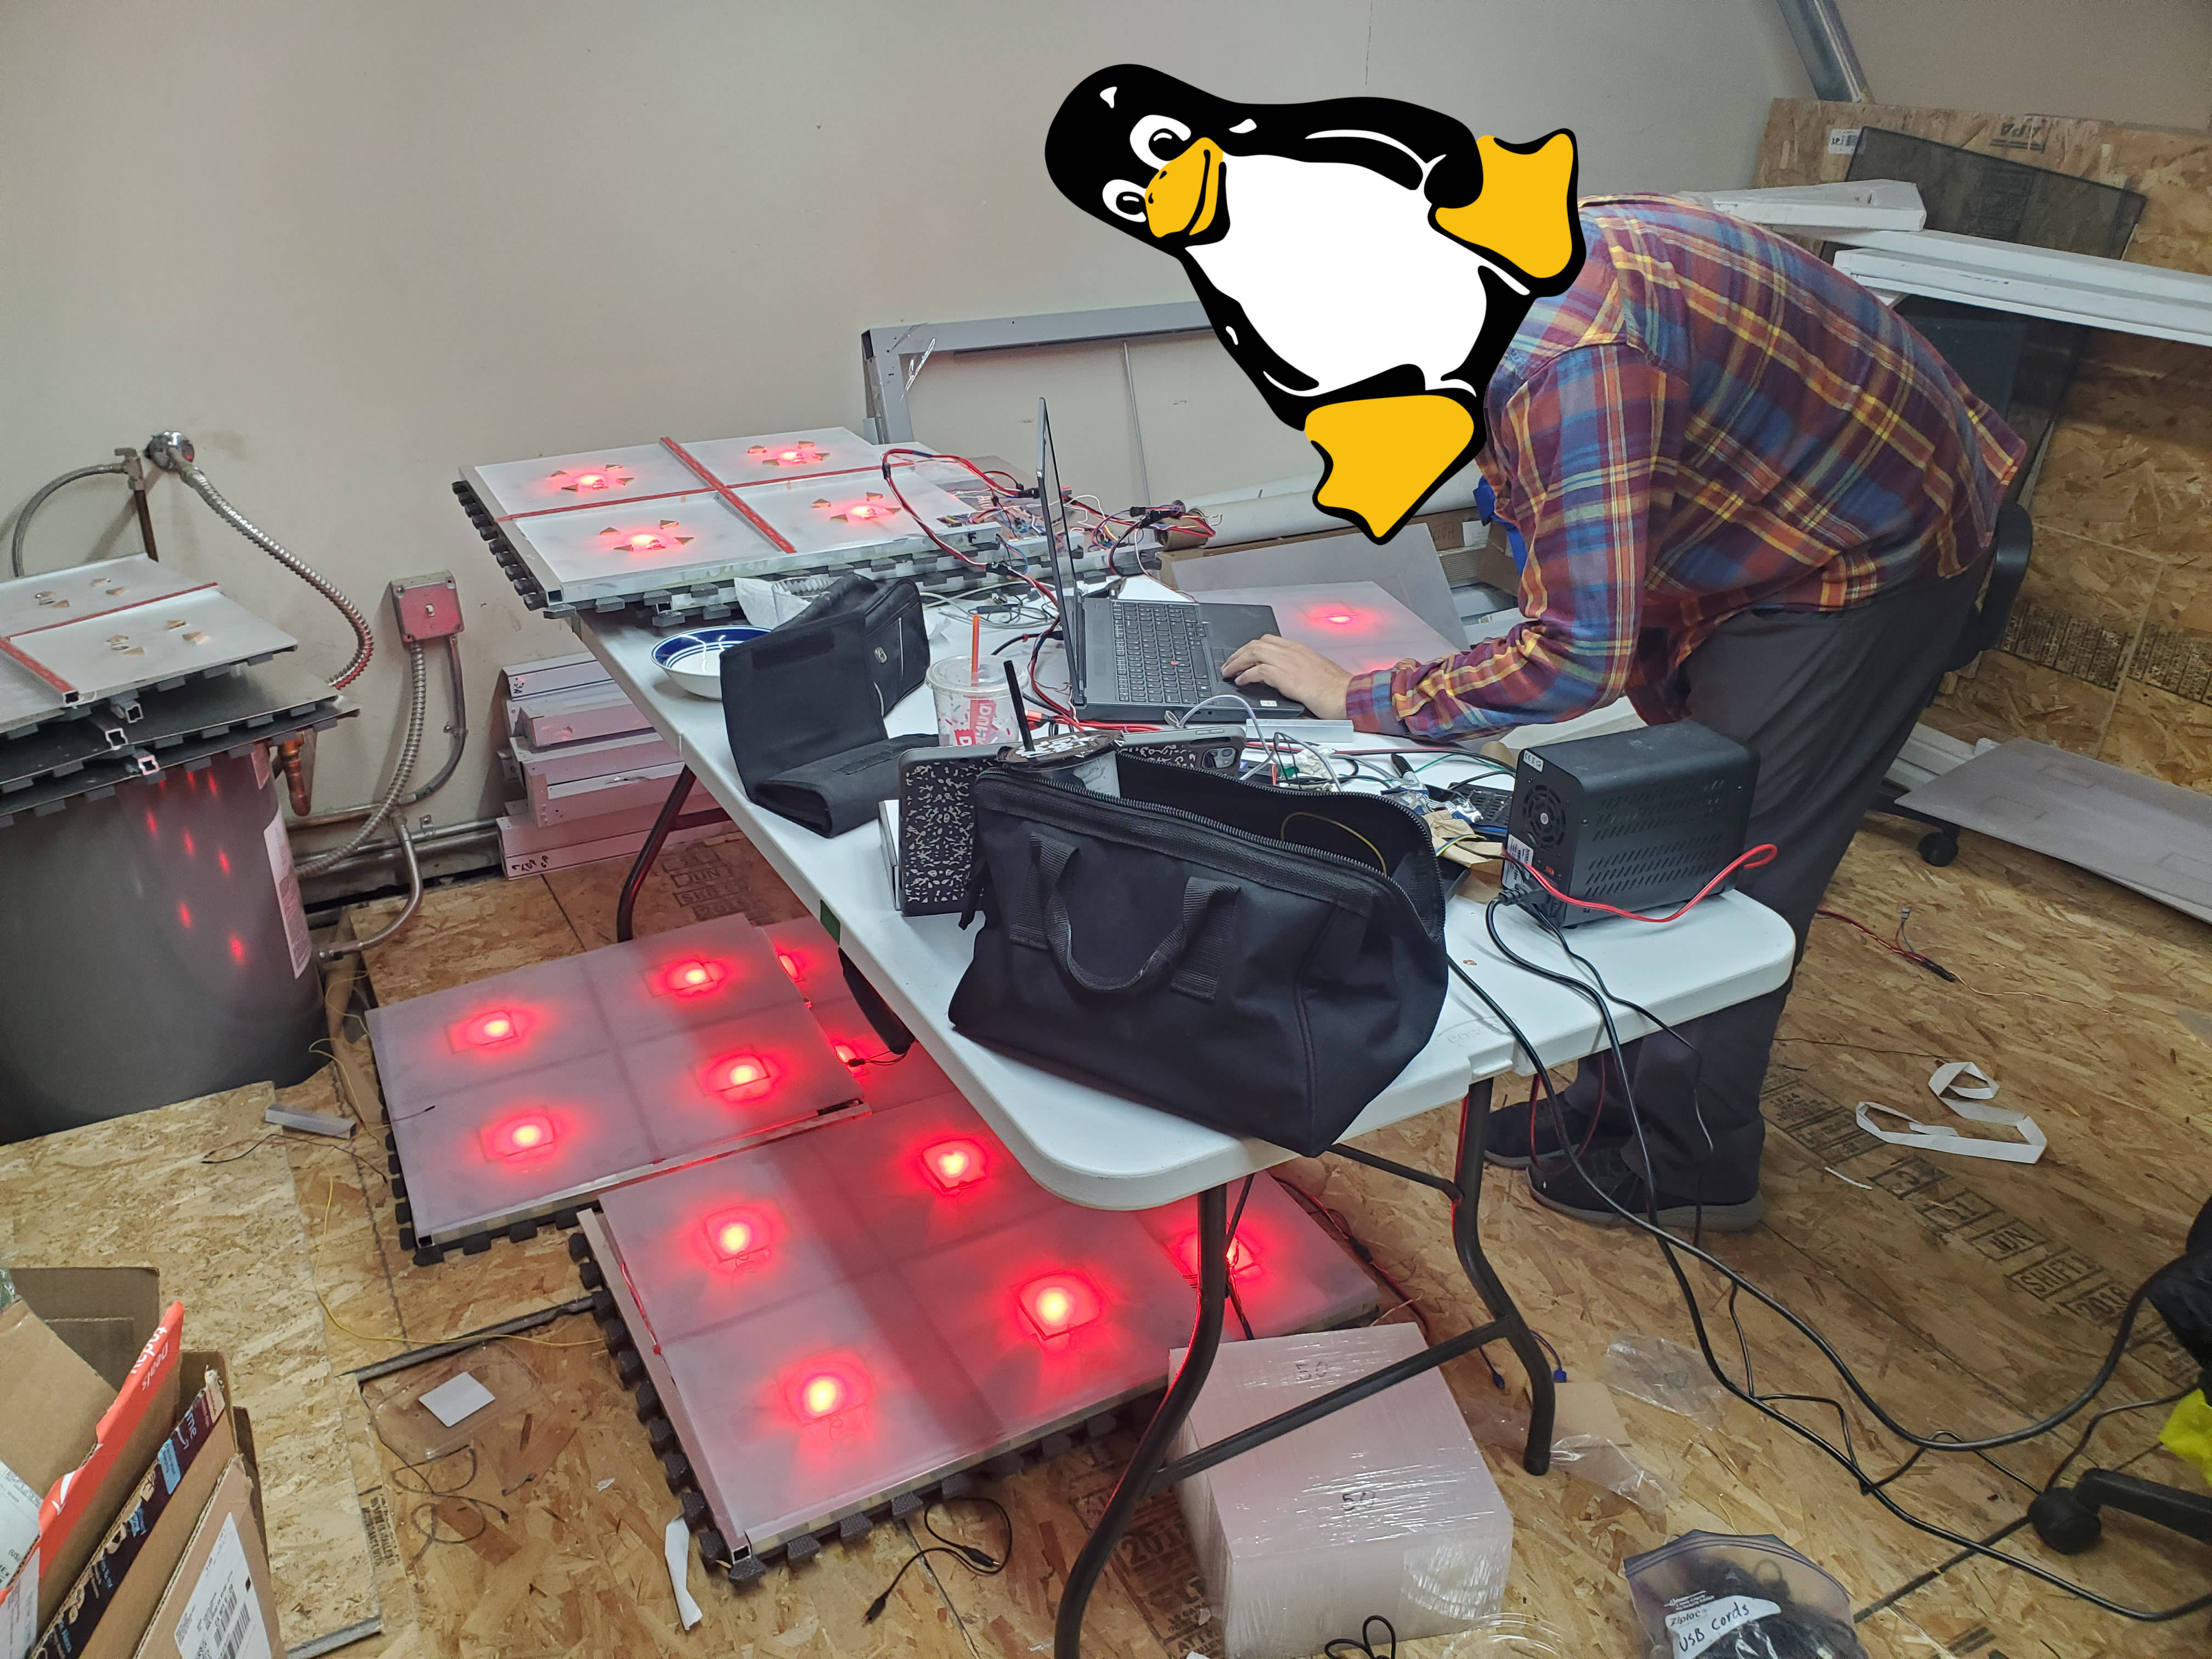
Prototype working. Parts ordered. Now begins Act II: Fabrication.
Fabrication
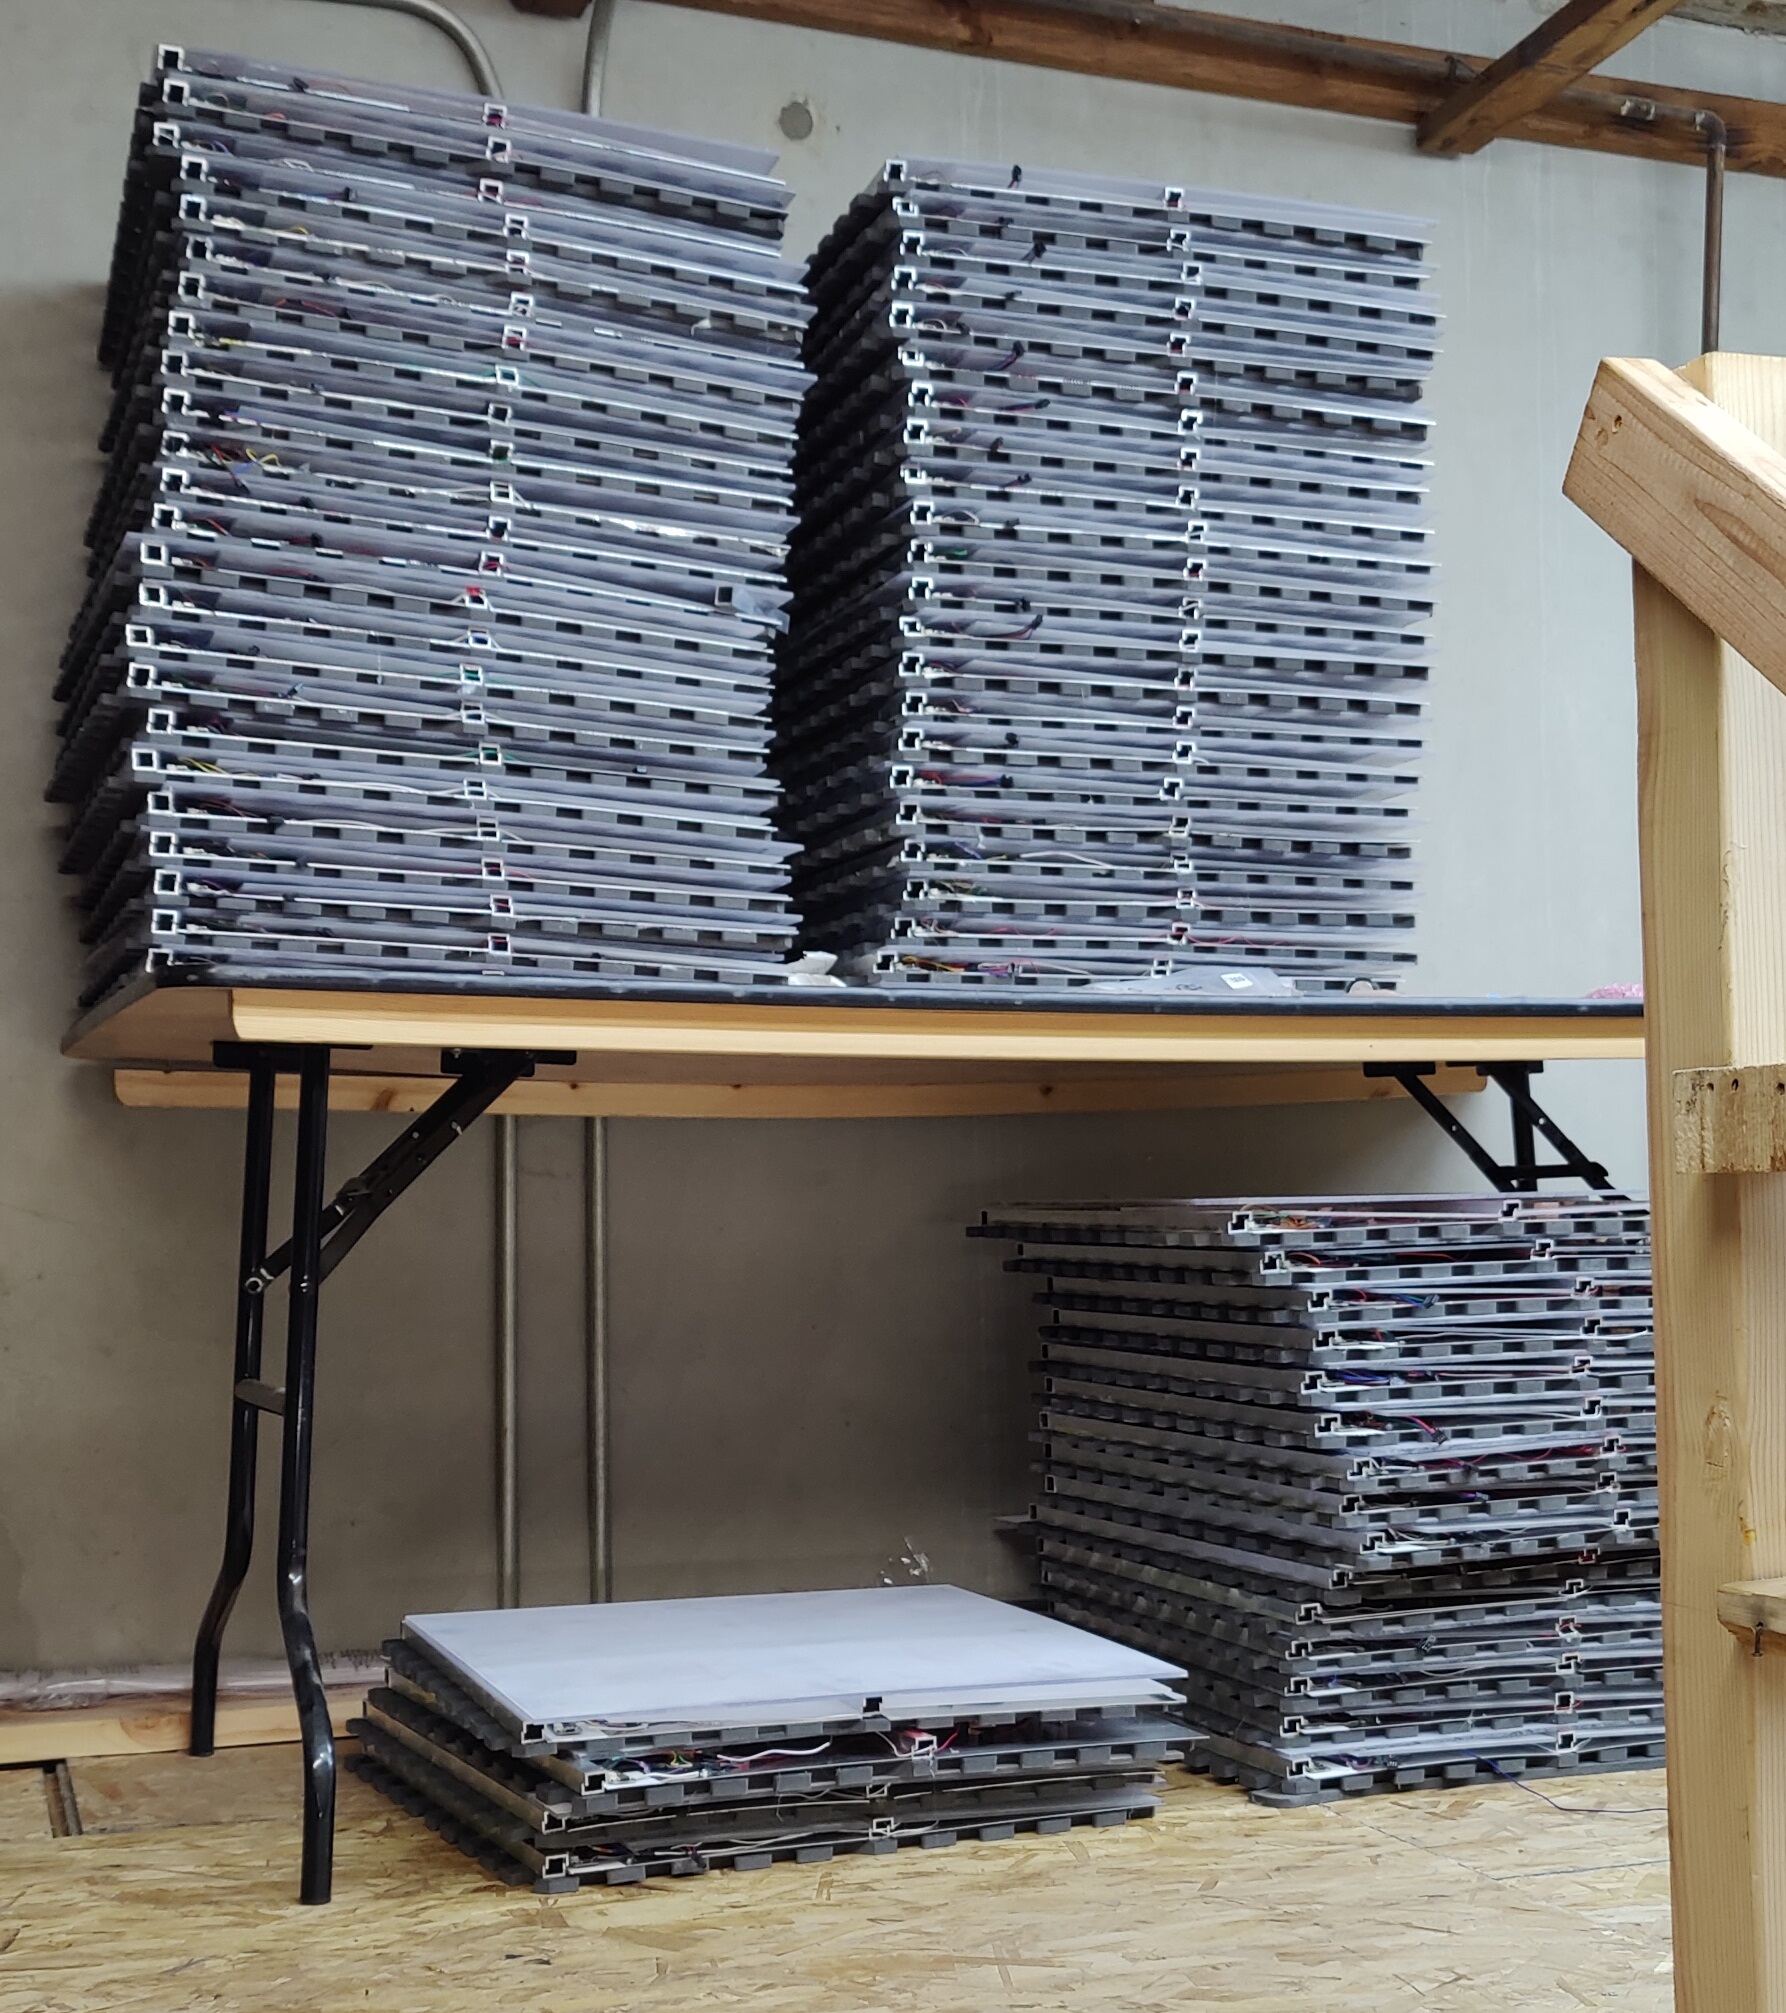
It is one skill to learn how to make something. It is another, different skill to make two of them, another to make ten, and another one for a hundred. I need to pick up these skills, and fast. We have four weeks till setup day.
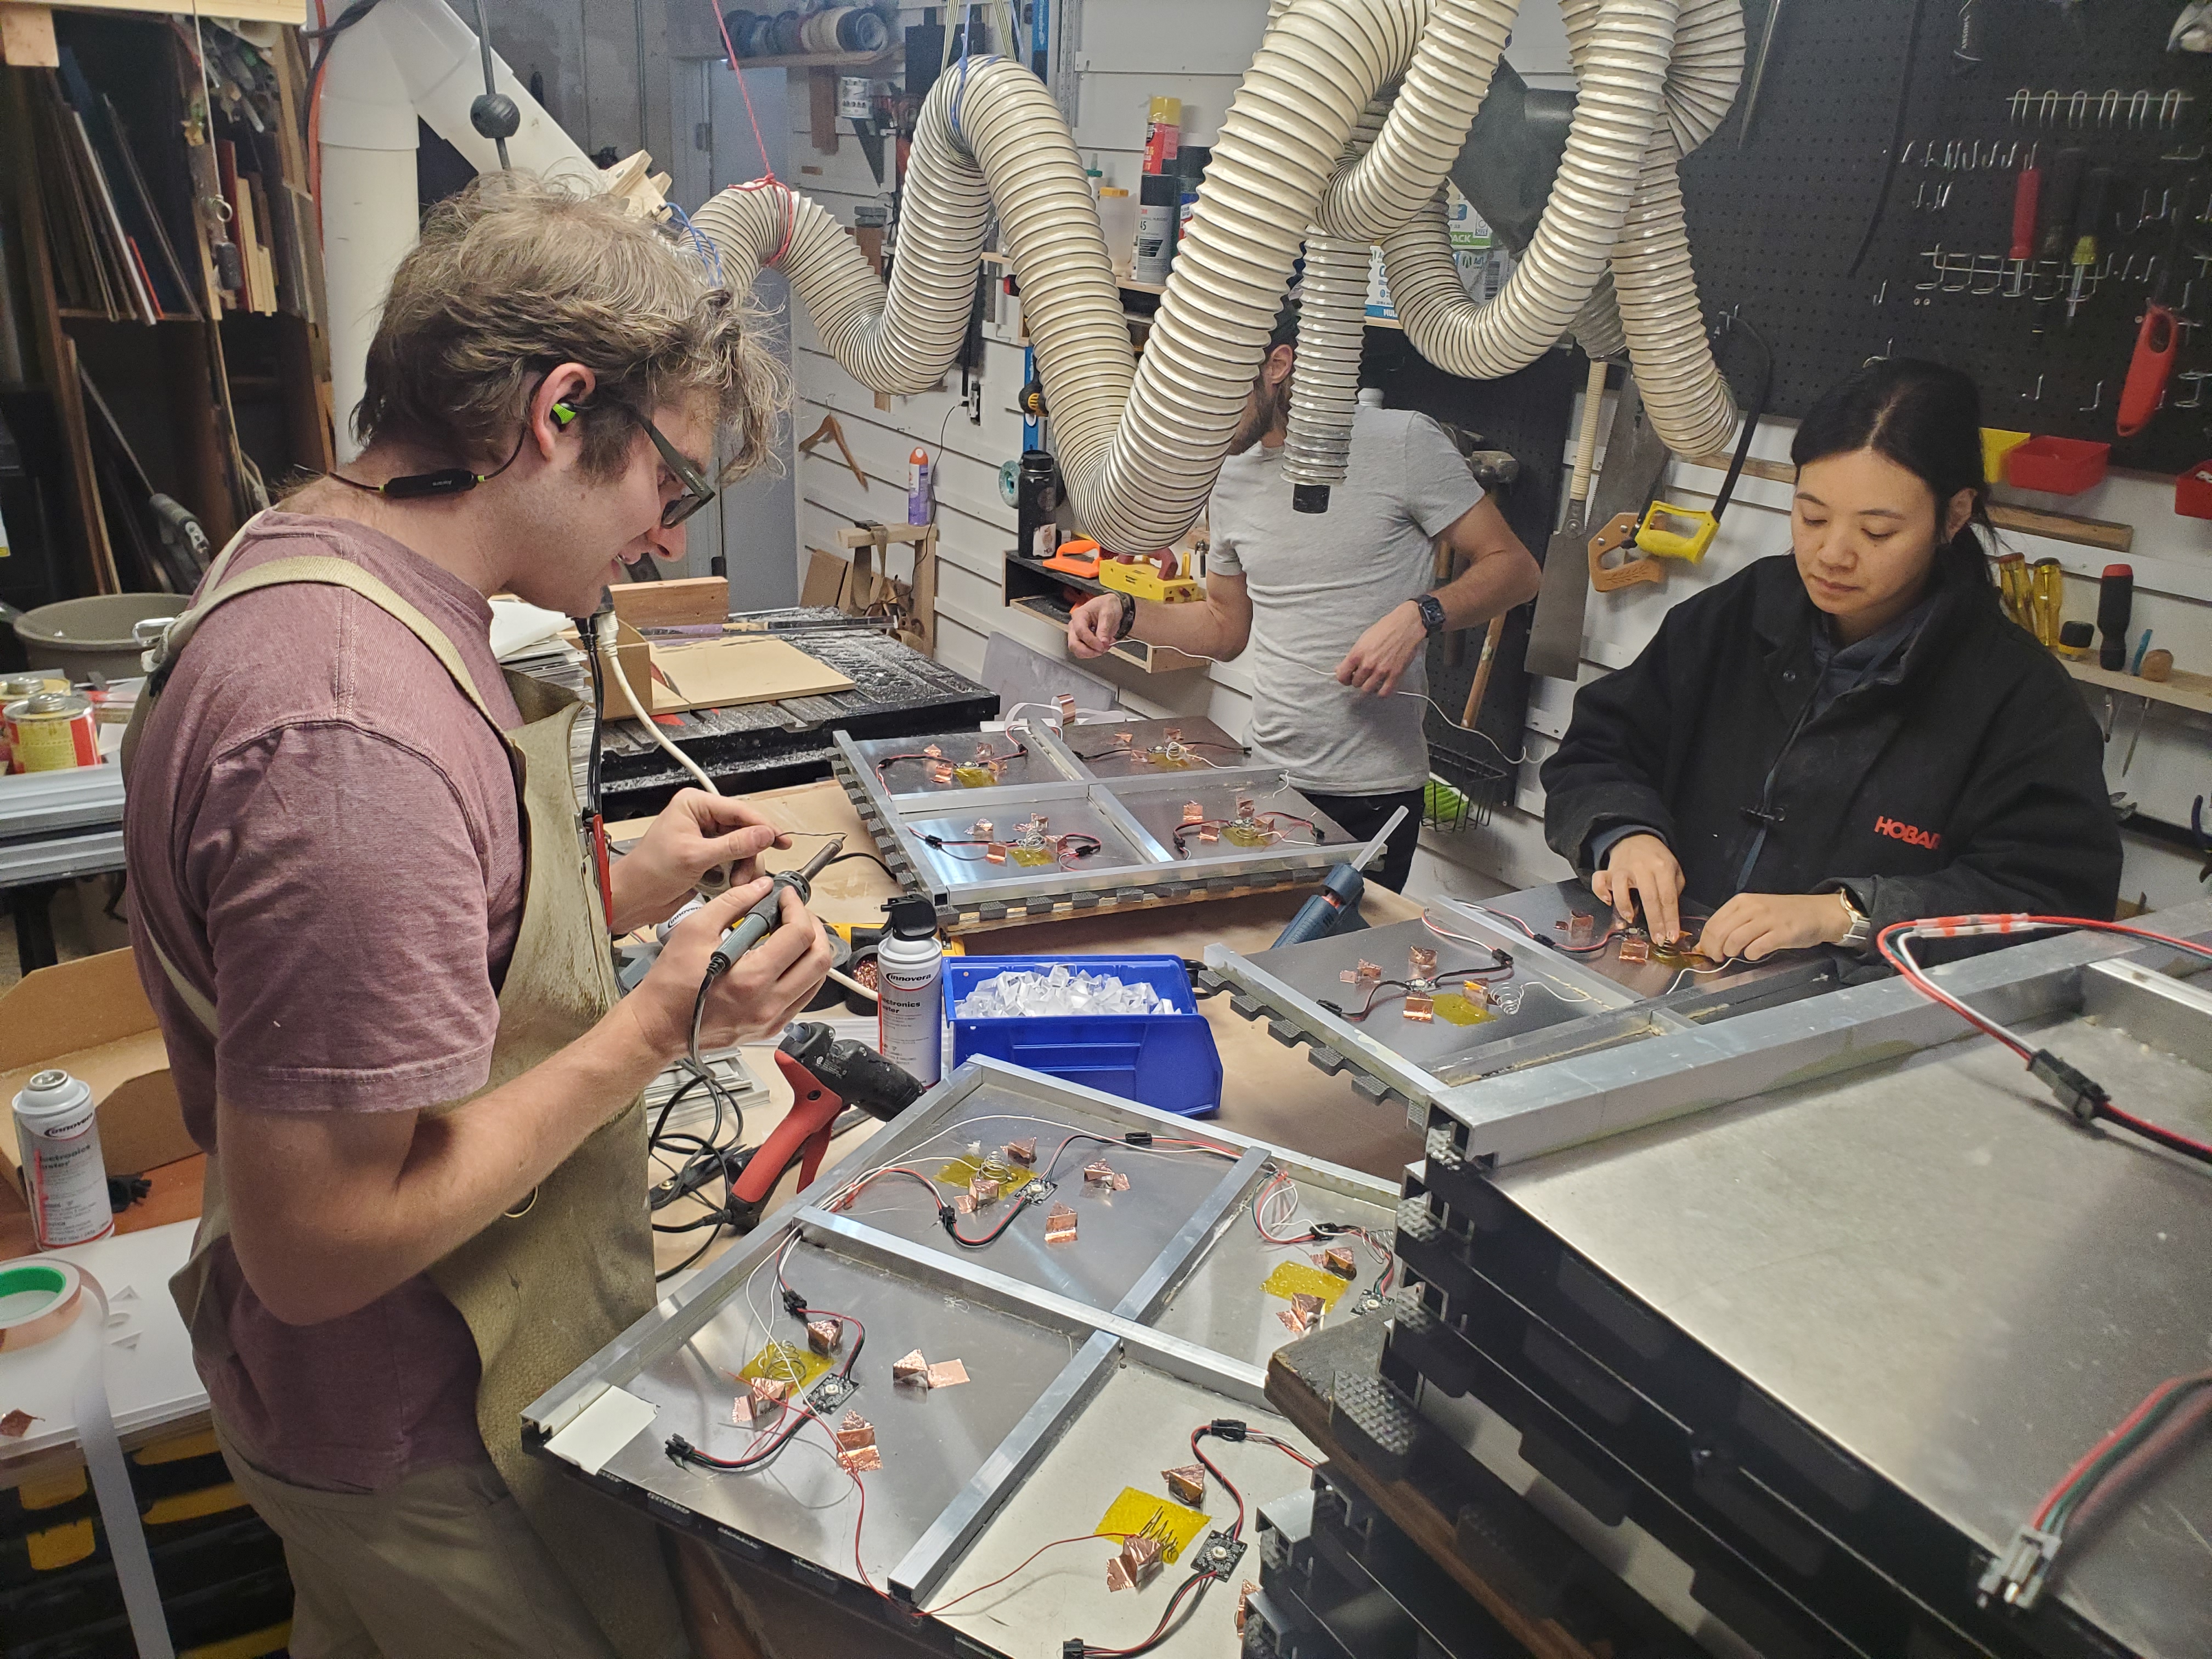
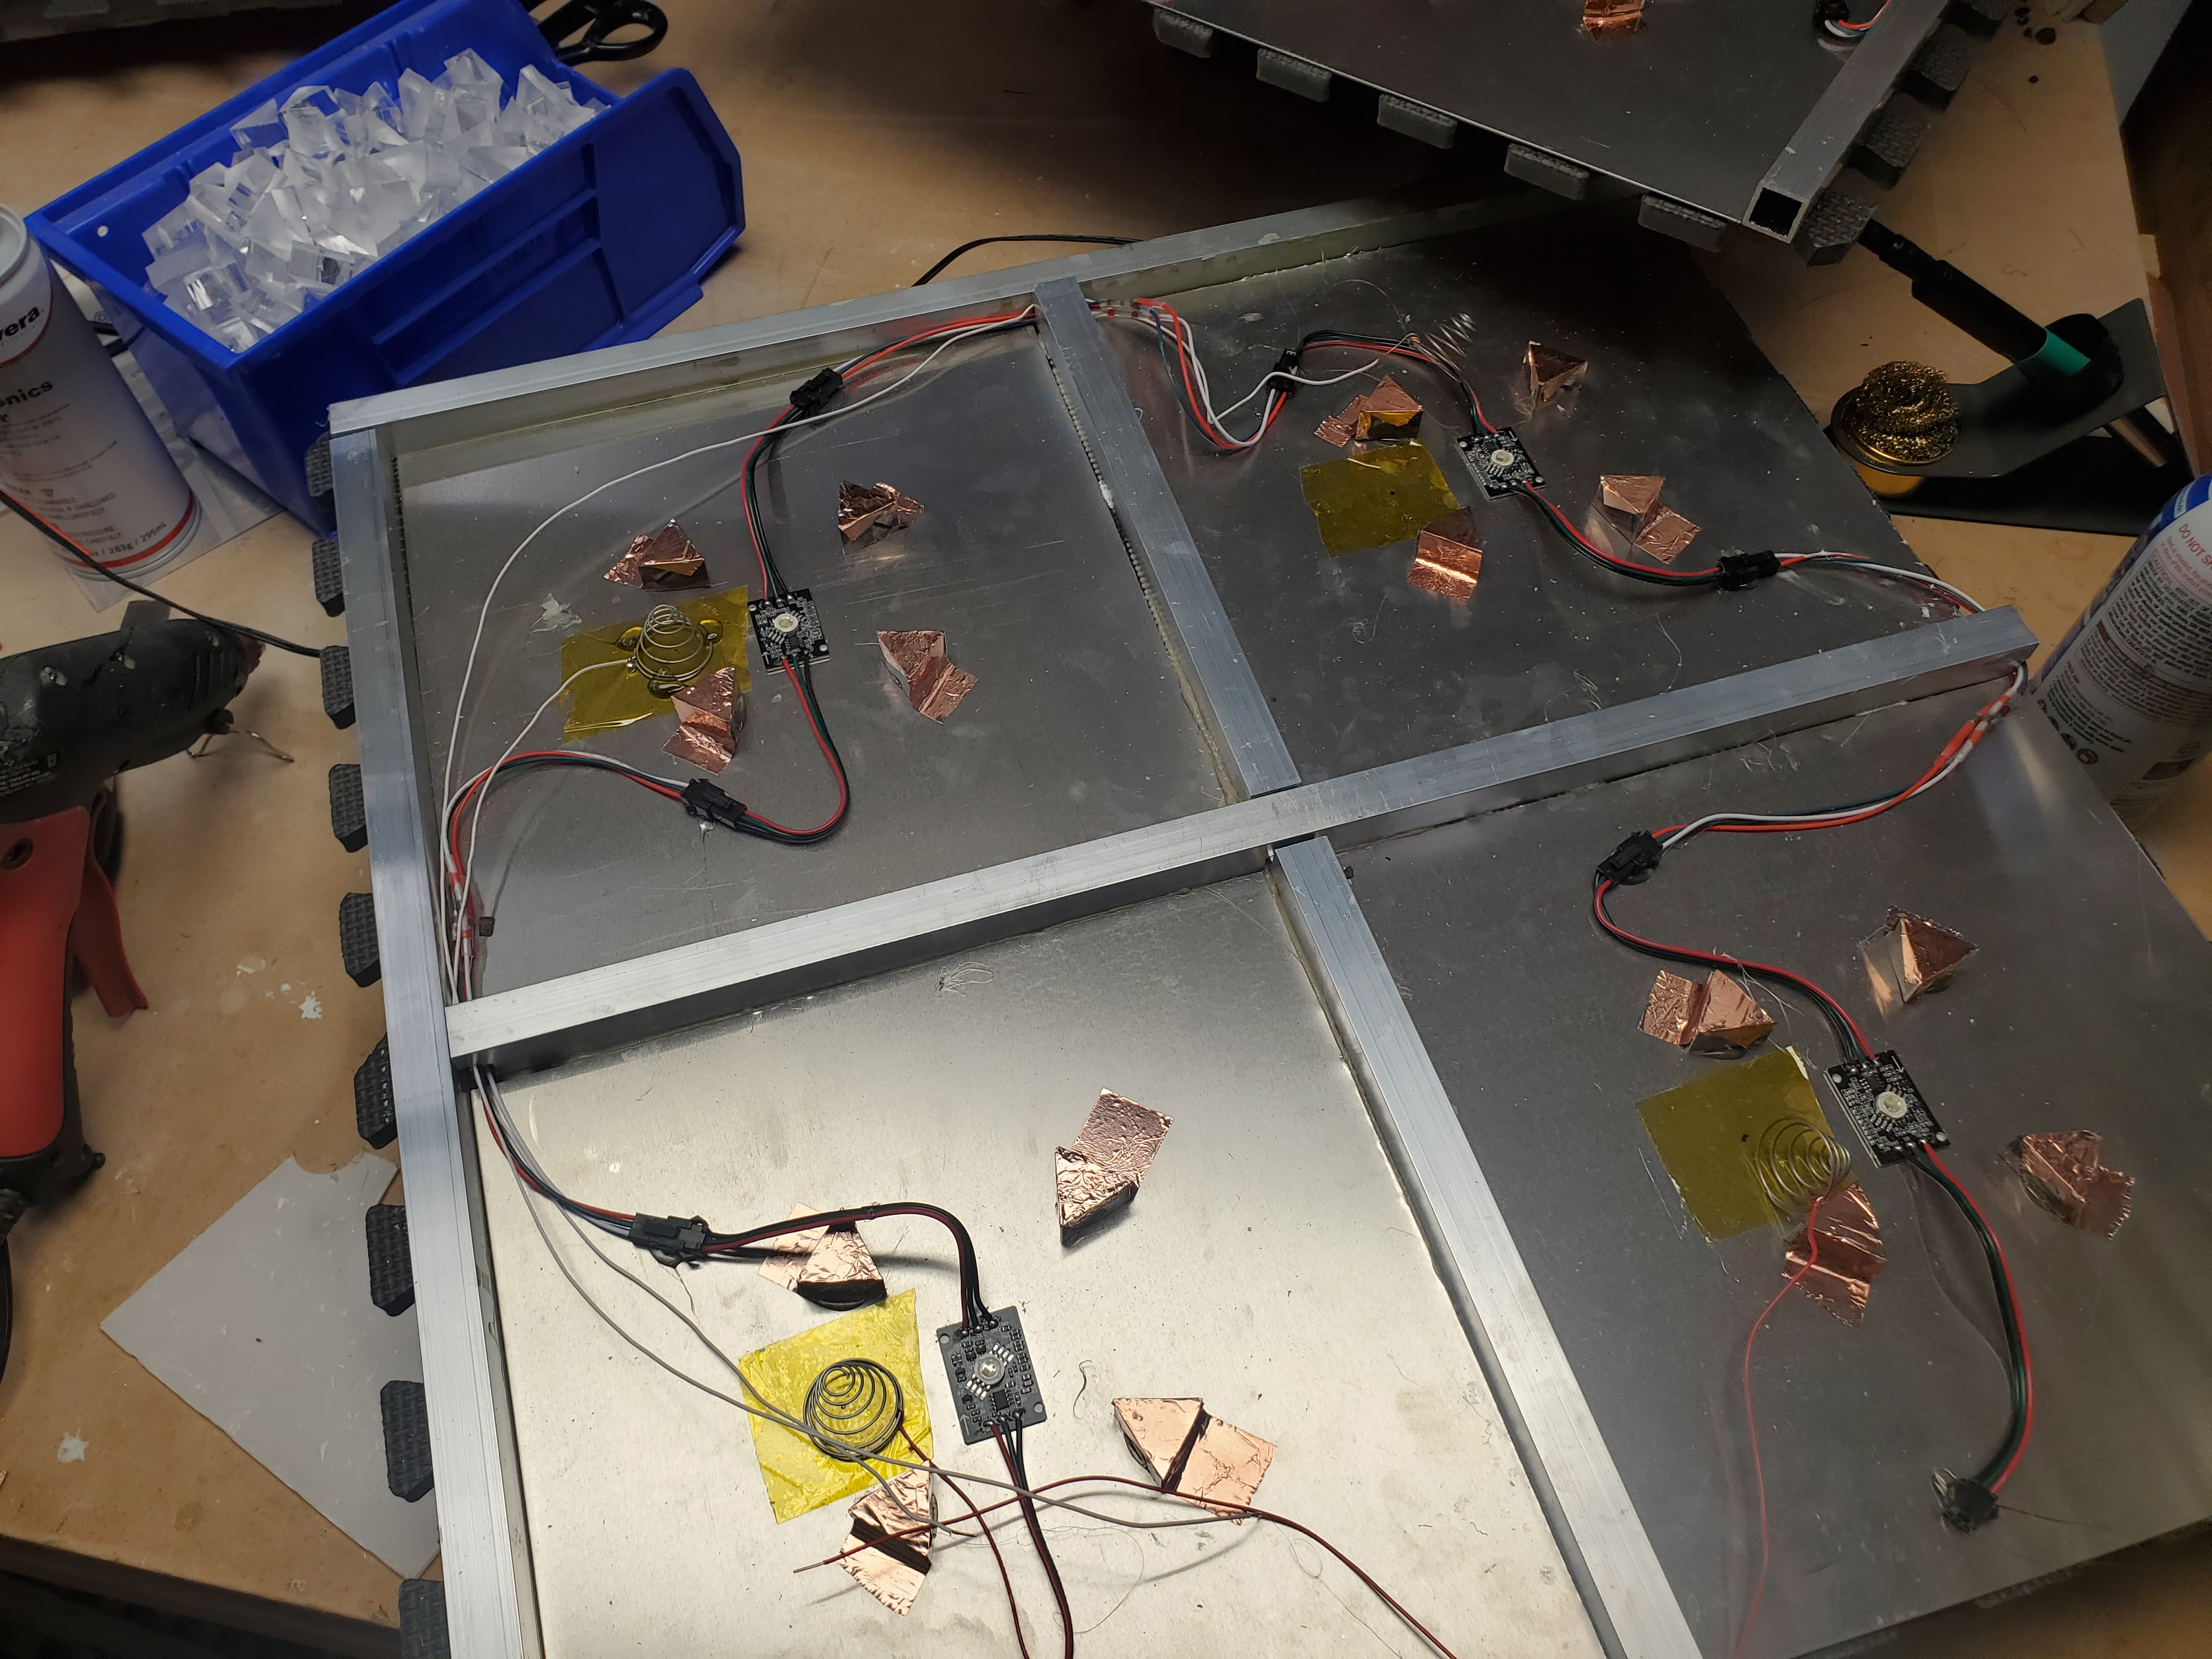
It takes a week to figure it out, but we get a rhythm going. First we prepare the raw materials for 20 tiles. I cut the metal, the polycarbonate lid is sanded, the four copper tape squares are added, one line at a time, to each tile lid.
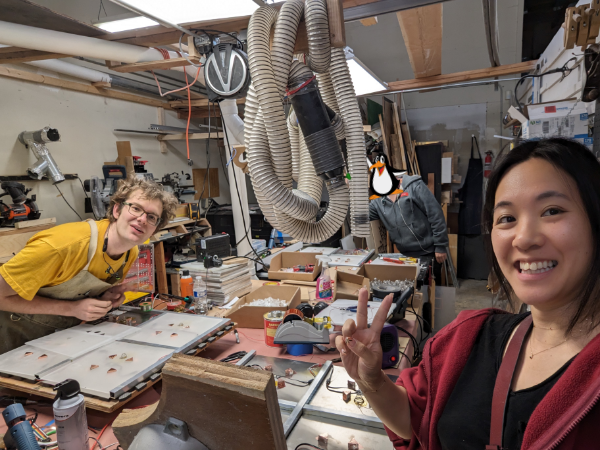
The name of the game is atomizing and modularizing tasks. I'm lucky enough to have a circle of family and friends willing to help out, but that means you need to know how to break down tasks into little pieces that are easily explained and mastered by newbies. We get people who get good at applying glue. People who get good at soldering specific wires together. People who get good at copper tape application. When our best sanding person is out for a few days, somebody else has to build up the knowledge of how to do that. Same goes for soldering together power cables, making floor sensors, and so on. Teaching takes additional time, and that time is precious. The critical thing is that if anyone is idling, something is wrong with the process.
Two weeks before the event
The workshop is running like a professional bakery. I've got a simple game that I've designed that works super well, and is fault-tolerant.
Soon the laser cutter is operating around the clock, spitting out 8 tiles of frosted acrylic diffusers every eight minutes, which are then sanded and prepped as the next set gets loaded in.
Friends are getting good at their assigned tasks, and we've got showtunes blasting on the speakers. But we're behind. Edits required by the venue and the tight timetable is getting to us. Even better, the premium glue we're holding everything together with is coming apart:
Barge Contact Cement sorta works well enough, but it means re-making more than three dozen tiles. An issue with grounding the aluminum plates leads to papering over the issue with copper tape. It's a failure point that I know is going to bite us later, but it should hold up for just long enough.
The Decision.
It's 3AM 13 days before installation day. I have no idea how much time I've put into this project, but I do know by now that I've underquoted the price, even not counting my own labor.
No days off for almost 2 months, Penguin is living on my couch, My workday has gone from 10 hours a day to 15, and we're at 80 tiles made, 64 to go if we want a 24x24ft floor like the client was hoping. We're able to make around 20 tiles every four days.
I have a choice: Keep going at this pace and maybe get to 144, or stop at 100 and have time to actually test anything, make sure everything works, and not let my team (and me) collapse from exhaustion.
It's late. November in San Diego is what we call "fall weather" here. My shop, like most, is unheated. That's rarely a problem. But tonight I think the chill is coming from in my head.
Running over the math, I make an executive decision. The client can have a big broken floor, or a smaller floor that works. They're not going to like it, but at the end of the day the game will still be fun.
And that's my job, dammit.
Seven days before the event.
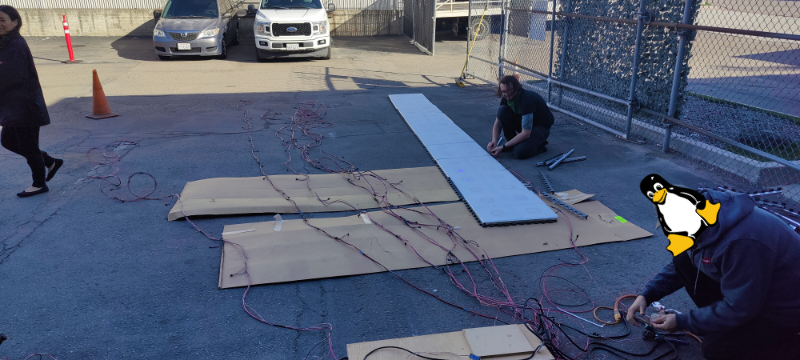
We've got to do some kind of testing. But this floor is HUGE. We're looking at a 20ft by 20ft square that also needs some serious power requirements by our calculations.
Our workshop has a large parking lot outside, so maybe at the right time of day after our neighbors have gone home, maybe we can use that?
Try de-sanding a desert next.
After putting out 12 tiles that are swiftly damaged by grit and dirt blowing into the electronics and torn up by the uneven asphalt, this idea is quickly abandoned. Got it! This is strictly an indoor, level-floor-only kinda game.
At least we can test some rows:
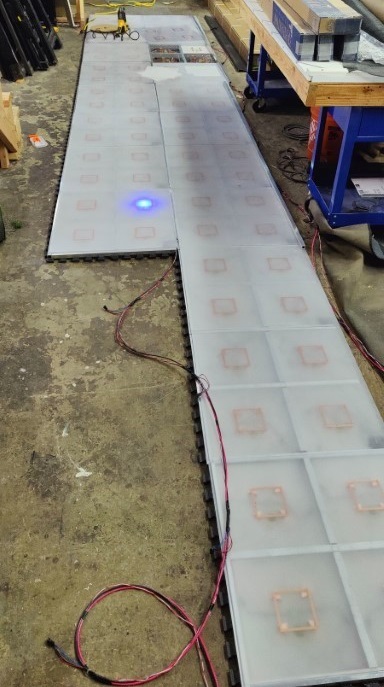
One game of "workshop Tetris" later, we get enough space to test half of the board at once. We lay out a few rows and realize something rather nasty:
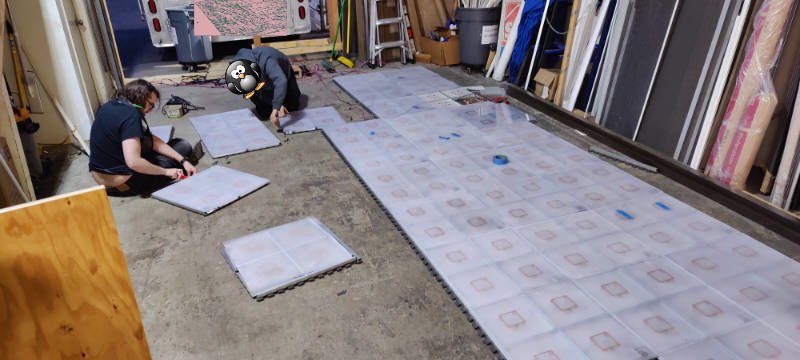
The power cables don't fit in-between the tiles. They're pushing the tiles apart.
CRAAAAAAAAAAP: the tolerances on the cables are too tight and I had conveniently forgotten that the acrylic diffusers I made, well, exist? They're taking up the space I had planned on the cables running through.
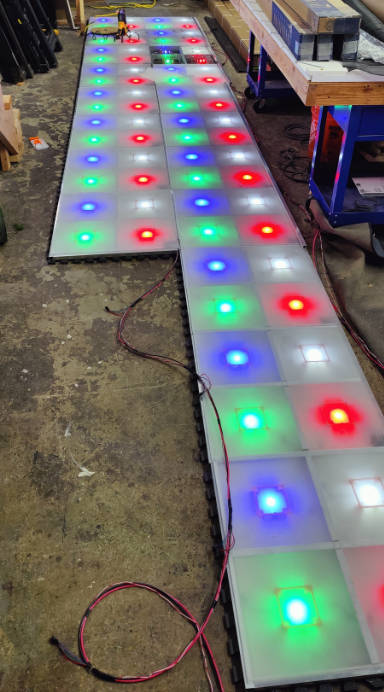
Okay, okay, don't panic. We can fix this. We can fix this! We can just cut a channel in the foam and loop the wire plugs over. Ah. Now the tiles don't mesh together anymore. Quick! Cut off all the teeth off the tiles. So long as we leave the edge tiles linked together, the floor should be stable enough to hold together.
Okay. It works. At half-scale, it works. And time is up. It's time to pack this thing up into some carts I made and bundle it into the rental truck for the event. We're going to have to test the full-scale for this thing at the event. Lord save us.
Installation Day
We had a very narrow installation window. We had a 9PM roll-in time and had to be ready for inspection by the client at 6AM.
I am not what I would describe as a nervous person. I have stayed up for over 100 hours in a row on a build before. I run 300 player MegaGames. But writing this even five months after the fact, I still have vertigo recalling the headspace I was in. Four months of anticipation, legal problems, payment issues, insurance, borrowing, design, manufacturing, all funneled down to a concentrated moment at 2AM in the convention hall that night.
I did not have a panic attack. But boy did I come close. I nearly threw up, despite having not eaten much of anything for days. The tiles are glitching out because of my design. We're fixing software glitches that are showing up out of nowhere. We forgot to bring enough black gaffer's tape. The venue is being run by people who are not sympathetic to our install, and who confiscate our spare tiles. Power usage is an order of magnitude lower than expected though, which is nice. At least we have that going for us.
This was the most stressful night of my life.
The sun isn't up yet, but our time is.
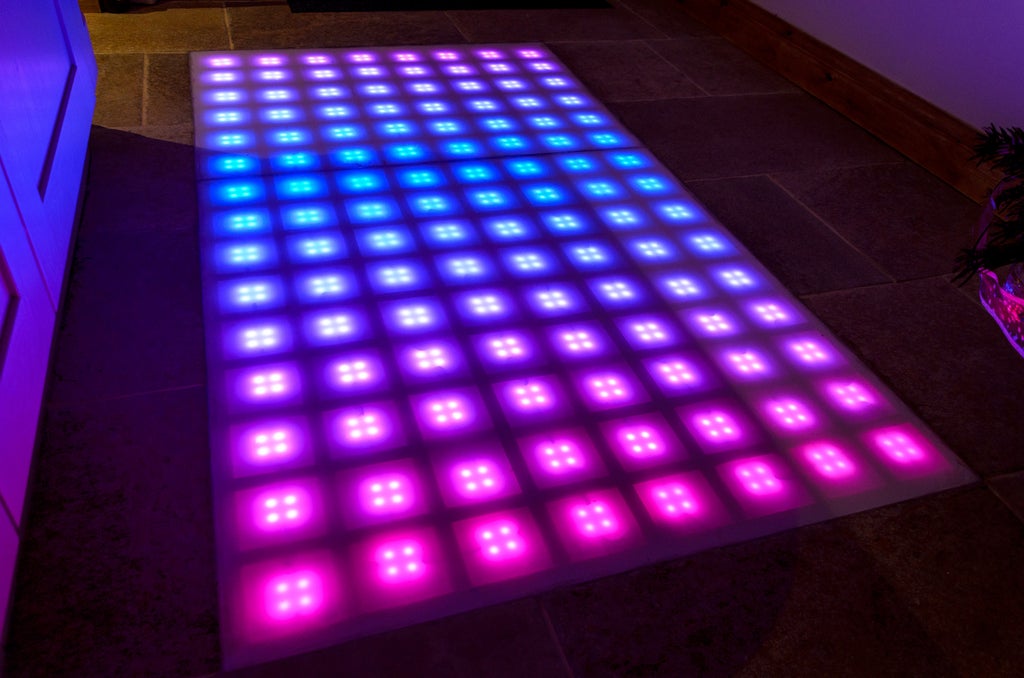
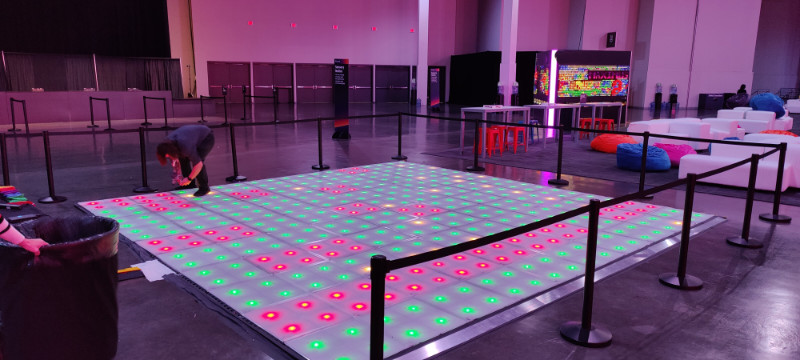
The Final Product
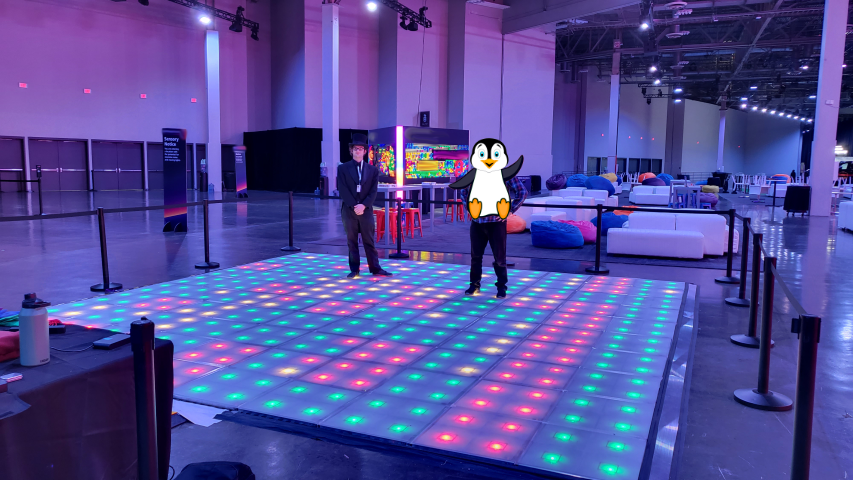
We run out of time at the install. The client (understandably) does not appreciate the smaller size and the glitches. We get harsh words, but are left alone to run the game.
We manage to get 2 hours of sleep before showtime. Showtime will be 9 hours a day for a week. We won't see the client for the rest of the convention, and they won't see us doing our repairs. As far as they are aware, we delivered a broken floor.
But.
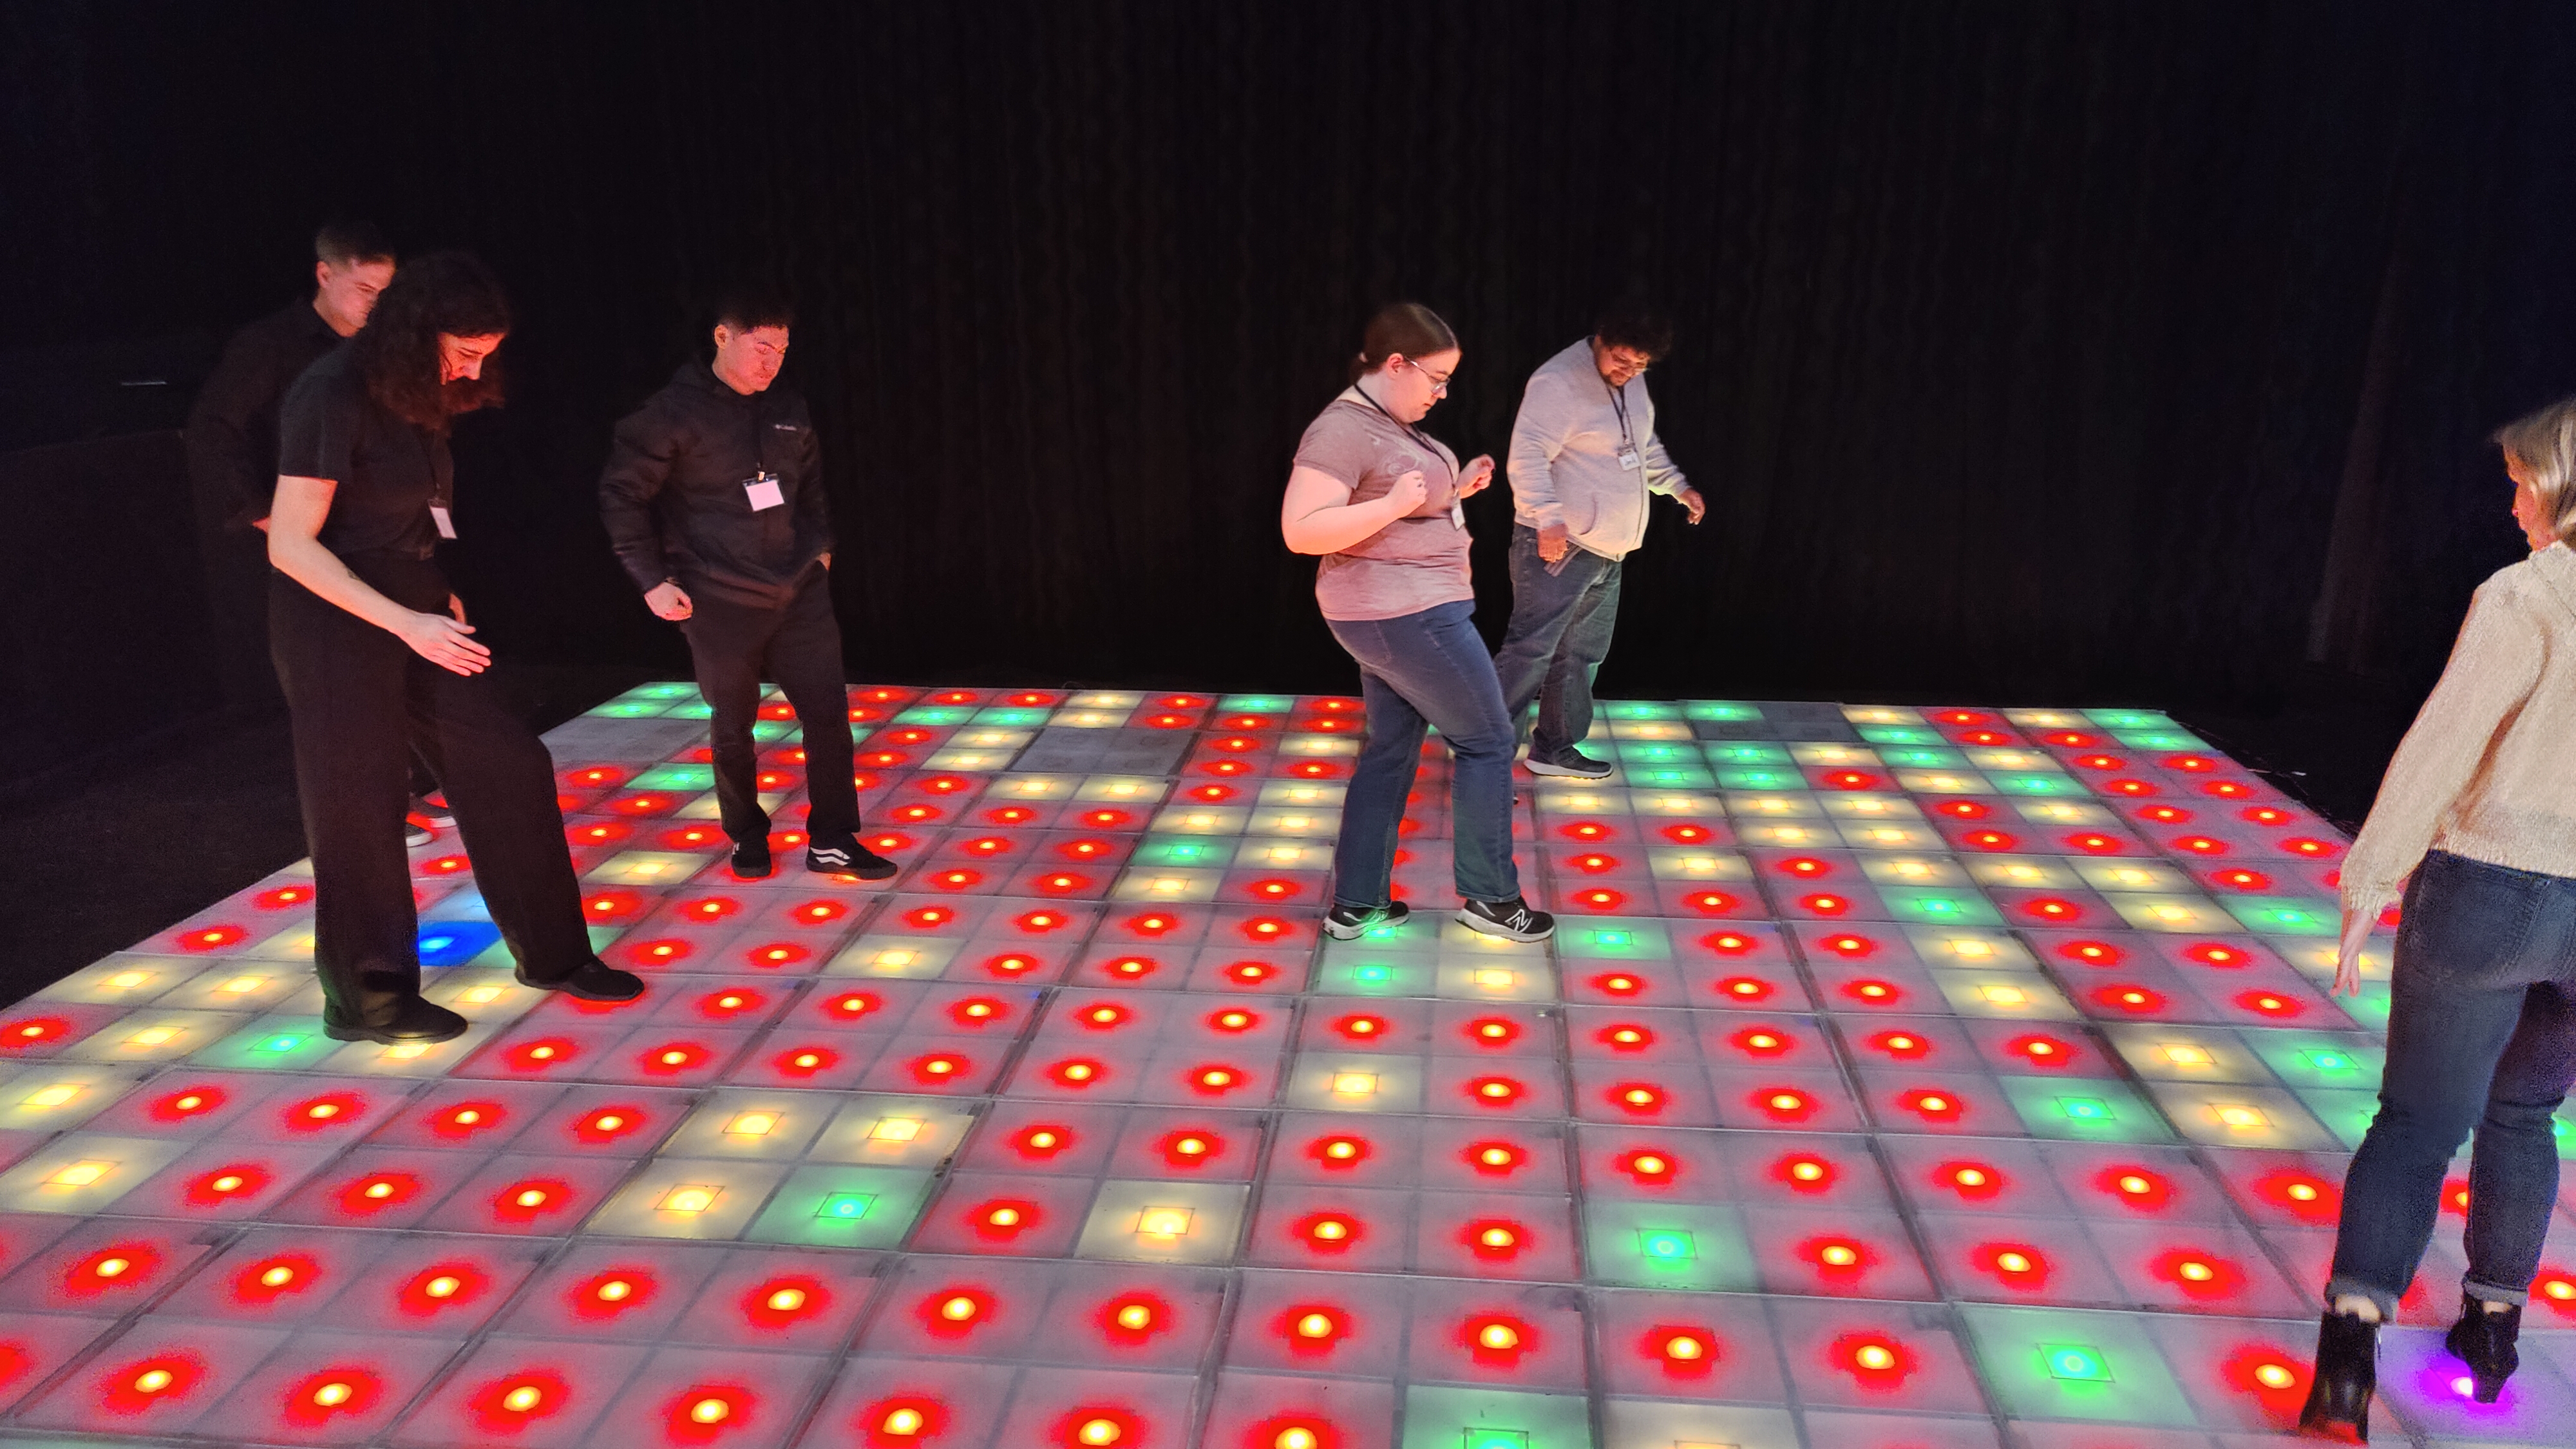
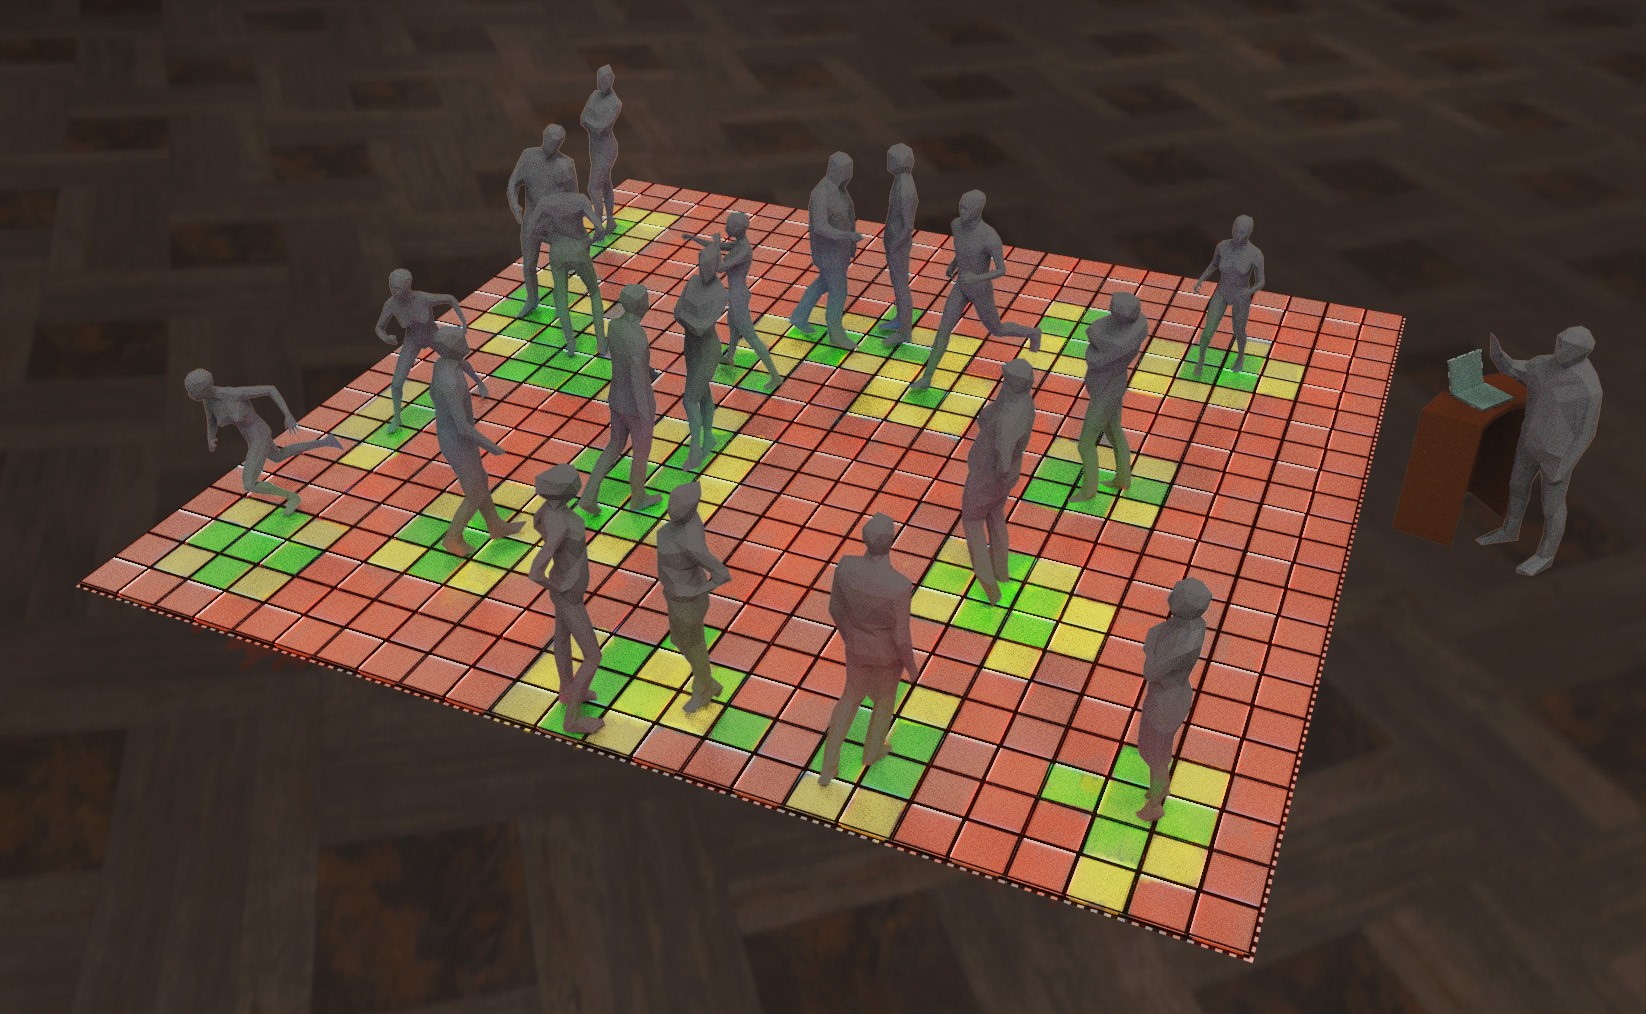
The game is fun. It's basically Spleef from Minecraft mixed with multi-player Snake. Step on a green tile, it turns yellow. Step on a yellow tile it turns red. Step on a red tile and you're out of the game. You are only allowed to move to adjacent tiles, and if you stay still too long the tile "sinks" anyways. The game was designed in 30 minutes and edited on the fly with code being pushed live while we were at the event.
We had a colorblind player lament that they couldn't play and we were able to pull them aside and modify the game code live to run with colors they chose! That was pretty sweet.
The floor looked pretty cool, and the real clients, (the ones that matter to me anyways), the players, had a great time. Admittedly though, given the nature of the event we had more players interested in learning how we built it instead of playing it.
So was it worth it?
If I get the option to do another project like this one, I definitely will. But now we have a clearer idea of what can be achieved in two months when it comes to large electrical projects, and the sorts of expenses you can rack up when you have a super duper short timeframe. It's also true that I dragged a lot of my favorite people into this to make it happen. I am down to do this again, but I'd like my collaborators to come willingly next time, not to save their friend from a mess they wound up in.
But was it worth it?
After being installed at two local boardgame conventions in which dozens and dozens of players joyfully used it, the copper tape contacts are toast. It takes 12 hours to set up on-location, and the glue is coming apart. The sensors have a failure rate of 1 in 10, and the API is non-functional.
The floor needs to be rebuilt. And it's not worth it to do so short of being given our original budget again. So! I've got parts in need of a project now, and I now have the skills (and a large pile of parts) to make the craziest Immersions I can think of.
Answer the question, Stevenson: Was. It. Worth. it?
Frankly, that will depend on this blog post, which serves as the most complete record of this project. If you enjoyed reading it, got inspired, or learned something, then I'd count that a win.
In the meantime, I have a thousand parts, an idle workshop, a continued desire for world domination, and an equal desire make rent.
If, after all of this, I sound like somebody you would like to work with, do drop me a line! I am always willing to make time for curious people. [email protected]
Acknowledgements
If it wasn't obvious by now, this project would not have been possible without the help of my team, my dear friends and family.
- Penguin, Software Wizard and Deacon of Deployment Under Duress
- Nina, Tireless Shop-hand and Boba Tea Consultant
- Marshall, Mr. SandingMan and Bringer of Tile Pizza
- Dwight, Master of All Stations
- Kirsten, Copper Tape Gremlin and Concept Artist
- Irene & Gideon, for helping install, run, and tear down this monster.
- Luke, Foam Slinger & Tooth Cutter
- Aaron, Shop Assistant
- Ella, for use of her Aaron-rental services (and also helping)
- Alan Murphy at Murphy's Surplus for answering dumb questions for hours.
- Bill, for having some excellent advice
- My mother and father, who supported me in countless ways, from food to soldering to metal construction.